
Converting existing project to hog - step to step guide#
Warning
Outdated Documentation! This documentation version is out of date. Please check the latest version 2026.1.
This section contains a step-to-step guide to convert an existing Vivado project to Hog. For this tutorial we are going to use the PiLUP_devel project
Note
To have a look at how the final repository will look like, once Hog and the CI are configured, go to PiLUP_paris.
Requirements#
This is a list of the requirements:
Have git (version 2.9.3 or greater)
Vivado 2020.2
(Optional) Doxygen version 1.9.1 or higher and graphviz
Step 0: Fork the tutorial repository#
First of all, we need to fork the tutorial repository. Go to https://gitlab.cern.ch/hog/tutorial/PiLUP_devel and click on Fork.
Select then your private namespace to fork the project. This will create a new repository at the address https://gitlab.cern.ch/<user>/PiLUP_devel, which you can use for this tutorial.
Step 1: clone the repository and create the project#
Let’s clone the forked project and move to a new branch:
  git clone --recursive https://gitlab.cern.ch/$USER/PiLUP_devel.git
  cd PiLUP_devel
  git checkout -b Converting_to_hog
What’s inside the repository? For the sake of the tutorial let’s notice that there are three Vivado projects for a Kintex-7 FPGA:
template
Protocol_Converter
Data_Generator
We have also another project called simple, targeting the Basys-3 Digilent board. We will use this project in the CI tutorial.
We will focus only on the template project during the tutorial. Let’s follow the project README to create it.
Create the project#
By following the instructions of the README, we can create the template project by running:
 cd Firmware/Kintex
 vivado -mode batch -notrace -source generate_project.tcl
and selecting template.

The project PiLUP_Kintex_template/PiLUP_Kintex_template.xpr has been created, and we can now open it with Vivado 2020.2.
Understand the project#
It’s useless to get into the project details for the tutorial’s sake. However, it will be useful to have a very basic understanding of what’s inside.
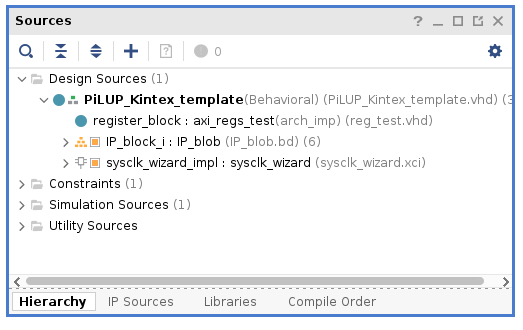
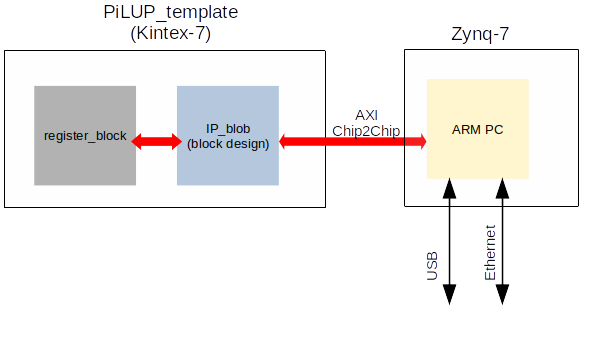
The project is a wrapper around a block design (called IP_blob) and a register block, handling firmware registers. Firmware registers read/write operations are performed by an ARM PC situated in a second Zynq-7 FPGA. The simplified block diagram is shown here:
Again, understanding the project interconnections and single blocks is useless, and the only things worth remembering are:
there are four VHDL files (PiLUP_Kintex_template.vhd, reg_test.vhd, datetimehash_pkg.vhd and register_pkg.vhd)
there is an IP core (sysclk_wizard.xci)
there is a Block Design (IP_blob.bd)
there is a constraint file (PiLUP.xdc)
It’s possible to read/write firmware registers
There are no testbenches
We can now close the Vivado project.
generate_project.tcl#
Before converting the project to a hog, let’s give a quick look into the tcl script generate_project.tcl, that can be found here.
The script is divided in two sections:
lines 1-20 create the project and add files
lines 21-120 create the block design and connect it to the project (IP_blob.bd is automatically generated, so it’s not into the repository)
##################################################################################
############################# Create block design ################################
##################################################################################
create_bd_design -dir "${root_dir}/bd/${appl_name}" IP_blob

#################################  IP cells  ##################################

# !!match AXI_WUSER and ID_WIDTH with master!!
create_bd_cell -type ip -vlnv xilinx.com:ip:axi_chip2chip axi_chip2chip_0
set_property -dict [list CONFIG.C_M_AXI_WUSER_WIDTH {0} CONFIG.C_M_AXI_ID_WIDTH {0} CONFIG.C_MASTER_FPGA {0}\
    CONFIG.C_USE_DIFF_IO {true} CONFIG.C_USE_DIFF_CLK {true}] [get_bd_cells axi_chip2chip_0]

create_bd_cell -type ip -vlnv xilinx.com:ip:xlconcat xlconcat_0
set_property -dict [list CONFIG.NUM_PORTS {4}] [get_bd_cells xlconcat_0]

create_bd_cell -type ip -vlnv xilinx.com:ip:axi_iic axi_iic_0
set_property -dict [list CONFIG.IIC_BOARD_INTERFACE {iic_main}] [get_bd_cells axi_iic_0]

create_bd_cell -type ip -vlnv xilinx.com:ip:proc_sys_reset proc_sys_reset_0

# !!match DCLK with axi CLK !!
create_bd_cell -type ip -vlnv xilinx.com:ip:xadc_wiz xadc_wiz_0
set_property -dict [list CONFIG.DCLK_FREQUENCY {200} CONFIG.OT_ALARM {false} CONFIG.USER_TEMP_ALARM {false} CONFIG.VCCINT_ALARM {false} \
    CONFIG.VCCAUX_ALARM {false} CONFIG.ADC_CONVERSION_RATE {1000}] [get_bd_cells xadc_wiz_0]


########################## Block Design ports #################################
# what's a for cycle?

# C2C
create_bd_port -dir I -type clk KZ_BUS_CLK_P
connect_bd_net [get_bd_pins /axi_chip2chip_0/axi_c2c_selio_rx_diff_clk_in_p] [get_bd_ports KZ_BUS_CLK_P]
set_property CONFIG.FREQ_HZ 200000000 [get_bd_ports KZ_BUS_CLK_P]
create_bd_port -dir I -type clk KZ_BUS_CLK_N
connect_bd_net [get_bd_pins /axi_chip2chip_0/axi_c2c_selio_rx_diff_clk_in_n] [get_bd_ports KZ_BUS_CLK_N]
set_property CONFIG.FREQ_HZ 200000000 [get_bd_ports KZ_BUS_CLK_N]
create_bd_port -dir O -type clk KZ_CLK_OUT_P
connect_bd_net [get_bd_pins /axi_chip2chip_0/axi_c2c_selio_tx_diff_clk_out_p] [get_bd_ports KZ_CLK_OUT_P]
create_bd_port -dir O -type clk KZ_CLK_OUT_N
connect_bd_net [get_bd_pins /axi_chip2chip_0/axi_c2c_selio_tx_diff_clk_out_n] [get_bd_ports KZ_CLK_OUT_N]
create_bd_port -dir I -from 8 -to 0 AXI_C2C_IN_P
connect_bd_net [get_bd_pins /axi_chip2chip_0/axi_c2c_selio_rx_diff_data_in_p] [get_bd_ports AXI_C2C_IN_P]
create_bd_port -dir I -from 8 -to 0 AXI_C2C_IN_N
connect_bd_net [get_bd_pins /axi_chip2chip_0/axi_c2c_selio_rx_diff_data_in_n] [get_bd_ports AXI_C2C_IN_N]
create_bd_port -dir O -from 8 -to 0 AXI_C2C_OUT_P
connect_bd_net [get_bd_pins /axi_chip2chip_0/axi_c2c_selio_tx_diff_data_out_p] [get_bd_ports AXI_C2C_OUT_P]
create_bd_port -dir O -from 8 -to 0 AXI_C2C_OUT_N
connect_bd_net [get_bd_pins /axi_chip2chip_0/axi_c2c_selio_tx_diff_data_out_n] [get_bd_ports AXI_C2C_OUT_N]
# IIC
apply_bd_automation -rule xilinx.com:bd_rule:board -config {Board_Interface "iic_main ( IIC ) " }  [get_bd_intf_pins axi_iic_0/IIC]
# AXI clk
create_bd_port -dir I -type clk AXI_CLK200
set_property CONFIG.FREQ_HZ 200000000 [get_bd_ports AXI_CLK200]
# reset
create_bd_port -dir I -type rst ext_reset_in
connect_bd_net [get_bd_pins /proc_sys_reset_0/ext_reset_in] [get_bd_ports ext_reset_in]
# AXI interface for control registers (match ADDR_WIDTH with generic)
create_bd_intf_port -mode Master -vlnv xilinx.com:interface:aximm_rtl:1.0 AXI_register_matrix
set_property -dict [list \
    CONFIG.ADDR_WIDTH {11} \
    CONFIG.PROTOCOL {AXI4LITE}] \
    [get_bd_intf_ports AXI_register_matrix]

######################## IP cells interconnections ############################

# connect axi interfaces to c2c with smartconnect
create_bd_cell -type ip -vlnv xilinx.com:ip:smartconnect smartconnect_0
set_property -dict [list CONFIG.NUM_MI {3} CONFIG.NUM_SI {1}] [get_bd_cells smartconnect_0]
connect_bd_intf_net [get_bd_intf_pins smartconnect_0/S00_AXI] [get_bd_intf_pins axi_chip2chip_0/m_axi]
connect_bd_intf_net [get_bd_intf_pins smartconnect_0/M00_AXI] [get_bd_intf_pins axi_iic_0/S_AXI]
connect_bd_intf_net [get_bd_intf_pins smartconnect_0/M01_AXI] [get_bd_intf_pins xadc_wiz_0/s_axi_lite]
connect_bd_intf_net [get_bd_intf_pins smartconnect_0/M02_AXI] [get_bd_intf_ports AXI_register_matrix]

# clock and reset "tree"
connect_bd_net [get_bd_pins [list \
    /AXI_CLK200 \
    /proc_sys_reset_0/slowest_sync_clk \
    /axi_chip2chip_0/idelay_ref_clk \
    [get_bd_pins */*aclk]]]
connect_bd_net [get_bd_pins [ list \
    /proc_sys_reset_0/peripheral_aresetn \
    [get_bd_pins  */*aresetn -filter {DIR == I}]]]

# intrs
connect_bd_net [get_bd_pins xlconcat_0/dout] [get_bd_pins axi_chip2chip_0/axi_c2c_s2m_intr_in]
connect_bd_net [get_bd_pins axi_iic_0/iic2intc_irpt] [get_bd_pins xlconcat_0/In0]
connect_bd_net [get_bd_pins xadc_wiz_0/ip2intc_irpt] [get_bd_pins xlconcat_0/In1]


##################### AXI ADDRESS assigments ################################
assign_bd_address [get_bd_addr_segs {axi_iic_0/S_AXI/Reg }]
assign_bd_address [get_bd_addr_segs {xadc_wiz_0/s_axi_lite/Reg }]
assign_bd_address [get_bd_addr_segs {AXI_register_matrix/Reg }]
set_property offset 0x7AA00000 [get_bd_addr_segs {axi_chip2chip_0/MAXI/SEG_axi_iic_0_Reg}]
set_property offset 0x7AA10000 [get_bd_addr_segs {axi_chip2chip_0/MAXI/SEG_xadc_wiz_0_Reg}]
set_property offset 0x7AA20000 [get_bd_addr_segs {axi_chip2chip_0/MAXI/SEG_AXI_register_matrix_Reg}]

regenerate_bd_layout
save_bd_design
update_compile_order -fileset sources_1
Step 2: Add hog submodule and create hog project#
Now that we have a very basic understanding of our Vivado project, let’s convert it to hog!
The first step will be to add hog submodule in the root path of your repository, preferably using its relative path. Let’s move back to the root path:
cd ../..
The relative path can be found from out repository URL:
our repository is in https://gitlab.cern.ch/$USER/PiLUP_devel
hog repository is in https://gitlab.cern.ch/hog/Hog
so in our case we will have to add the Hog submodule as:
git submodule add ../../hog/Hog.git
Note
This command will add the latest hog official release. To select a different release, run the command
  cd Hog
  git checkout <release-tag>
  cd ..
Official Hog releases are called Hog<Year>.<version>-<patch>. For this tutorial, we are using Hog2021.2-9.
It’s finally time to convert our projects to Hog! We’ll let Hog perform its magic by running:
./Hog/Init.sh
We’ll be asked some questions:
Do you want to compile Questasim libraries for Vivado (this might take some time)?
nDo you want to compile Modelsim libraries for Vivado (this might take some time)?
nFound existing Vivado project PiLUP_Kintex_template.xpr. Do you want to convert it to a Hog compatible project? (creates listfiles and hog.conf)
yFound existing Vivado project simple.xpr. Do you want to convert it to a Hog compatible project? (creates listfiles and hog.conf)
yDo you want to create projects now (can be done later with CreateProject.sh)?
yDo you want to add three buttons to the Vivado GUI to check and update the list files and the project hog.conf file automatically?
yYour repository does not have Hog-compatible tags, do you wish to create an initial tag v0.0.1 now?
y
What happened? Hog recognised our Vivado projects within the repository and, based on it, created a set of list files and two folder containing all the project properties in Top/PiLUP_Kintex_template/ and Top/simple/.

Those files contain everything hog needs to create and handle the project. Any modification to the project shall be also propagated to those files. A better explanation of the contents of the files can be found in the hog documentation.
Let’s browse the files:
Top/PiLUP_Kintex_template/hog.conf#
# vivado

[main]
BOARD_PART=xilinx.com:kc705:part0:1.5
PART=xc7k325tffg900-2
It contains all the not-default project properties. In our case it sets PART (Kintex7) and the BOARD_PART (KC705) as specified in the original project.
Top/PiLUP_Kintex_template/list/Default.con#
Firmware/Kintex/template/xdc/PiLUP.xdc
It contains the constraint files.
Top/PiLUP_Kintex_template/list/xil_defaultlib.src#
Firmware/Kintex/template/src/control_registers/register_pkg.vhd 93
Firmware/Kintex/template/src/datetimehash_pkg.vhd 93
Firmware/Kintex/template/src/control_registers/reg_test.vhd 93
Firmware/Kintex/template/src/PiLUP_Kintex_template.vhd top=PiLUP_Kintex_template 93
This file is named after the VHDL library of the project (xil_defaultlib) and contains all the VHDL files of that library.
Top/PiLUP_Kintex_template/list/Default.src#
Firmware/Kintex/template/IP/sysclk_wizard/sysclk_wizard.xci
Firmware/Kintex/bd/template/IP_blob/IP_blob.bd
It contains all the IPs and Block Designs of the project.
Open hog project#
Hog also created a new Vivado project (based on the contents of those files) in Projects/PiLUP_Kintex_template/PiLUP_Kintex_template.xpr.
We won’t need any more the original project, and we can already delete it!
rm -r Firmware/Kintex/PiLUP_Kintex_template/
Let’s open the new project! The first thing we notice is there are now three new buttons on the Vivado toolbar:

What do they do? Remember that we said that every modification to the project must be propagated to the hog list files and hog.conf; the first button (CHK) checks that the project files and properties match what is defined in the Top directory. If they don’t match, it’s possible to recreate automatically the list files by pressing the second button (LIST) or hog.conf by pressing the third button (CONF).
Let’s try it!!! After pressing the first hog button, we get some messages from Vivado, saying that List Files and hog.conf match the project. This is expected, since we just created the project.

Let’s try to change some project property: as an example, let’s set Synthesis Strategy to Flow_AreaOptimized_medium.

Now, let’s click again on the first hog button (CHK). This time we get (as expected) a bunch of Critical Warnings, because we changed a project property but not hog.conf.
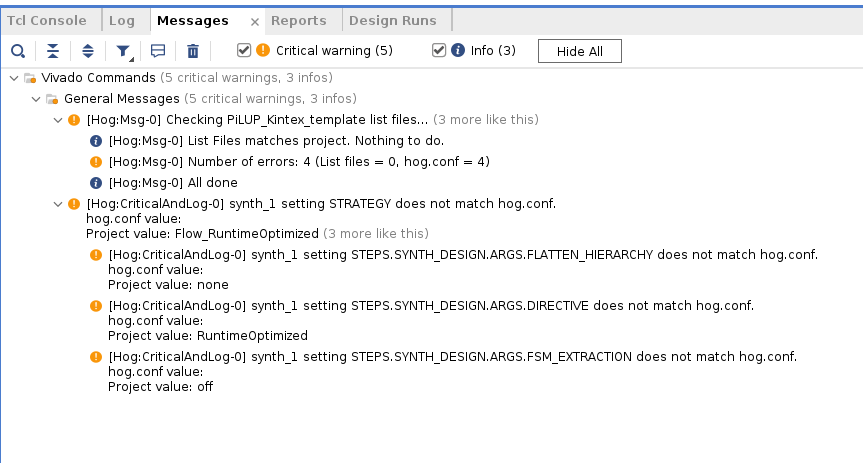
To fix the CriticalWarnings, we have to modify hog.conf, either by editing it ourself or by clicking on the third hog button (CONF). Let’s click on the button.
Again, we receive some messages from Hog saying what just happened.
If we now open again hog.conf, we will see that some lines were added, in order to match the project.
# vivado

[main]
BOARD_PART=xilinx.com:kc705:part0:1.5
PART=xc7k325tffg900-2

[synth_1]
STEPS.SYNTH_DESIGN.ARGS.CONTROL_SET_OPT_THRESHOLD=1
STEPS.SYNTH_DESIGN.ARGS.DIRECTIVE=AreaOptimized_medium
STRATEGY=Flow_AreaOptimized_medium
Step 3: build the hog project#
It’s time to build our project. We can do it in two different ways:
using the Vivado GUI
using the
Hog/LaunchWorkflow.shbash script provided by hog.
Since we have already our Vivado GUI open, let’s use it and let’s start the synthesis (Run Synthesis).
We get a bunch of CriticalWarnings from hog.

Why? Because we didn’t commit anything yet! Hog expects a clean repository, and every file shall be properly committed!
If we look inside our directory, we see that there is a new subdirectory called bin/PiLUP_Kintex_template-v0.0.0-0-g29e3290-dirty/.
This directory has the suffix dirty because again our repository is not clean.
Let’s fix it.
We check the status of our repository with
git status
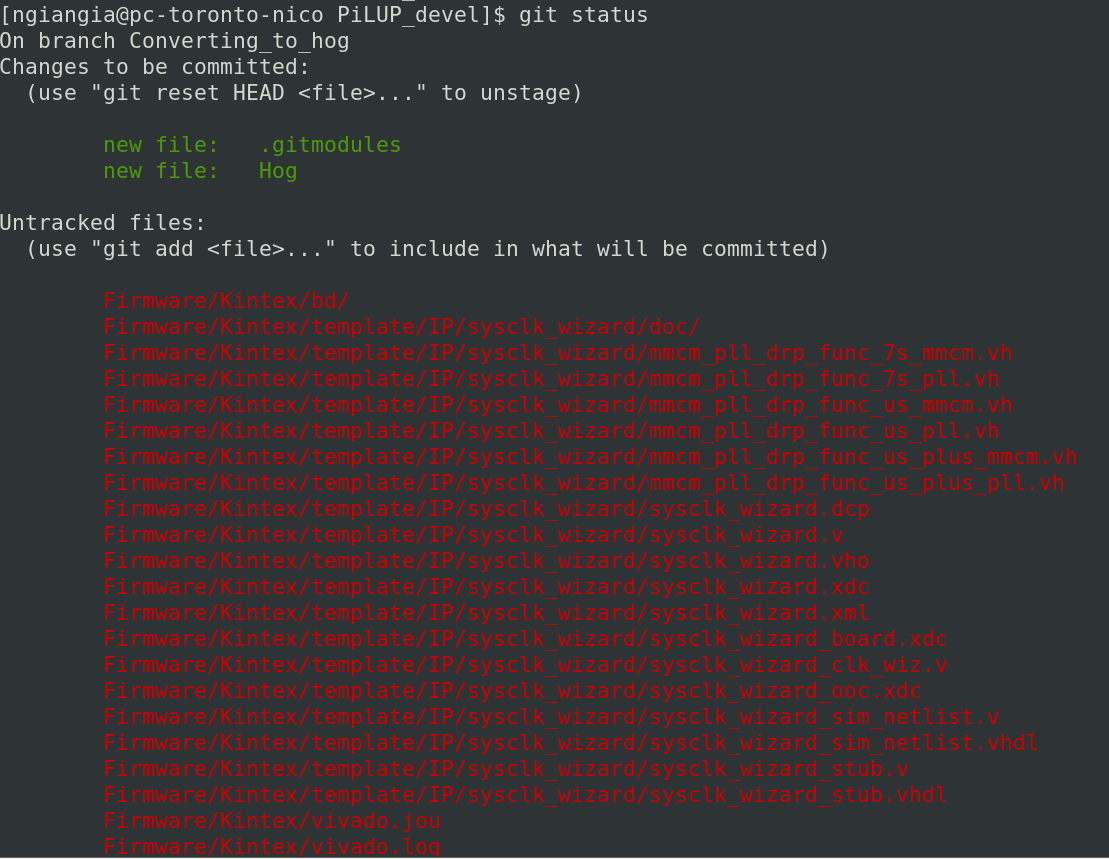
Most of our untracked files are auto-generated Vivado files. We shall handle them with a .gitignore. We can copy the template provided by hog:
cp Hog/Templates/gitignore ./.gitignore
We need to modify it to accommodate for our IPs and block design files (lines 21-25):
Firmware/Kintex/template/IP/*/*
!Firmware/Kintex/template/IP/*/*.xci

Firmware/Kintex/bd/template/*/*
!Firmware/Kintex/bd/template/*/*.bd
Now we have to add the .gitignore, the Top directory (automatically generated by Hog) and IP_blob.bd and commit:
git add .gitignore Firmware/Kintex/bd/template/IP_blob/IP_blob.bd Top/
git commit -m "FEATURE: Converted project to hog"
Feature
The FEATURE keyword signals Hog to copy the message into the Changelog, once the release will be created. More info here
If we re-run git status again, we’ll see that everything is clean.
git status

Now we can run again synthesis and build the project. The Critical Warnings are now disappeared, and the output files are now in the directory bin/PiLUP_Kintex_template-v0.0.1-1-g44d444c/.
If we dump the bit-file produced, we see that the git SHA is embedded within it:

Warning
The git SHA might be different in your project.
Step 4: connect hog parameters to registers#
One of the main hog features is that information such as commit SHA or project version can be embedded to the firmware registers. Since our example design has a register engine, we’ll now add hog generics to it.
Let’s copy hog generics from hog templates and add it to our top file (Firmware/Kintex/template/src/PiLUP_Kintex_template.vhd), after proper modification:
...
  entity PiLUP_Kintex_template is
  generic (
    -- Global Generic Variables
    GLOBAL_DATE : std_logic_vector(31 downto 0);
    GLOBAL_TIME : std_logic_vector(31 downto 0);
    GLOBAL_VER  : std_logic_vector(31 downto 0);
    GLOBAL_SHA  : std_logic_vector(31 downto 0);
    TOP_VER     : std_logic_vector(31 downto 0);
    TOP_SHA     : std_logic_vector(31 downto 0);
    CON_VER     : std_logic_vector(31 downto 0);
    CON_SHA     : std_logic_vector(31 downto 0);
    HOG_VER     : std_logic_vector(31 downto 0);
    HOG_SHA     : std_logic_vector(31 downto 0);

    -- Project Specific Lists (One for each .src file in your Top/myproj/list folder)
    xil_defaultlib_VER : std_logic_vector(31 downto 0);
    xil_defaultlib_SHA : std_logic_vector(31 downto 0);
    Default_VER        : std_logic_vector(31 downto 0);
    Default_SHA        : std_logic_vector(31 downto 0)
    );
  Port (
    ...
Now, we have to add new registers to our project and connect them to the hog generics. Let’s follow the project README and let’s modify Firmware/Kintex/template/src/control_registers/register_pkg.vhd:
...
    -- STATUS registers
    constant N_STATUS_REGS                          : integer    := 14;

    constant GLOBAL_DATE_REG                        : natural := 0;
    subtype GLOBAL_DATE_RANGE                        is natural range 31 downto 0;

    constant GLOBAL_TIME_REG                        : natural := 1;
    subtype GLOBAL_TIME_RANGE                       is natural range 31 downto 0;

    constant GLOBAL_VER_REG                         : natural := 2;
    subtype GLOBAL_VER_RANGE                        is natural range 31 downto 0;

    constant GLOBAL_SHA_REG                         : natural := 3;
    subtype GLOBAL_SHA_RANGE                        is natural range 31 downto 0;

    constant TOP_VER_REG                            : natural := 4;
    subtype TOP_VER_RANGE                           is natural range 31 downto 0;

    constant TOP_SHA_REG                            : natural := 5;
    subtype TOP_SHA_RANGE                           is natural range 31 downto 0;

    constant CON_VER_REG                            : natural := 6;
    subtype CON_VER_RANGE                           is natural range 31 downto 0;

    constant CON_SHA_REG                            : natural := 7;
    subtype CON_SHA_RANGE                           is natural range 31 downto 0;

    constant HOG_VER_REG                            : natural := 8;
    subtype HOG_VER_RANGE                           is natural range 31 downto 0;

    constant HOG_SHA_REG                            : natural := 9;
    subtype HOG_SHA_RANGE                           is natural range 31 downto 0;

    constant xil_defaultlib_VER_REG                 : natural := 10;
    subtype xil_defaultlib_VER_RANGE                is natural range 31 downto 0;

    constant xil_defaultlib_SHA_REG                 : natural := 11;
    subtype xil_defaultlib_SHA_RANGE                is natural range 31 downto 0;

    constant Default_VER_REG                        : natural := 12;
    subtype Default_VER_RANGE                       is natural range 31 downto 0;

    constant Default_SHA_REG                        : natural := 13;
    subtype Default_SHA_RANGE                       is natural range 31 downto 0;
    constant REGS_AXI_ADDR_WIDTH : integer := 31;
...
Note
We removed the old STATUS registers, since we won’t use them anymore.
Now, it’s time to connect the registers to the hog generics. In the top file:
...

    -- status registers
    status(GLOBAL_DATE_REG)(GLOBAL_DATE_RANGE)                     <= GLOBAL_DATE;
    status(GLOBAL_TIME_REG)(GLOBAL_TIME_RANGE)                     <= GLOBAL_TIME;
    status(TOP_VER_REG)(TOP_VER_RANGE)                             <= TOP_VER;
    status(TOP_SHA_REG)(TOP_SHA_RANGE)                             <= TOP_SHA;
    status(CON_VER_REG)(CON_VER_RANGE)                             <= CON_VER;
    status(CON_SHA_REG)(CON_SHA_RANGE)                             <= CON_SHA;
    status(HOG_VER_REG)(HOG_VER_RANGE)                             <= HOG_VER;
    status(HOG_SHA_REG)(HOG_SHA_RANGE)                             <= HOG_SHA;
    status(xil_defaultlib_VER_REG)(xil_defaultlib_VER_RANGE)       <= xil_defaultlib_VER;
    status(xil_defaultlib_SHA_REG)(xil_defaultlib_SHA_RANGE)       <= xil_defaultlib_SHA;
    status(Default_VER_REG)(Default_VER_RANGE)                     <= Default_VER;
    status(Default_SHA_REG)(Default_SHA_RANGE)                     <= Default_SHA;
    --                        USER LOGIC                    --

...
Now we can remove Firmware/Kintex/template/src/datetimehash_pkg.vhd from the project, since we won’t need it anymore.
We also need to remove the package from PiLUP_Kintex_template.vhd by deleting the following line:
use work.datetimehash_pkg.all;
Remember to click on on the LST hog button to update the list files! Now we can commit everything and build again the firmware.
git add Firmware/Kintex/template/src/control_registers/register_pkg.vhd Top/PiLUP_Kintex_template/list/xil_defaultlib.src Firmware/Kintex/template/src/PiLUP_Kintex_template.vhd
git rm Firmware/Kintex/template/src/datetimehash_pkg.vhd
git commit -m "Connected hog generics to registers"
Congratulations, our project is now fully compatible with hog!
Step 5: run a project simulation#
As an excercise, we can run a dummy simulation in our project. We’ll use Vivado simulator (xsim). Let’s copy the following code in Firmware/Kintex/template/tb/sysclk_wiz_tb.vhd
library IEEE;
use IEEE.STD_LOGIC_1164.ALL;

-- Uncomment the following library declaration if using
-- arithmetic functions with Signed or Unsigned values
--use IEEE.NUMERIC_STD.ALL;

-- Uncomment the following library declaration if instantiating
-- any Xilinx leaf cells in this code.
--library UNISIM;
--use UNISIM.VComponents.all;

entity sysclk_wiz_tb is
--  Port ( );
end sysclk_wiz_tb;

architecture Behavioral of sysclk_wiz_tb is

  signal sysclk_p        : std_logic := '0';
  signal sysclk_n        : std_logic := '1';
  signal reset_i         : std_logic := '0';
  constant sysclk_period : time      := 5ns;


  component sysclk_wizard
    port (
      -- Clock out ports
      clk200_out : out std_logic;
      -- Status and control signals
      reset      : in  std_logic;
      locked     : out std_logic;
      clk_in1_p  : in  std_logic;
      clk_in1_n  : in  std_logic
      );
  end component;


begin

  uut : sysclk_wizard
    port map(
      clk200_out => open,
      reset      => reset_i,
      locked     => open,
      clk_in1_p  => SYSCLK_P,
      clk_in1_n  => SYSCLK_N
      );

  sysclk_proc : process
  begin
    wait for sysclk_period/2;
    sysclk_p <= not sysclk_p;
    sysclk_n <= not sysclk_n;
  end process sysclk_proc;

  reset_proc : process
  begin
    reset_i <= '1';
    wait for 1 us;
    reset_i <= '0';
    wait;

  end process reset_proc;


  test_proc : process
  begin
    wait for 20us;
    report "Simulation is done";
  end process test_proc;

end Behavioral;
Note that this simulation is simply running the clocking wizard IP, and after 20us prints to screen “Simulation is done”.
Now we create a new simulation set in Vivado called dummy_sim and we add the file we just created, setting it as top.
Note that by default Vivado runs a simulation for 1000ns, and we need to change the value to at least 20us, if we want to see the message printed to screen.
To do so, edit the setting Tools -> Settings -> Simulation -> xsim.simulation.runtime to 20us.
We can now run the simulation to check that everything works as expected.
At this point, we have to inform Hog about our new test-bench. As usual, we can just click on the LST button to automatically update the list files.
A new file called Top/PiLUP_Kintex_template/list/dummy.sim has been created (note that the file name is the same as the name of the simulation set).
We can open the file:
#Simulator XSim
Firmware/Kintex/template/tb/sysclk_wiz_tb.vhd topsim=sysclk_wiz_tb runtime=20us 93
We notice that all the useful information, such as the name of the top module and the simulation runtime are contained in this file, as explained here. Don’t forget to add everything and commit on git:
git add Firmware/Kintex/template/tb/sysclk_wiz_tb.vhd
git add Top/PiLUP_Kintex_template/list/dummy.sim
git commit -m "Added dummy simulation"
Step 6: (optional) doxygen documentation#
Hog supports doxygen, so let’s create a doxygen website for our project.
Note
We’ll need Doxygen 1.8.13 or higher
We start by copying doxygen.conf and from hog templates:
mkdir doxygen
cp Hog/Templates/doxygen.conf doxygen/
Let’s edit it to match our project:
...
PROJECT_NAME           = "PiLUP_template"
...
Now let’s add a simple message in doxygen format to our top file:
-------------------------------------------------------
--! @file
--! @brief This is a Doxygen documentation example
-------------------------------------------------------
...
Now we can commit everything to our repository:
git add Firmware/Kintex/template/src/PiLUP_Kintex_template.vhd
git add doxygen/doxygen.conf
git commit -m "Added doxygen conf"
Now we can finally build our doxygen documentation with the command:
tclsh Hog/Tcl/utils/make_doxygen.tcl
You can browse your local documentation with:
firefox Doc/html/index.html
Step 7: (advanced feature) use user-script to generate block design#
In the previous steps we added our block design (IP_BLOB.bd) to our repository, but originally this file was auto-generated by a script during project creation. We want to replicate the same behaviour with our hog project.
Hog allows users to define scripts to be run before of after project creation:
pre-creation.tcl
post_creation.tcl
We can add the block design generation instructions to post_creation.tcl.
Let’s start by closing the Vivado project and deleting Firmware/Kintex/bd/template/IP_blob/IP_blob.bd.
git rm Firmware/Kintex/bd/template/IP_blob/IP_blob.bd
Now we can copy the block design creation instructions from Firmware/Kintex/generate_project.tcl into Top/PiLUP_Kintex_template/post-creation.tcl:
##################################################################################
############################# Create block design ################################
##################################################################################

set root_dir [file normalize [info script]/../../../Firmware/Kintex]

if {"${root_dir}/bd/template/IP_blob/IP_blob.bd" in [get_files]} {
    remove_files  ${root_dir}/bd/template/IP_blob/IP_blob.bd
}
create_bd_design -dir "${root_dir}/bd/template" IP_blob

#################################  IP cells  ##################################

# !!match AXI_WUSER and ID_WIDTH with master!!
create_bd_cell -type ip -vlnv xilinx.com:ip:axi_chip2chip axi_chip2chip_0
set_property -dict [list CONFIG.C_M_AXI_WUSER_WIDTH {0} CONFIG.C_M_AXI_ID_WIDTH {0} CONFIG.C_MASTER_FPGA {0}\
    CONFIG.C_USE_DIFF_IO {true} CONFIG.C_USE_DIFF_CLK {true}] [get_bd_cells axi_chip2chip_0]

create_bd_cell -type ip -vlnv xilinx.com:ip:xlconcat xlconcat_0
set_property -dict [list CONFIG.NUM_PORTS {4}] [get_bd_cells xlconcat_0]

create_bd_cell -type ip -vlnv xilinx.com:ip:axi_iic axi_iic_0
set_property -dict [list CONFIG.IIC_BOARD_INTERFACE {iic_main}] [get_bd_cells axi_iic_0]

create_bd_cell -type ip -vlnv xilinx.com:ip:proc_sys_reset proc_sys_reset_0

# !!match DCLK with axi CLK !!
create_bd_cell -type ip -vlnv xilinx.com:ip:xadc_wiz xadc_wiz_0
set_property -dict [list CONFIG.DCLK_FREQUENCY {200} CONFIG.OT_ALARM {false} CONFIG.USER_TEMP_ALARM {false} CONFIG.VCCINT_ALARM {false} \
    CONFIG.VCCAUX_ALARM {false} CONFIG.ADC_CONVERSION_RATE {1000}] [get_bd_cells xadc_wiz_0]

########################## Block Design ports #################################
# what's a for cycle?

# C2C
create_bd_port -dir I -type clk KZ_BUS_CLK_P
connect_bd_net [get_bd_pins /axi_chip2chip_0/axi_c2c_selio_rx_diff_clk_in_p] [get_bd_ports KZ_BUS_CLK_P]
set_property CONFIG.FREQ_HZ 200000000 [get_bd_ports KZ_BUS_CLK_P]
create_bd_port -dir I -type clk KZ_BUS_CLK_N
connect_bd_net [get_bd_pins /axi_chip2chip_0/axi_c2c_selio_rx_diff_clk_in_n] [get_bd_ports KZ_BUS_CLK_N]
set_property CONFIG.FREQ_HZ 200000000 [get_bd_ports KZ_BUS_CLK_N]
create_bd_port -dir O -type clk KZ_CLK_OUT_P
connect_bd_net [get_bd_pins /axi_chip2chip_0/axi_c2c_selio_tx_diff_clk_out_p] [get_bd_ports KZ_CLK_OUT_P]
create_bd_port -dir O -type clk KZ_CLK_OUT_N
connect_bd_net [get_bd_pins /axi_chip2chip_0/axi_c2c_selio_tx_diff_clk_out_n] [get_bd_ports KZ_CLK_OUT_N]
create_bd_port -dir I -from 8 -to 0 AXI_C2C_IN_P
connect_bd_net [get_bd_pins /axi_chip2chip_0/axi_c2c_selio_rx_diff_data_in_p] [get_bd_ports AXI_C2C_IN_P]
create_bd_port -dir I -from 8 -to 0 AXI_C2C_IN_N
connect_bd_net [get_bd_pins /axi_chip2chip_0/axi_c2c_selio_rx_diff_data_in_n] [get_bd_ports AXI_C2C_IN_N]
create_bd_port -dir O -from 8 -to 0 AXI_C2C_OUT_P
connect_bd_net [get_bd_pins /axi_chip2chip_0/axi_c2c_selio_tx_diff_data_out_p] [get_bd_ports AXI_C2C_OUT_P]
create_bd_port -dir O -from 8 -to 0 AXI_C2C_OUT_N
connect_bd_net [get_bd_pins /axi_chip2chip_0/axi_c2c_selio_tx_diff_data_out_n] [get_bd_ports AXI_C2C_OUT_N]
# IIC
apply_bd_automation -rule xilinx.com:bd_rule:board -config {Board_Interface "iic_main ( IIC ) " }  [get_bd_intf_pins axi_iic_0/IIC]
# AXI clk
create_bd_port -dir I -type clk AXI_CLK200
set_property CONFIG.FREQ_HZ 200000000 [get_bd_ports AXI_CLK200]
# reset
create_bd_port -dir I -type rst ext_reset_in
connect_bd_net [get_bd_pins /proc_sys_reset_0/ext_reset_in] [get_bd_ports ext_reset_in]
# AXI interface for control registers (match ADDR_WIDTH with generic)
create_bd_intf_port -mode Master -vlnv xilinx.com:interface:aximm_rtl:1.0 AXI_register_matrix
set_property -dict [list \
    CONFIG.ADDR_WIDTH {11} \
    CONFIG.PROTOCOL {AXI4LITE}] \
    [get_bd_intf_ports AXI_register_matrix]

######################## IP cells interconnections ############################

# connect axi interfaces to c2c with smartconnect
create_bd_cell -type ip -vlnv xilinx.com:ip:smartconnect smartconnect_0
set_property -dict [list CONFIG.NUM_MI {3} CONFIG.NUM_SI {1}] [get_bd_cells smartconnect_0]
connect_bd_intf_net [get_bd_intf_pins smartconnect_0/S00_AXI] [get_bd_intf_pins axi_chip2chip_0/m_axi]
connect_bd_intf_net [get_bd_intf_pins smartconnect_0/M00_AXI] [get_bd_intf_pins axi_iic_0/S_AXI]
connect_bd_intf_net [get_bd_intf_pins smartconnect_0/M01_AXI] [get_bd_intf_pins xadc_wiz_0/s_axi_lite]
connect_bd_intf_net [get_bd_intf_pins smartconnect_0/M02_AXI] [get_bd_intf_ports AXI_register_matrix]

# clock and reset "tree"
connect_bd_net [get_bd_pins [list \
    /AXI_CLK200 \
    /proc_sys_reset_0/slowest_sync_clk \
    /axi_chip2chip_0/idelay_ref_clk \
    [get_bd_pins */*aclk]]]
connect_bd_net [get_bd_pins [ list \
    /proc_sys_reset_0/peripheral_aresetn \
    [get_bd_pins  */*aresetn -filter {DIR == I}]]]

# intrs
connect_bd_net [get_bd_pins xlconcat_0/dout] [get_bd_pins axi_chip2chip_0/axi_c2c_s2m_intr_in]
connect_bd_net [get_bd_pins axi_iic_0/iic2intc_irpt] [get_bd_pins xlconcat_0/In0]
connect_bd_net [get_bd_pins xadc_wiz_0/ip2intc_irpt] [get_bd_pins xlconcat_0/In1]


##################### AXI ADDRESS assigments ################################
assign_bd_address [get_bd_addr_segs {axi_iic_0/S_AXI/Reg }]
assign_bd_address [get_bd_addr_segs {xadc_wiz_0/s_axi_lite/Reg }]
assign_bd_address [get_bd_addr_segs {AXI_register_matrix/Reg }]
set_property offset 0x7AA00000 [get_bd_addr_segs {axi_chip2chip_0/MAXI/SEG_axi_iic_0_Reg}]
set_property offset 0x7AA10000 [get_bd_addr_segs {axi_chip2chip_0/MAXI/SEG_xadc_wiz_0_Reg}]
set_property offset 0x7AA20000 [get_bd_addr_segs {axi_chip2chip_0/MAXI/SEG_AXI_register_matrix_Reg}]

regenerate_bd_layout
save_bd_design
Now we commit everything and we create the project:
git add Top/PiLUP_Kintex_template/post-creation.tcl
git commit -m "block design autogenerated with post-creation.tcl"
./Hog/CreateProject.sh PiLUP_Kintex_template
Note that we have a Critical Warning:
CRITICAL WARNING: [Hog:ReadListFile-0] PiLUP_devel/Firmware/Kintex/bd/template/IP_blob/IP_blob.bd not found in PiLUP_devel
This is expected since IP_blob was created only after the CreateProject instructions. We can ignore this Critical Warning.
We can now try that everything works as expected: re-open the project and build it. We notice that we have again some Critical Warnings from Hog during synthesis:

Hog is complaining because Firmware/Kintex/bd/template/IP_blob/IP_blob.bd is not in the git repository (we deleted it) but it’s still a part of the project.
This situation is exactly what we wanted to achieve, so we have to inform hog that everything is fine, so it will stop complaining.
One way to do it, is to modify the hog.conf file, specifying that there should be no check on uncommitted files by adding the ALLOW_FAIL_ON_GIT flag (according to the hog documentation):
# vivado

[main]
BOARD_PART=xilinx.com:kc705:part0:1.5
PART=xc7k325tffg900-2

[synth_1]
STEPS.SYNTH_DESIGN.ARGS.CONTROL_SET_OPT_THRESHOLD=1
STEPS.SYNTH_DESIGN.ARGS.DIRECTIVE=AreaOptimized_medium
STRATEGY=Flow_AreaOptimized_medium

[hog]
ALLOW_FAIL_ON_GIT=True
We commit the changes, and we notice that our build is now clean:
git add Top/PiLUP_Kintex_template/hog.conf
git commit -m "Modified hog.conf"
Warning
Disabling the uncommitted files check could be dangerous, since this allows the developers to add files to the project and generate a clean bitstream, without committing the changes. Tracking of IPs generated using tcl scripts has been implemented for the future Hog2022.1 release.
You can give it already a try by checking out the develop branch, setting ALLOW_FAIL_ON_GIT=False in hog.conf, removing the .bd file from the .src list, committing your changes, recreate the project and start again the synthesis. This time you should not see any Critical Warnings, but this message would appear.
Step 8: (advanced feature) set user generics#
Let’s assume that we want to add a user generic to the project top and that we want to set it to a user-defined value before synthesis.
Let’s start by creating the new generic on the top file PiLUP_Kintex_template.vhd:
entity PiLUP_Kintex_template is
Generic (
-- Global Generic Variables
    GLOBAL_DATE : std_logic_vector(31 downto 0);
    GLOBAL_TIME : std_logic_vector(31 downto 0);
    GLOBAL_VER  : std_logic_vector(31 downto 0);
    GLOBAL_SHA  : std_logic_vector(31 downto 0);
    TOP_VER     : std_logic_vector(31 downto 0);
    TOP_SHA     : std_logic_vector(31 downto 0);
    CON_VER     : std_logic_vector(31 downto 0);
    CON_SHA     : std_logic_vector(31 downto 0);
    HOG_VER     : std_logic_vector(31 downto 0);
    HOG_SHA     : std_logic_vector(31 downto 0);

    -- Project Specific Lists (One for each .src file in your Top/myproj/list folder)
    Default_VER : std_logic_vector(31 downto 0);
    Default_SHA : std_logic_vector(31 downto 0);
    xil_defaultlib_VER : std_logic_vector(31 downto 0);
    xil_defaultlib_SHA : std_logic_vector(31 downto 0);

    user_generic : std_logic_vector(31 downto 0)
);
To set the generic, we need to add a pre-synthesis instruction. As defined here, hog allows the user to define user pre-synthesis/implementation scripts that will be run immediately after the hog pre-synthesis(implementation).tcl.
So, to set our generic, we have to create a user pre-synthesis.tcl:
emacs -nw Top/PiLUP_Kintex_template/pre-synthesis.tcl
Here we write the instructions to set our generic. It’s important that first we read the generics that have already been created by hog before adding ours..
set hog_generics [get_property generic [current_fileset]]
set user_generics "user_generic=32'hC0CAC07A"
set_property generic "$hog_generics $user_generics" [current_fileset]
We commit everything:
git add Top/PiLUP_Kintex_template/pre-synthesis.tcl
git add Firmware/Kintex/template/src/PiLUP_Kintex_template.vhd
git commit -m "FEATURE: Added user generic"
We can now synthesise the project, and if we look at the log, we see that the parameter user_generic has been set to the correct value.

Step 9: Git push#
Let’s now push our changes
git push origin Converting_to_hog
git push --tags