CI Tutorial#
Warning
Outdated Documentation! This documentation version is out of date. Please check the latest version 2026.1.
Requirements for this tutorial are a CERN account, a CERN service account (https://account.cern.ch/account/Management/NewAccount.aspx).
Create Openstack machine#
The first step is to create an Openstack Virtual Machine, running CENTOS7. CERN user can easily request a virtual machine for production, test and development purposes. For more information, visit https://clouddocs.web.cern.ch/.
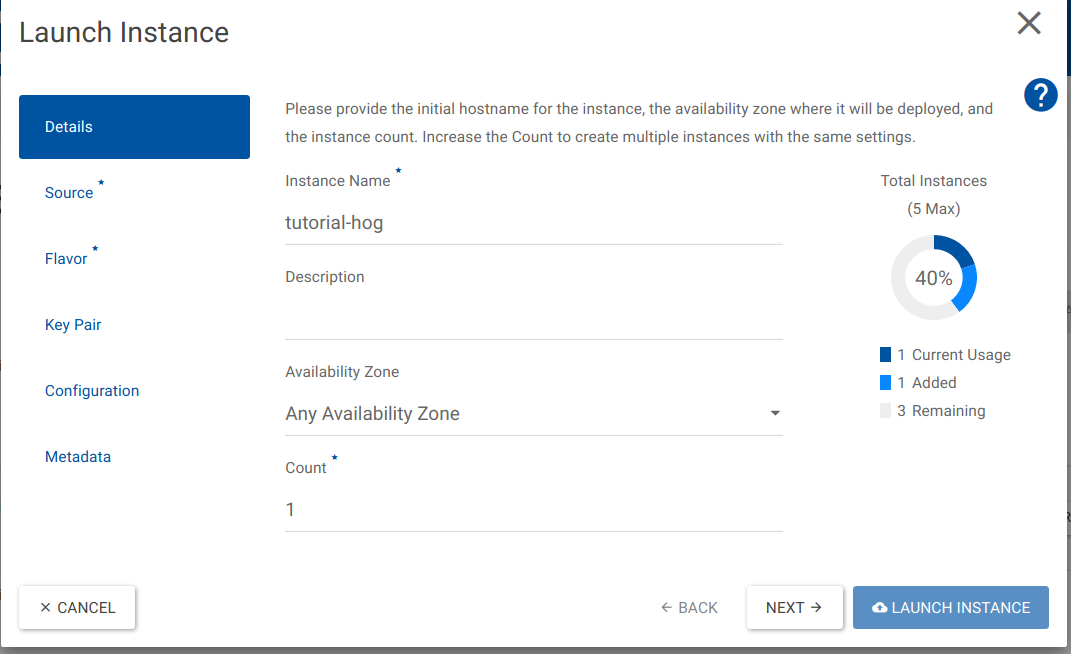
To create the virtual machine, go to https://openstack.cern.ch/, click in the left sidebar on Compute->Instances. Then click on Launch Instance.

Choose an Instance Name (e.g. tutorial-hog) and click on Next.
Select the CC7 - x86_64 image and click on Next.

Select the largest flavour available (typically m2.large) and click on Next.

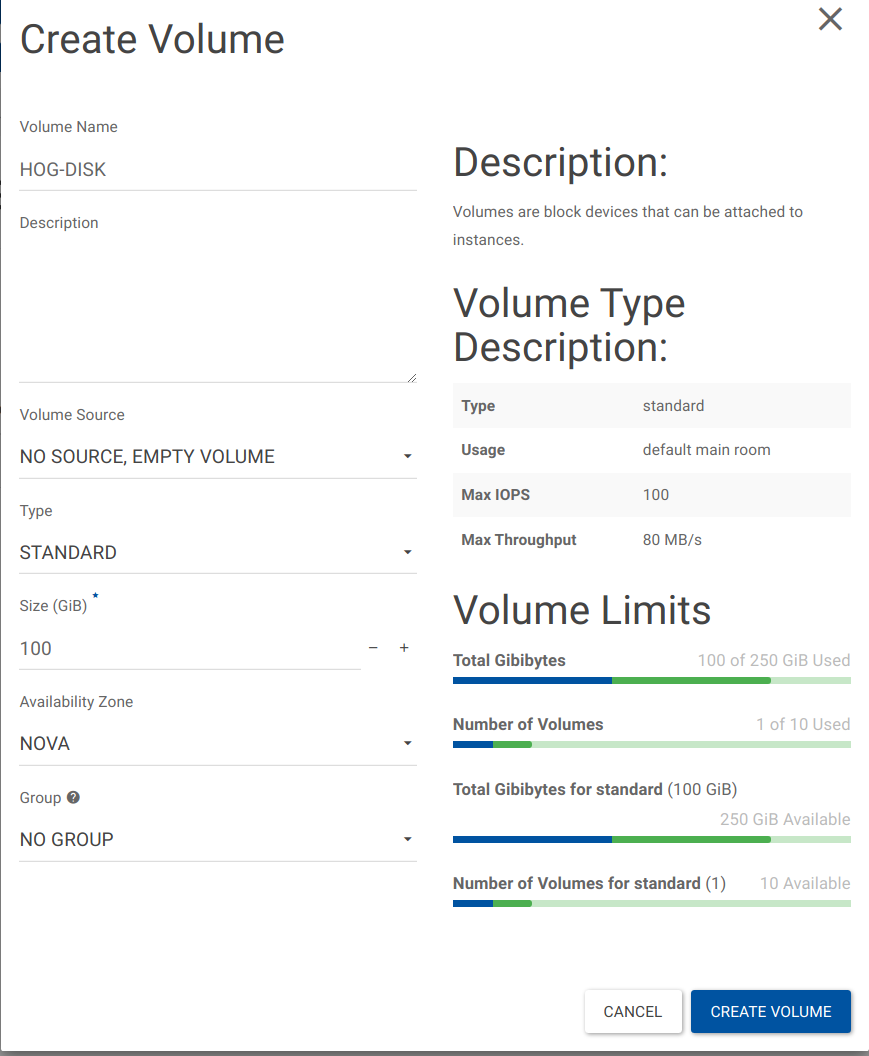
This will take few minutes. Meanwhile create an external volume to be attached to the VM. From the left sidebar, click on Volumes->Volumes, and then on CREATE VOLUME.

Choose a Volume Name (e.g. HOG-DISK), and allocate at least 100 GB to it. Then click on CREATE VOLUME.
Once the volume has been created and the Virtual Machine has been setup, click on Actions->MANAGE ATTACHMENTS.
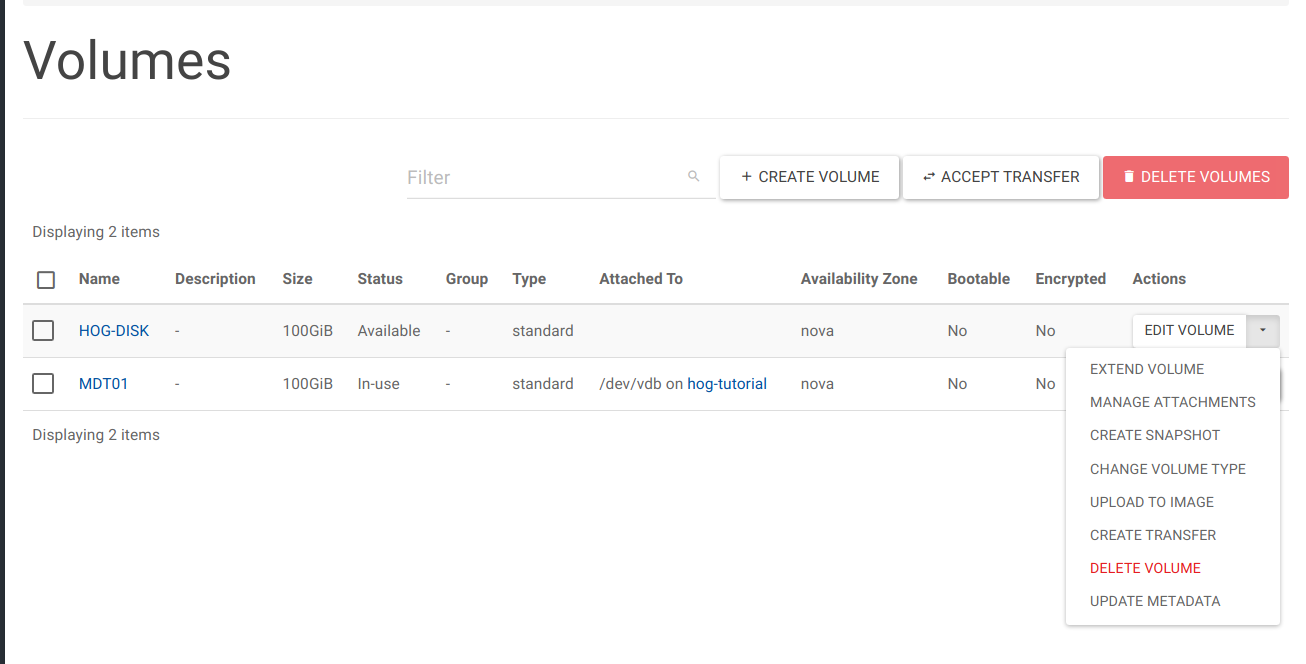
Select in the list the VM you just created, e.g. tutorial-hog, and click on ATTACH VOLUME.

We are now ready to configure the machine to run the Hog CI.
Configure the Openstack VM#
Login to lxplus.cern.ch
ssh -XY user@lxplus.cern.ch
Clone the Hog VM setup repository, in any folder inside your AFS area.
git clone https://gitlab.cern.ch/hog/vm-setup.git
Note
EOS is not accessible from the Virtual Machine, so don’t clone the repository there.
Now login into your VM.
ssh -XY tutorial-hog
Go to the just cloned vm-setup folder, and switch to root permission.
sudo su
Now install the required dependencies,
./install_dependecies.sh
Then format and mount the volume,
./volume-setup.sh
Finally, install the required software (Vivado, QuestaSim, Quartus) in the attached volume (/mnt/vd).
Follow the instructions to install them from the correspondent vendor website.
Warning
You are the one responsible for correctly licensing the software.
Once this is done, we can install our gitlab-runner. First, we need to find the gitlab-runner registering token.
Open your gitlab repository on a web browser, and go to Settings->CI/CD->Runners. Copy the registration token.

Go back to your virtual machine, and launch the install_runner.sh script, without options to see the Usage description.
 Hog - Install gitlab runner
 ---------------------------
 Install the Gitlab Runner on a linux machine

 Usage: ./install_runner.sh -u <user_name> -g <user_group> -t <gitlab_token> [OPTIONS]
 Options: --tags: <list of tags for this VM>, default: hog,vivado
          --url: <Gitlab url>. Default: https://gitlab.cern.ch
          --output_limit: <maximum size of output log in the CI jobs. Default: 0 (no limit)>
As you can see, it is possible to specify the tags for the runner and the gitlab_url, to create a runner for other Gitlab’s locations (e.g. gitlab.com).
Note
By default, Hog requires the vivado and hog tags to run its CI. However, it is possible to change the required tags, individually for each CI job, as we’ll be shown later in the tutorial.
Launch now the script with the right options. This will create the home folder for your service account on the VM, and register the gitlab runner. The gitlab runner configuration will be saved on /etc/gitlab-runner/config.toml, and will look like this,
concurrent = 1
check_interval = 0

[session_server]
  session_timeout = 1800

[[runners]]
  name = "Hog runner on tutorial-hog"
  url = "https://gitlab.cern.ch"
  token = "<my_token>"
  executor = "shell"
  [runners.custom_build_dir]
  [runners.cache]
    [runners.cache.s3]
    [runners.cache.gcs]
Here you can change the concurrent value, to set the maximum numbers of gitlab CI jobs this machine will run in parallel.
If you go now back to your gitlab repository webpage, under Settings->CI/CD->Runners, you should see your new runner under the Other available runners list.
We are now ready to configure the repository to run the Hog-CI.
Setup the Hog-CI on your repository#
Configure Gitlab CI/CD variables#
To run the Hog-CI, we need to configure some variables in the CI/CD page of our Gitlab repository. Open a web browser and go to https://gitlab.cern.ch/
Expand the Variables section and add the following variables.
HOG_USER: Your service account;
HOG_EMAIL: The email of your service account;
HOG_PASSWORD: The password of your service account (Mask it!!);
HOG_PATH: The
PATHenvironmental variable for your VM, should include the Vivado bin directory;HOG_PUSH_TOKEN: The push token you have generated for your service account. You can obtain one here, logging in with your service account a select
apias scope;HOG_XIL_LICENSE: The Xilinx License Server.
More information on the CI/CD variables that Hog uses can be found here.
Note
These variables can be also written inside the .gitlab-ci.yml file. Gitlab uses the following priority scheme for the environmental variables.
Gitlab CI/CD Variables -> Jobs Specific Variables -> Global gitlab-ci.yml variables.
More info here
Other interesting variables are:
EOS_MGM_URL: EOS root url, e.g.
root://eosuser.cern.chHOG_OFFICIAL_BIN_EOS_PATH: Path in EOS, where to store the official binary files;
HOG_CHECK_PROJVER: If set to 1, Hog CI runs only the projects that have been modified with respect to the target branch;
HOG_CHECK_SYNTAX: If set to 1, Hog will check the syntax of your source files, before running the synthesis;
HOG_CHECK_YAMLREF: If set to 1, Hog will check that the reference Hog version in your
.gitlab-ci.ymlis the same as the cloned submodule;HOG_IP_EOS_PATH: EOS Path where Hog will store the generated IP files, to speed up the CI;
HOG_USE_DOXYGEN: If set to 1, Hog will produce the doxygen documentation and copy to EOS;
HOG_CREATE_OFFICIAL_RELEASE: If set to 1, Hog creates an official release note using the version and timing summaries taken from the artifact of the projects.
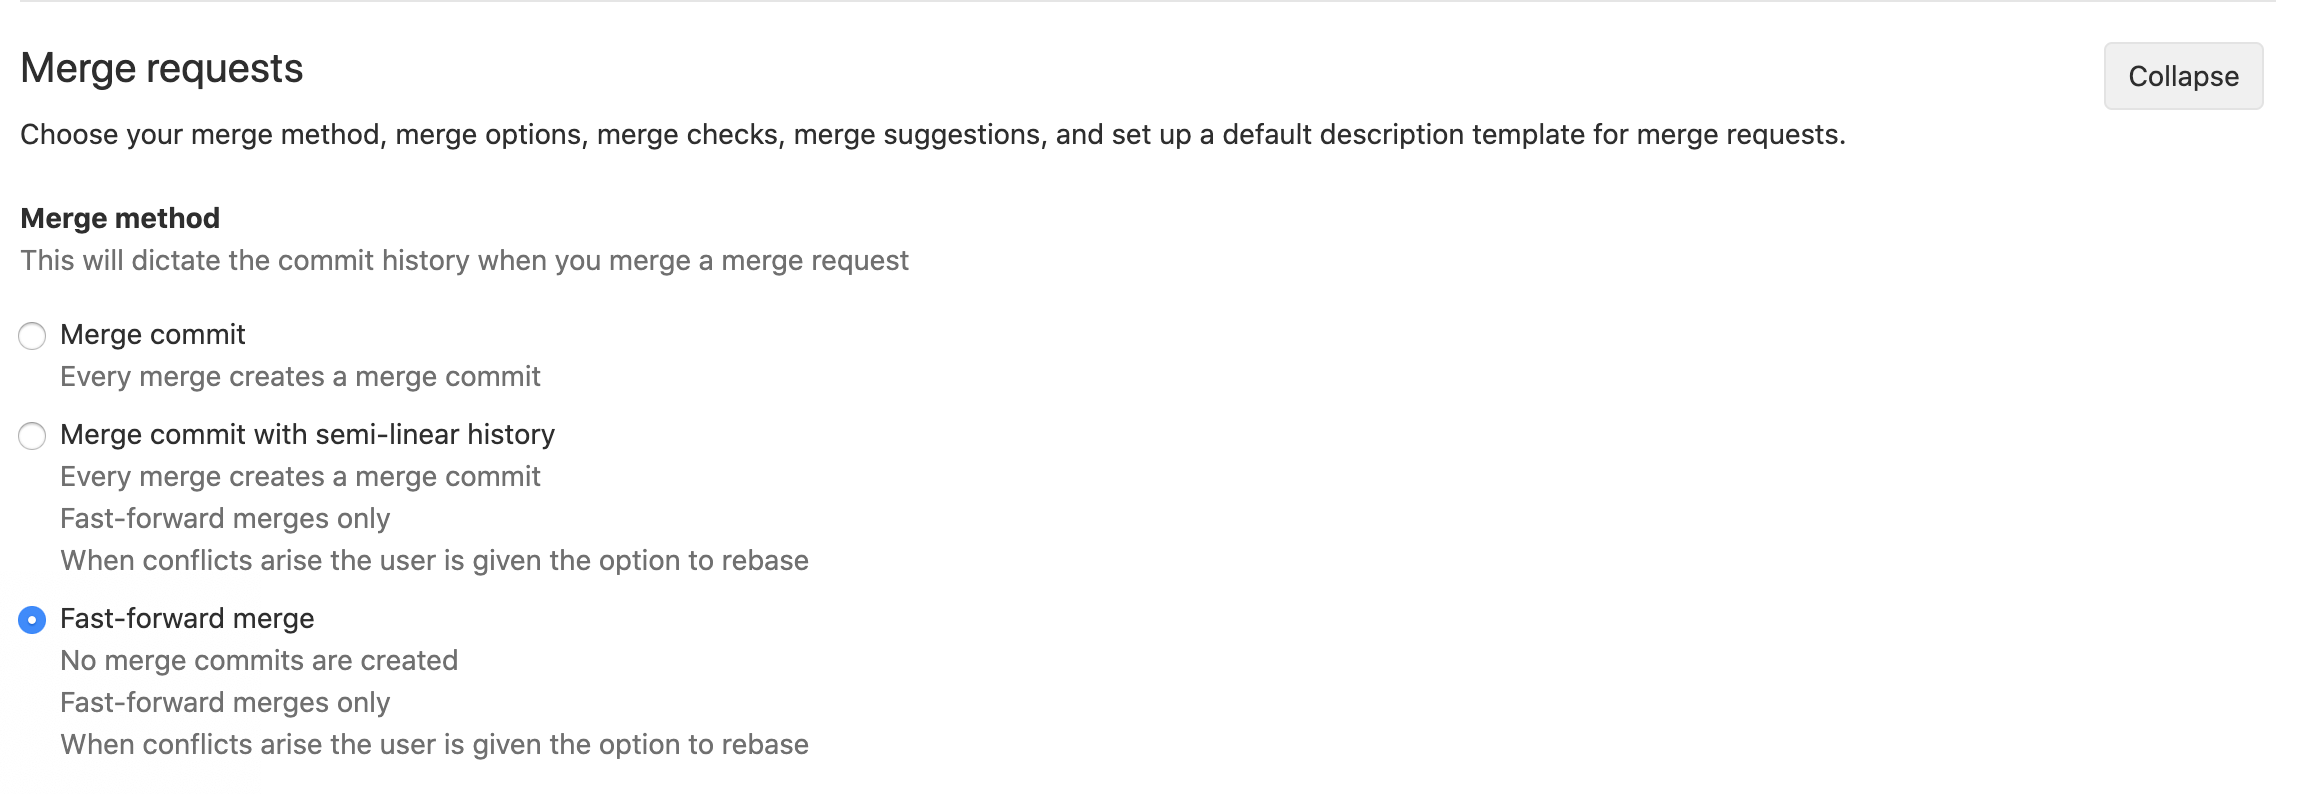
Remove merge commit#
Go to https://gitlab.cern.ch/
Pipeline configuration#
Go to https://gitlab.cern.ch/
Select git clone
Set Git shallow clone to 0
Set Timeout to a long threshold, for example 1d
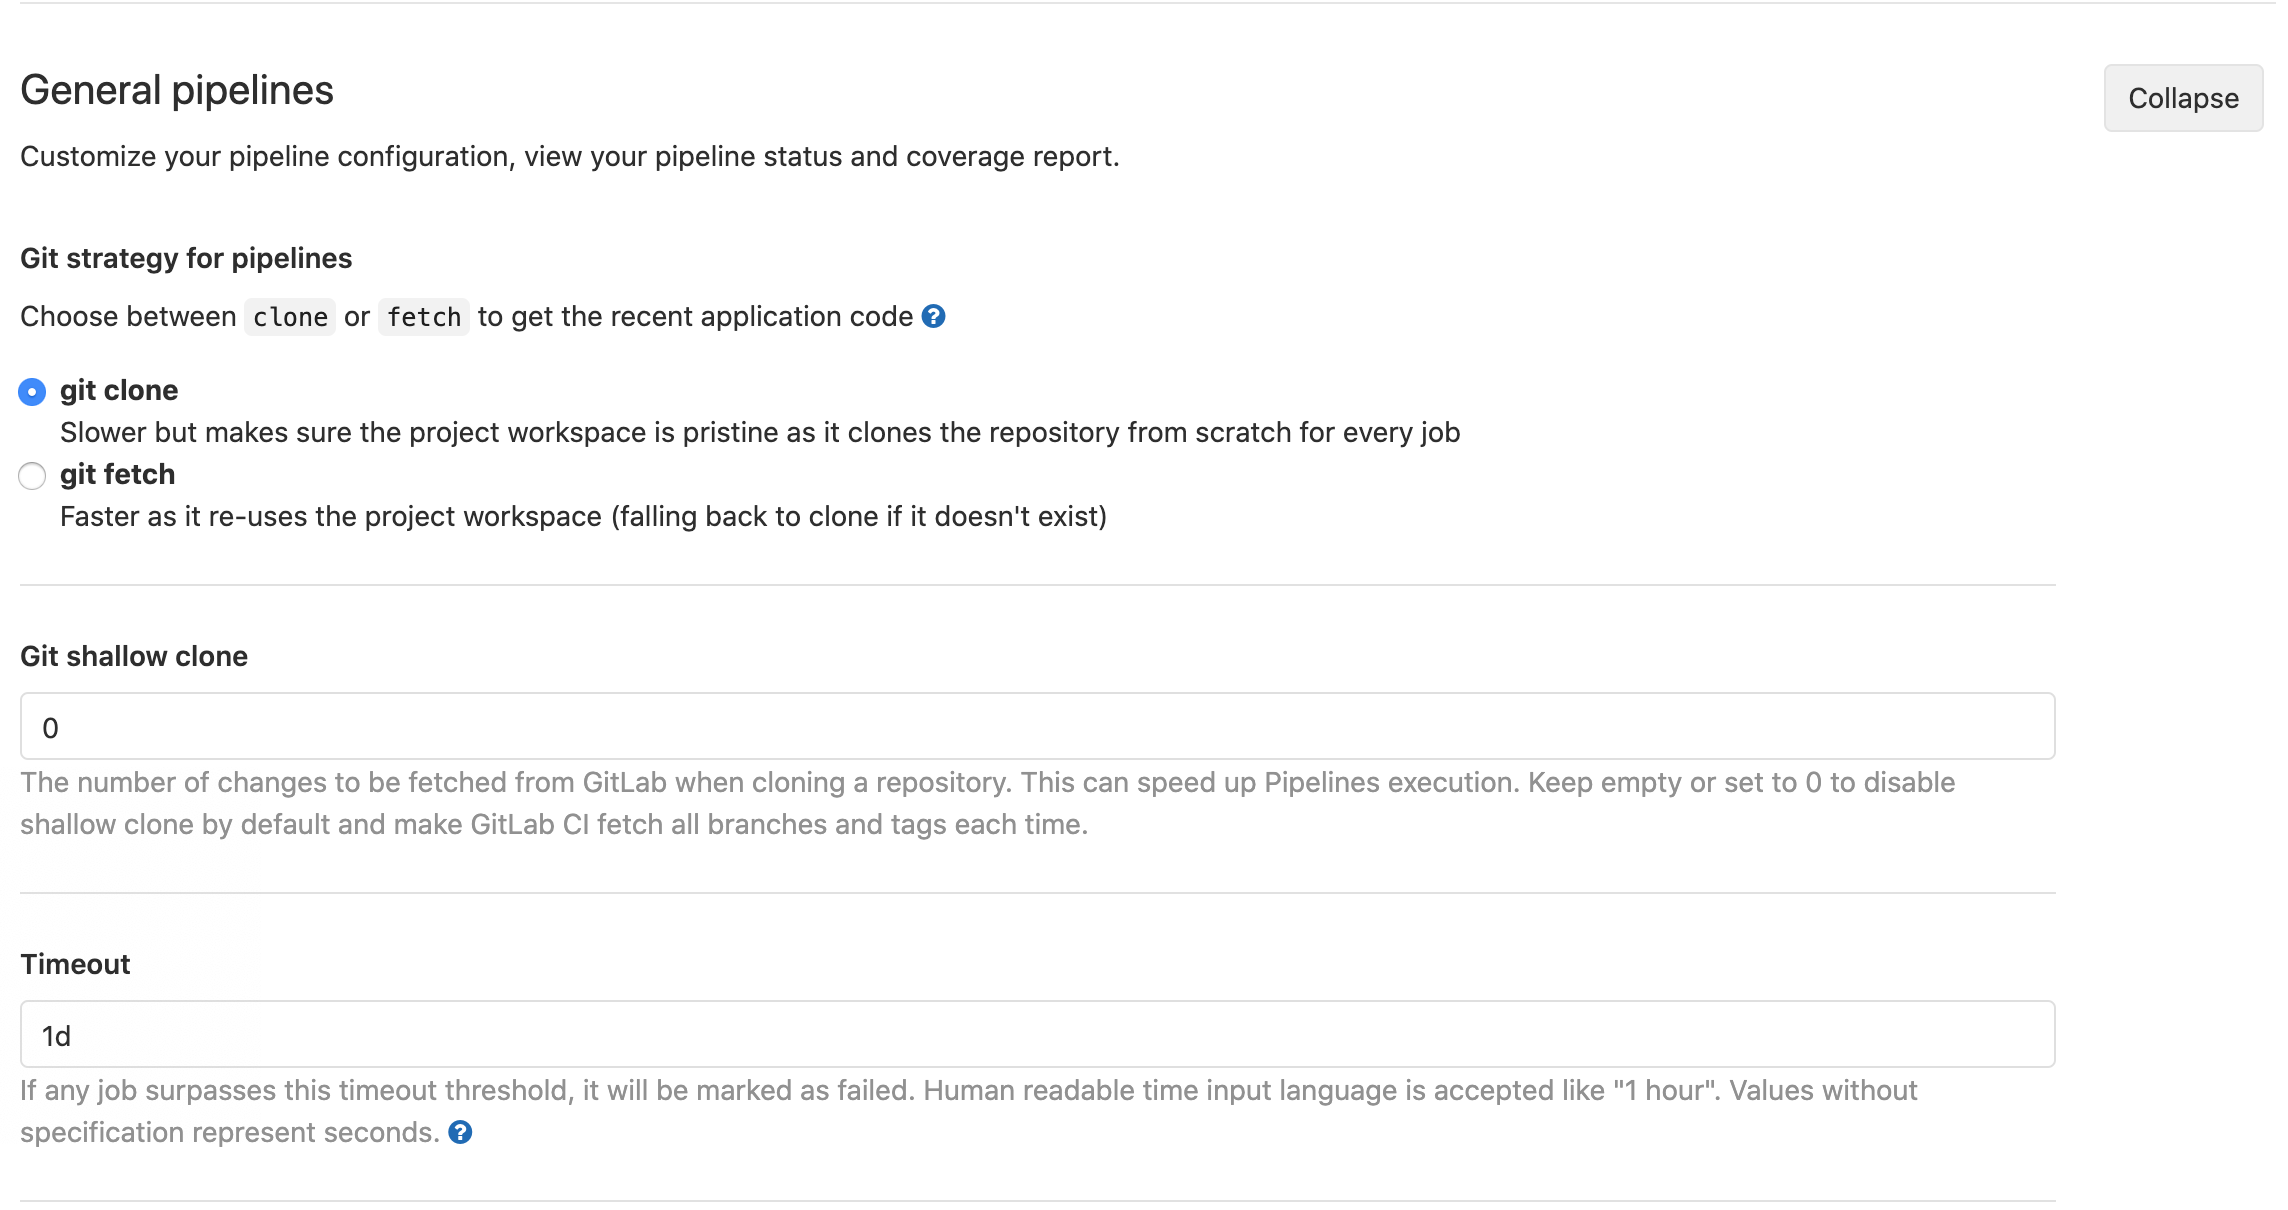
Remember to save the changes!
Add your service account to the members#
Go to https://gitlab.cern.ch/
The gitlab-ci.yml configuration file#
Now we need to add our CI configuration file. Open a terminal and go back to the path, where you cloned the PiLUP_devel repository.
Copy the Hog gitlab-ci.yml template to the main folder of your repository.
cp ./Hog/Templates/gitlab-ci.yml .gitlab-ci.yml
Let’s have a look at the content of this file. Open it with your favourite editor.
include:
    - project: 'hog/Hog'
      file: '/hog.yml'
      ref: 'v0.2.1'

#################### example ###########################
### Change 'example' with your project name

GEN:example:
    extends: .generate_project
    variables:
      extends: .vars
      PROJECT_NAME: example
      HOG_ONLY_SYNTH: 0 # if 1 runs only the synthesis

SIM:example:
    extends: .simulate_project
    variables:
      extends: .vars
      PROJECT_NAME: example
We need to change the reference value to point to correct Hog version. In this tutorial we are using Hog2021.2.
include:
    - project: 'hog/Hog'
      file: '/hog.yml'
      ref: 'Hog2021.2-2'
The project that we want to run on the CI is called simple, so the yaml would look like,
GEN:simple:
    extends: .generate_project
    variables:
      extends: .vars
      PROJECT_NAME: simple
      HOG_ONLY_SYNTH: 0 # if 1 runs only the synthesis

SIM:simple:
    extends: .simulate_project
    variables:
      extends: .vars
      PROJECT_NAME: simple
Save the file and push it to the remote.
git add .gitlab-ci.yml
git commit -m "FEATURE: Enabling Hog Continuous Integration"
git push
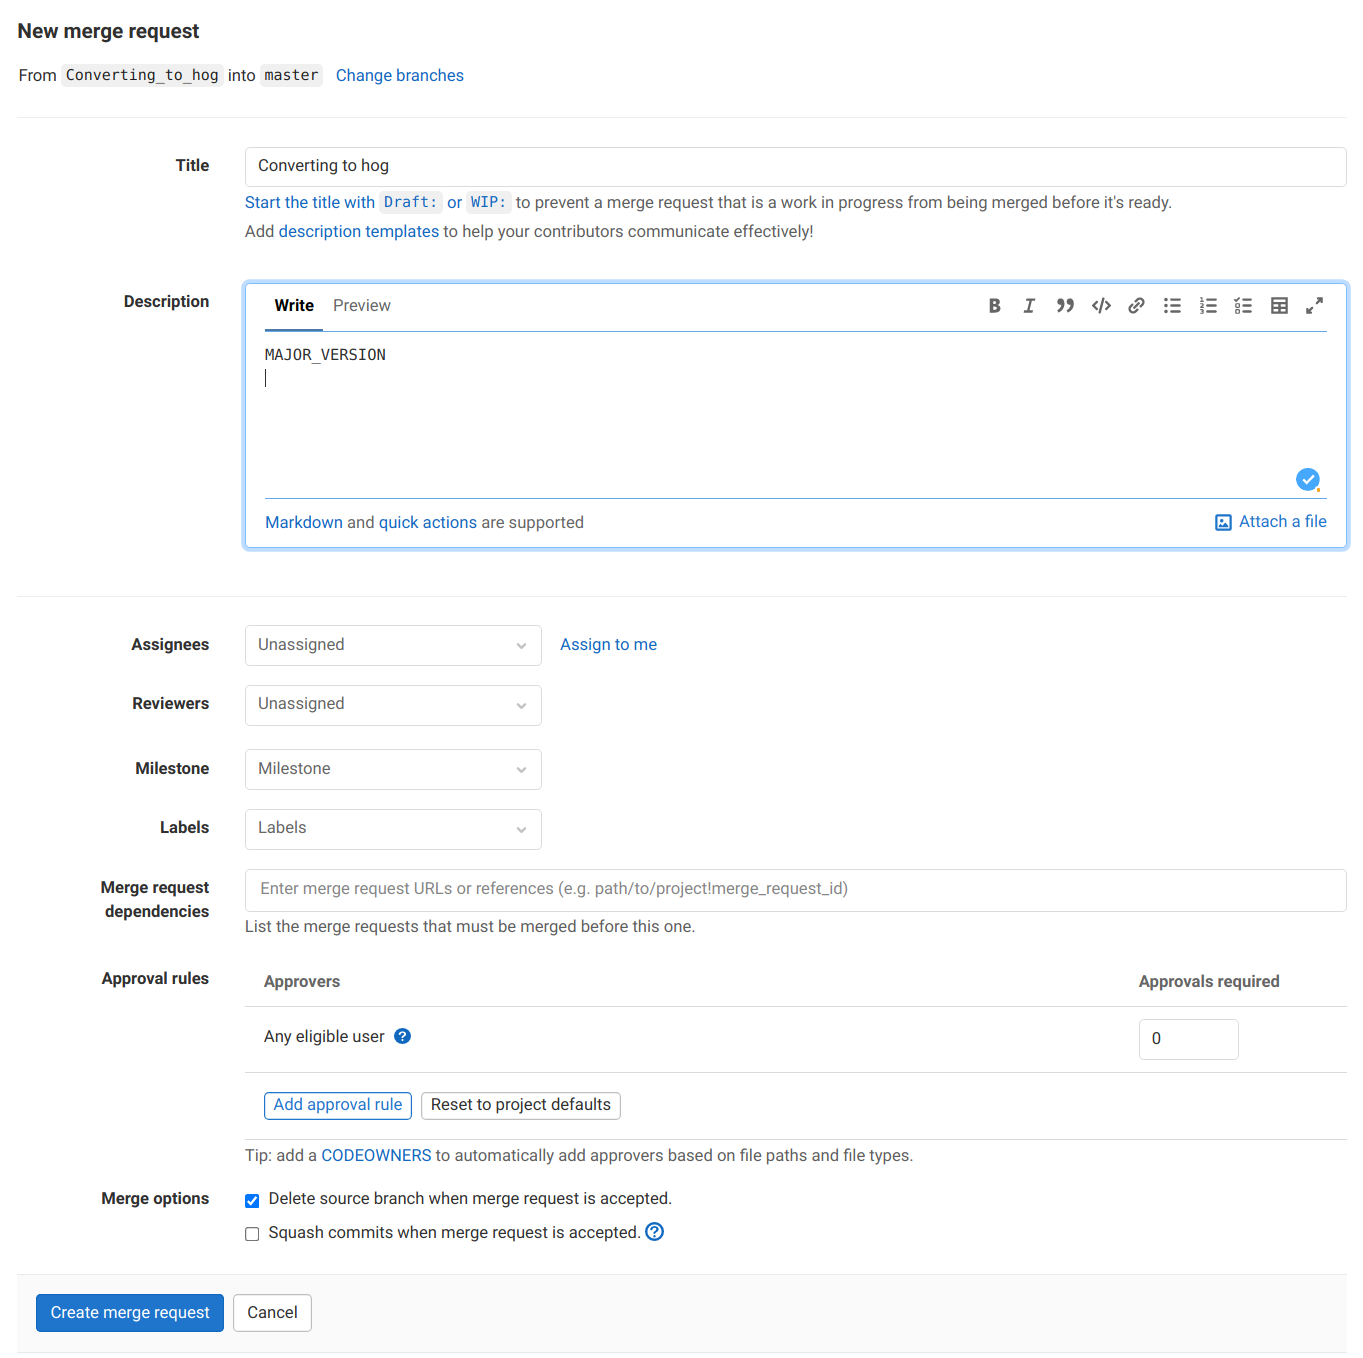
We are now ready to open the merge request, by either visiting the link git suggests in the output log, or going to https://gitlab.cern.ch/New merge request.
As source branch, select Converting_to_hog and as target the master branch in your repository. Click then on Compare branches and continue.
In the next page, write in the description,
MAJOR_VERSION
In this way, Hog will increase the Major number, when creating the new tag once the merge request is accepted. By default, Hog increases the patch number. More info here.
Leave the remaining fields empty and click on Create merge request.
This will trigger the merge request pipeline (info here). While we wait for the pipeline to finish, one can explore the different executed jobs.
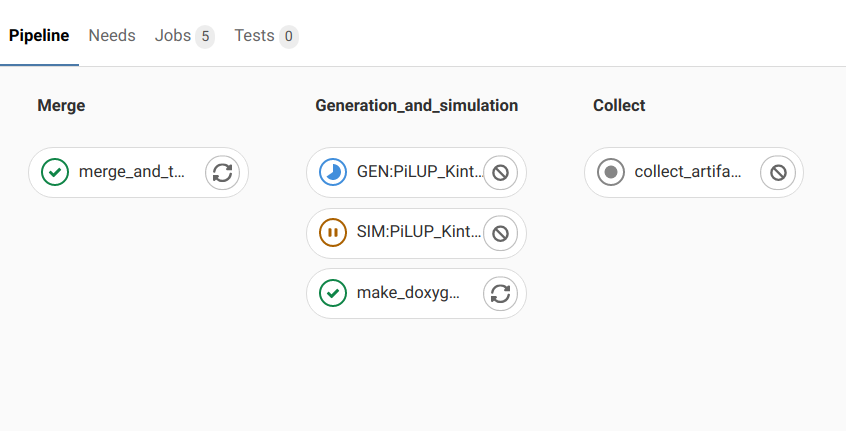
Once this done, Hog will write a message in the Merge Request page, with a summary of the build projects with timing and versions. You can also have a look at the produced binary files, by downloading the artifacts of the collect_artifacts job.
Decompress the download archive, and have a look at the bin folder. It contains the note.md file that will be used later for the release, and a folder for each build project, in our case only PiLUP_Kintex_template. Inside that you’ll find the reports and the produced bit files.
Local and CI bit-files
Try to do a diff between the bit-file you produced locally in the previous chapter, and the one just downloaded from the CI. They should be identical!
Now we can finally merge our request. Go back to the merge request page, and click on Merge.

This triggers the master and later the tag pipelines, which create the tag and gitlab release. Finally, you can have a look at the generated release at https://gitlab.cern.ch/
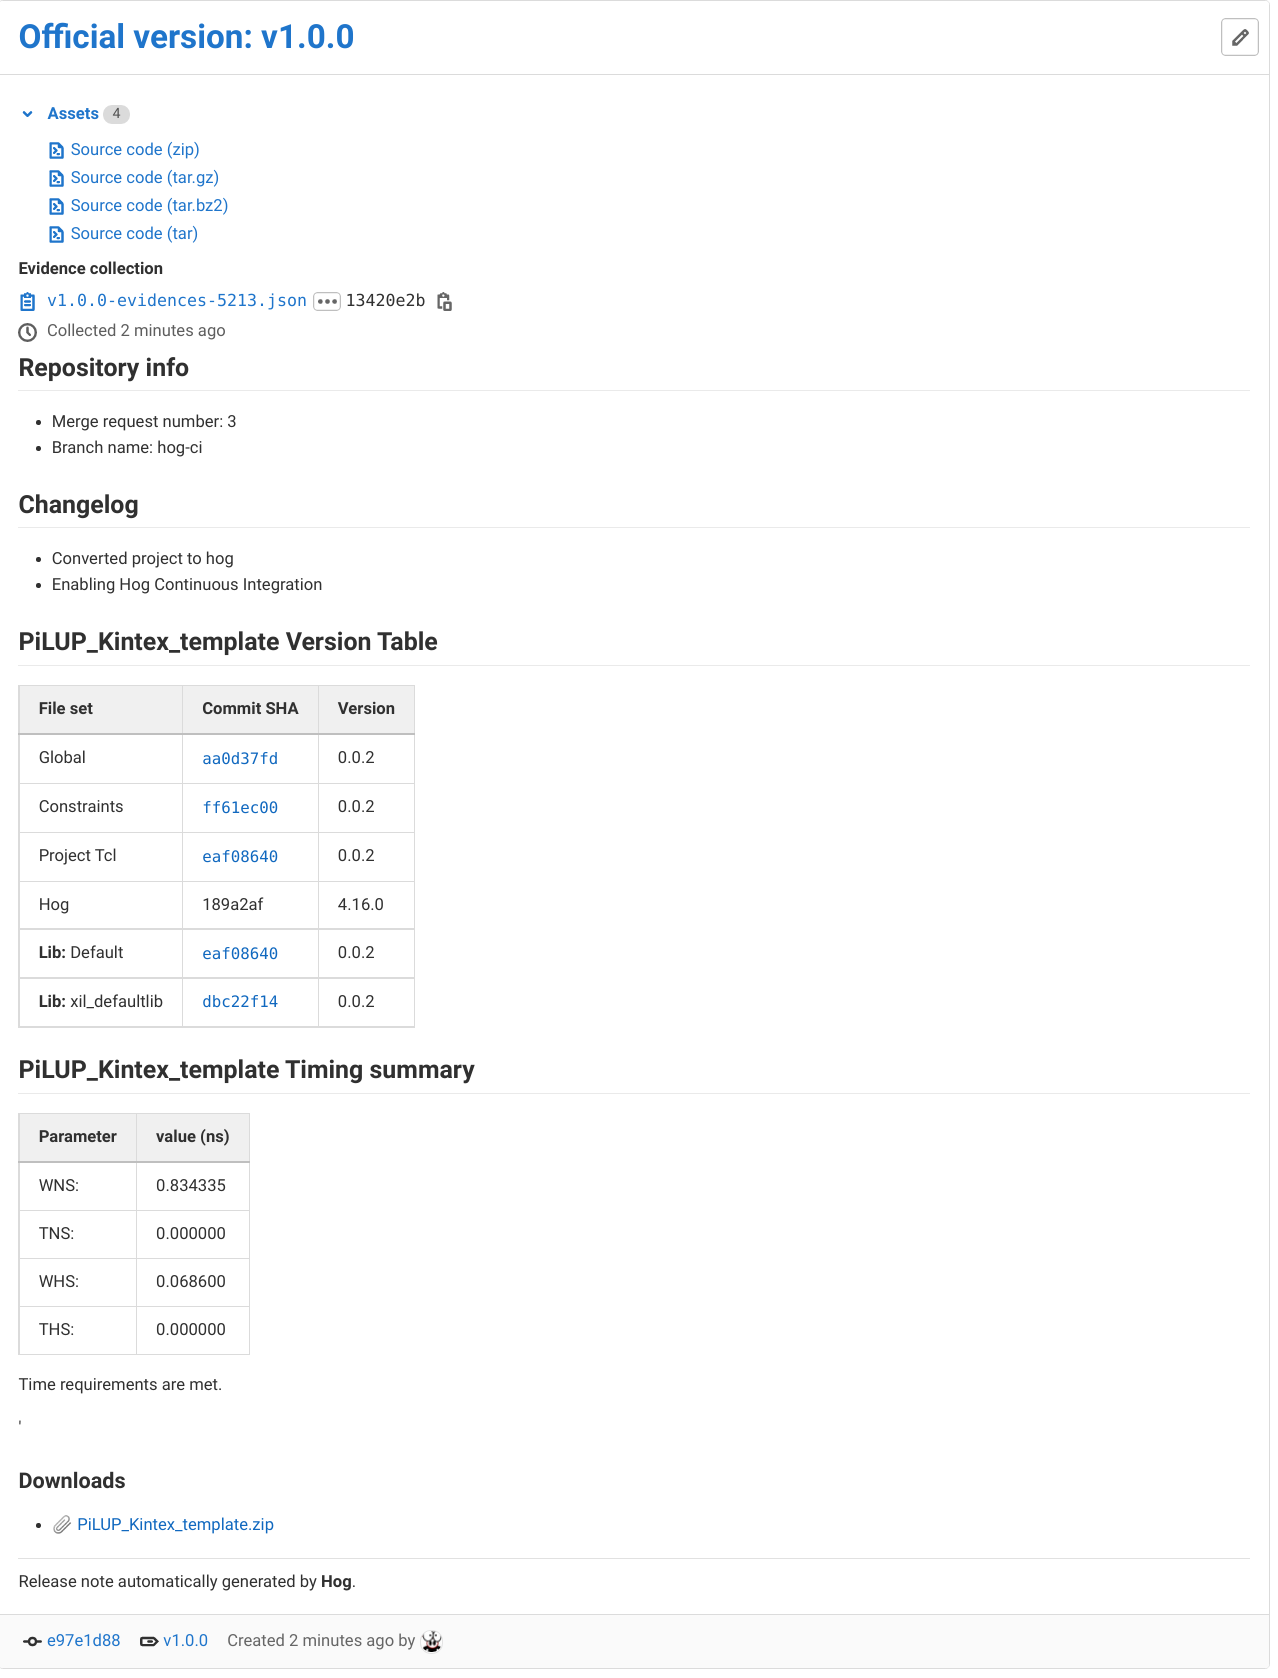
You can see how the pipeline artifacts have been attached to the release. If you configured EOS, these have been also copied to your storage.
The dynamic CI (Optional)#
An experimental feature of Gitlab allows the developer to dynamically generate the yaml configuration. Hog supports this feature, even if it still recommended to use the standard CI.
To enable the dynamic CI, one should include the hog-dynamic.yml in the .gitlab-ci.yml,
include:
    - project: 'hog/Hog'
      file: '/hog-dynamic.yml'
      ref: 'Hog2021.2'
That’s it! For the dynamic CI you don’t need to configure individually each job. Hog will look for each project in the Top folder and create dynamically the CI jobs, which will be run in a child pipeline. By default, both implementation and simulation jobs are created for each project. It is possible to configure the single projects, by adding a ci.conf file in the Top project directory. More info here.
Create a new branch, commit the modified .gitlab-ci.yml and open a new merge request.
git checkout -b dynamic_ci
git add .gitlab-ci.yml
git commit -m "FEATURE: Dynamic Continuous Integration"
git push
Opening the merge request enables the dynamic CI pipeline.
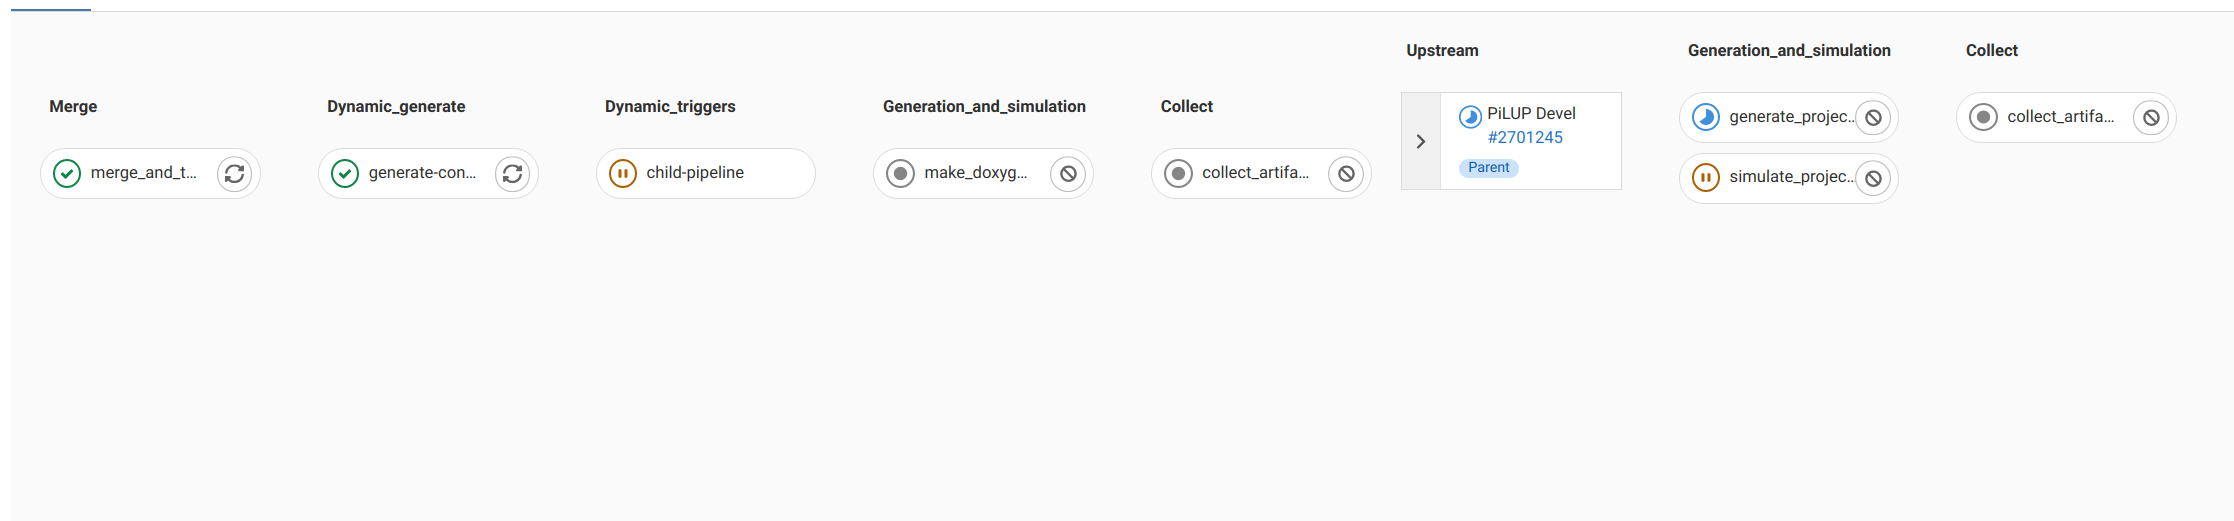
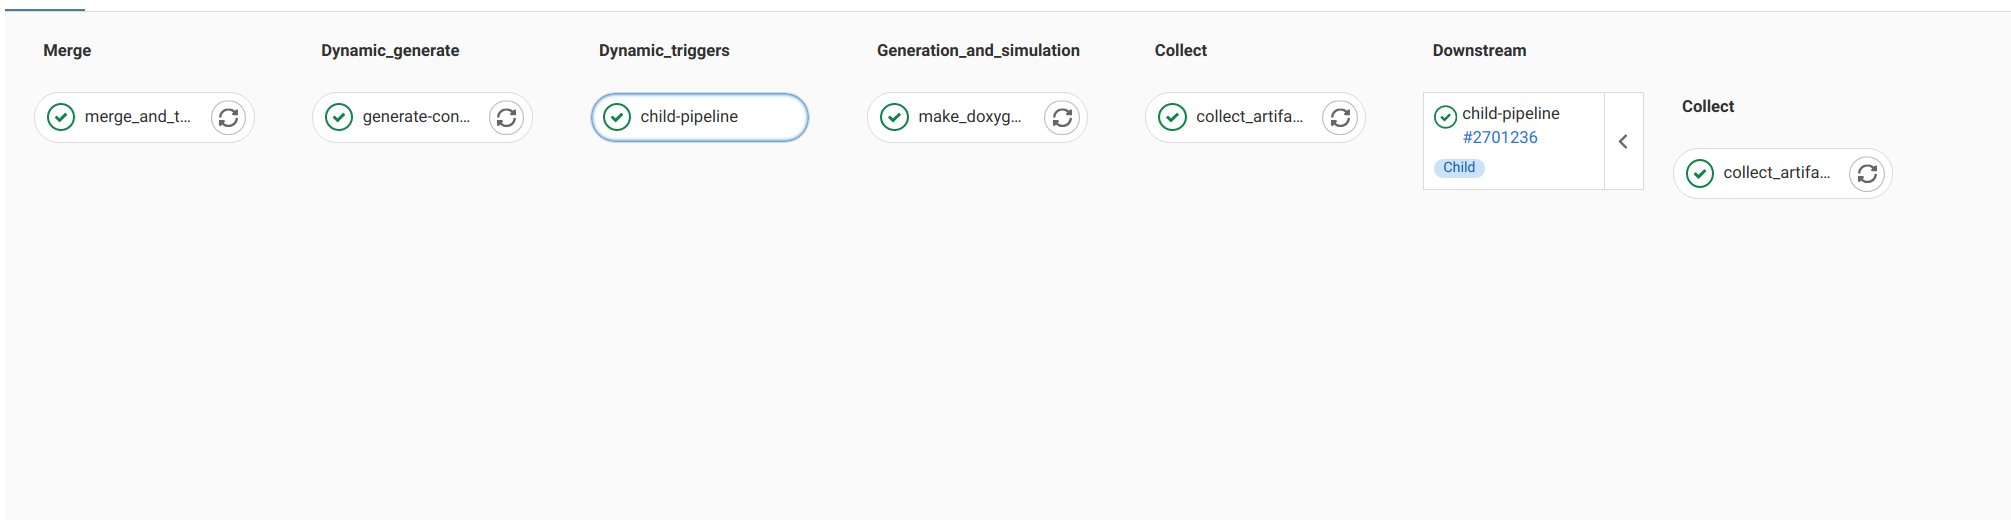
The jobs are created in the dynamic_generate stage, and run in the child pipeline, in the Upstream section.
The dynamic CI allows the developers to save resources and computing time, when enabling the HOG_CHECK_PROJVER variable.
If this is enabled, in the standard CI, Hog runs in any case all the generation and simulation jobs specified in the YAML file, but it stops the execution before starting the synthesis or the simulation, if the project has not been changed with respect to the target branch.
The dynamic CI, on the other hand, performs this check before creating the individual project jobs. If you now, enable the variable in the CI/CD settings of your repository, and relaunch the pipeline by doing a fake commit (just change the README for instance), you will see that the child-pipeline this time consists only of the collect_artifact job.