
How to Convert an Existing Project to Hog#
Converting an existing project to Hog involves copying your source files into a git repository, adding Hog as a submodule, creating Hog list files (text files containing the names of your source files), and writing a hog.conf file to store the project’s properties.
Before You Start#
This guide assumes you are starting from a clean repository and want to convert a Vivado project stored in a local folder.
If you are migrating to Hog without changing repositories, you can follow these instructions but skip the creation of a new local repository. In this case, consider working in a new branch.
Suppose your new repository is called new_repo with URL new_repo_url, your project is named myproject, and it is currently stored in a local folder mypath. If you do not have a new repository, create one on GitLab.
Creating the Git Repository#
First, create a new folder for your HDL design, initialize it as a git repository, and connect it to the remote repository:
mkdir new_repo
cd new_repo
git init
git remote add origin <new_repo_url>
Here, <new_repo_url> is the URL to your new empty repository. You can obtain this URL from your GitLab server after creating a new repository.
By default, you will work on the master branch. If you prefer, you can create and switch to a new branch:
git checkout -b first_branch
git push origin first_branch
Add Hog to Your Project#
Hog should be included as a submodule in the root of your repository. To do this, run:
git submodule add ssh://git@gitlab.com:7999/hog-cern/Hog.git
If you prefer https:
git submodule add https://gitlab.com/hog-cern/Hog.git
Or for krb5:
git submodule add https://:@gitlab.com:8443/hog-cern/Hog.git
However, it is recommended not to include the protocol explicitly, but to let it be inherited from the parent repository. To do this, edit the .gitmodules file with your preferred text editor:
vim .gitmodules
Modify the URL value to use a relative path, for example:
[submodule "Hog"]
  path = Hog
  url = ../../hog-cern/Hog.git
If your repository is stored on gitlab.cern.ch, the URL should be:
url = ../../hog/hog.git
Now update the submodule:
git submodule update
This will trigger an error if the repository path is incorrect.
Copying Templates from Hog and Committing#
Now that you have Hog locally, you can start setting up your repository. Hog provides templates you can use. For example, to add a .gitignore:
cp Hog/Templates/gitignore .gitignore
Note
You may need to modify your .gitignore file if you have a more complex directory structure, especially for IP and BD files. The Hog template assumes IPs are stored in IP/ip_name/ip_name.xci. Adjust as needed for your setup.
Make your first commit:
git add .gitignore .gitmodules Hog
git commit -m "Add Hog to the repository"
git push origin master
If you are working in a branch other than master, replace the last command with:
git push origin your_branch_name
Early Tagging of Your Repository#
Hog assumes that at least one version tag of the form vM.m.p is present in your repository. Create the first Hog tag:
git tag -m "First version" v0.0.1
git push --tags
The tag message is necessary to prevent git from creating a lightweight tag.
Convert Your Project to Hog#
Automatic Conversion#
Warning
This feature is currently only supported for Vivado.
If you want to integrate your project(s) within the Hog framework without modifying your directory structure, you can do so almost automatically. Copy your entire directory content, including the Vivado project, into the new repository:
cp ../old_repo/* .
Warning
If your project contains submodules, do not copy them from the original repository. Instead, add them as submodules. See the submodules section for details.
Now, run the Init.sh script:
./Hog/Init.sh
This script scans for all non-Hog Vivado projects in your directory and (optionally) converts them into Hog projects. It automatically creates a Top directory, with one subdirectory for each Vivado project converted. Inside each, you’ll find a hog.conf file and a list subdirectory.
Your old Vivado project(s) are now obsolete and should be deleted.
Commit your project files (e.g., Top directory, source files, IPs[1], etc.):
git add Top
git add path_1/file_1.vhd
git add path_2/file_2.xdc
git add path_3/file_3.xci
git commit -m "Add files to project"
To check for uncommitted files:
git status
Warning
When copying your old directory, you may also copy many temporary files you don’t want in your repository. Be careful to add only the necessary files. Proper .gitignore rules can help.
Now you are ready to create your Hog project (stored in the Projects directory):
./Hog/Do CREATE myproject
Manual Conversion#
Generating the Hog Directory Structure#
Create a directory structure similar to this:
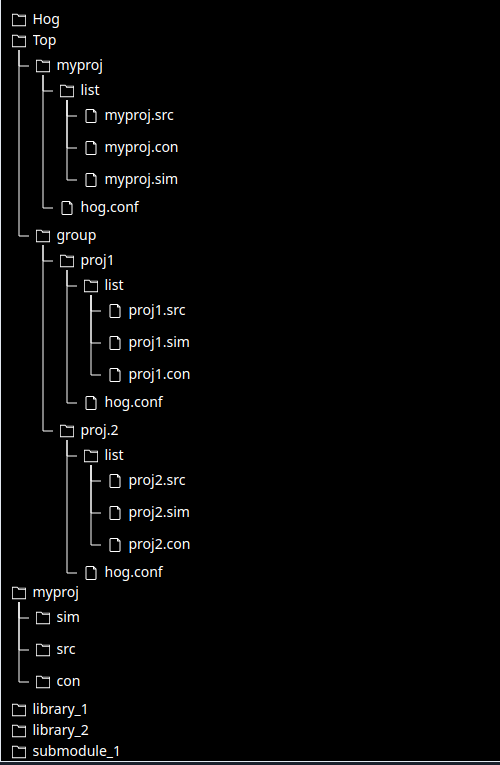
A full description of each folder is in the Hog User Manual.
Top Folder#
Every Hog-handled HDL repository must have a Top directory, which stores configuration files needed to create HDL projects. Each subdirectory inside Top (the project top-directory) represents an HDL project.
Create your project top-directory:
mkdir -p Top/myproject
Each project top-directory must contain a list subdirectory for Hog list files:
mkdir Top/myproject/list
A file named hog.conf must be in the project top-directory. Hog reads this configuration file to create a project.
This is a recap of what we have learned up to now:
A
Topfolder must be in the repositoryInside this folder, there is one subfolder for each project in the repository, called the project top-directory
Inside each project’s top-directory there is 1. a
listsubdirectory containing the list files 2. ahog.conffile;
For more advanced Hog features, additional files and folder are located in the Top folder, but we do not discuss them now for simplicity.
To create the project’s hog.conf script, we will start from the template provided in the Hog/Templates folder:
cp Hog/Templates/hog_vivado.conf Top/myproject/hog.conf
Templates are provided for Vivado, PlanAhead, and Quartus: hog_vivado.conf, hog_ise.conf, and hog_quartus.conf.
Edit the configuration file as needed (e.g., FPGA name, synthesis/implementation strategies). The template contains comments to guide you.
Commit your changes:
git add Top
git commit -m "Add Hog Top folder"
Note
Hog supports a complex subfolder structure. For example:
mkdir -p Top/subfolder/myproject
The resulting project name will be subfolder/myproject.
Importing Source Files#
Copy your source, simulation, and constraint files into the repository. Except for reserved directories (Top, Projects, bin), you can organize your files as you prefer.
For example, create a directory for your project files:
mkdir -p lib_myproject/source lib_myproject/simulation lib_myproject/constraint
cp ../old_repo/source_1.vhd lib_myproject/source
cp ../old_repo/source_2.v lib_myproject/source
cp ../old_repo/simulation_1.vhd lib_myproject/simulation
cp ../old_repo/simulation_2.v lib_myproject/simulation
cp ../old_repo/constraint_1.xdc lib_myproject/constraint
cp ../old_repo/constraint_2.tcl lib_myproject/constraint
Add the file paths to the appropriate list files. For example:
Top/myproject/list/myproject.srcfor source filesTop/myproject/list/myproject.simfor simulation filesTop/myproject/list/myproject.confor constraint files
Note
Paths in list files are relative to the repository root.
You can add comments (lines starting with #) and empty lines in list files.
Check that files are correctly picked up by regenerating the Hog project:
./Hog/Do CREATE myproject
Open the created project in Projects/myproject/myproject.xpr (or .qpf for Quartus) and verify all files are present. If not, update the list files and recreate the project. When satisfied, commit your work:
git add lib_myproject
git add Top/myproject/list/myproject.src
git add Top/myproject/list/myproject.sim
git add Top/myproject/list/myproject.con
git commit -m "Add source files"
Submodules#
If your project uses files from another repository, add it as a git submodule:
git submodule add my_submodule_url
Add submodules wherever you like in your repository. Files from submodules must also be listed in a Hog list file.
Intellectual Properties (IP)#
IP files can be stored anywhere in your repository or submodules. To avoid committing generated files, follow these rules:
Each IP file (
.xcifor Vivado) must be in a subfolder named after the IP (excluding the extension).Only the IP file should be committed (e.g.,
.xcifor Vivado,.ipfor Quartus).Use a
.gitignorefile to ignore all non-IP files (a template is provided inTemplates).
For each IP:
mkdir -p path_to_your_ips/ip_name/
cp ../old_repo/ip_name.xci path_to_your_ips/ip_name/
Add the .xci files to a .src list file (e.g., IP.src).
Note
There is no concept of library for IPs, so it is common to use a separate .src file for them. You may also add them to your main source list file if you prefer.
Check that files are picked up by regenerating the project:
./Hog/Do CREATE myproject
If satisfied, commit your changes:
git add path_to_your_ips
git add Top/myproject/list/IP.src
git commit -m "Add IP files"
If you have .coe or similar files for RAM initialization, add them to a .src list file and specify them with a relative path when customizing the IP.
The Top Module of Your Project#
Specify the top module with the property top=top_module_name. For example, if your top module is mytop in mytop.vhd, your list file would include:
# Example .src file
mytop.vhd top=mytop
...
Note
If not specified, Hog uses top_<project_name> as the default top module.
Hog provides a set of parameters/generics to your top module at synthesis. You should add these to your top module to store versioning information. See the parameters/generics list and templates for details.
Code Documentation#
Hog can help you document VHDL code by automatically generating and deploying documentation using Doxygen version 1.8.13 or later.
If your code uses Doxygen-style comments, you can generate documentation by creating a doxygen directory containing the necessary files, including a doxygen.conf file. You can copy a template from Hog/Templates/doxygen.conf and modify it.