
Tutorial Part I: Create and Manage a HDL repository with Hog#
This tutorial will show how to create a Hog project starting from an example Vivado project (BFT). For this tutorial we will use Hog version Hog2025.1-3.
To run this tutorial, you need a machine with git and Vivado version 2022.2 installed.
Step 1: Create an example Vivado project#
Let’s start our tutorial by switching to a new empty directory:
mkdir Hog-Tutorial
cd Hog-Tutorial
Now we open Vivado and we create an example project. From the Project Template page, select BFT.
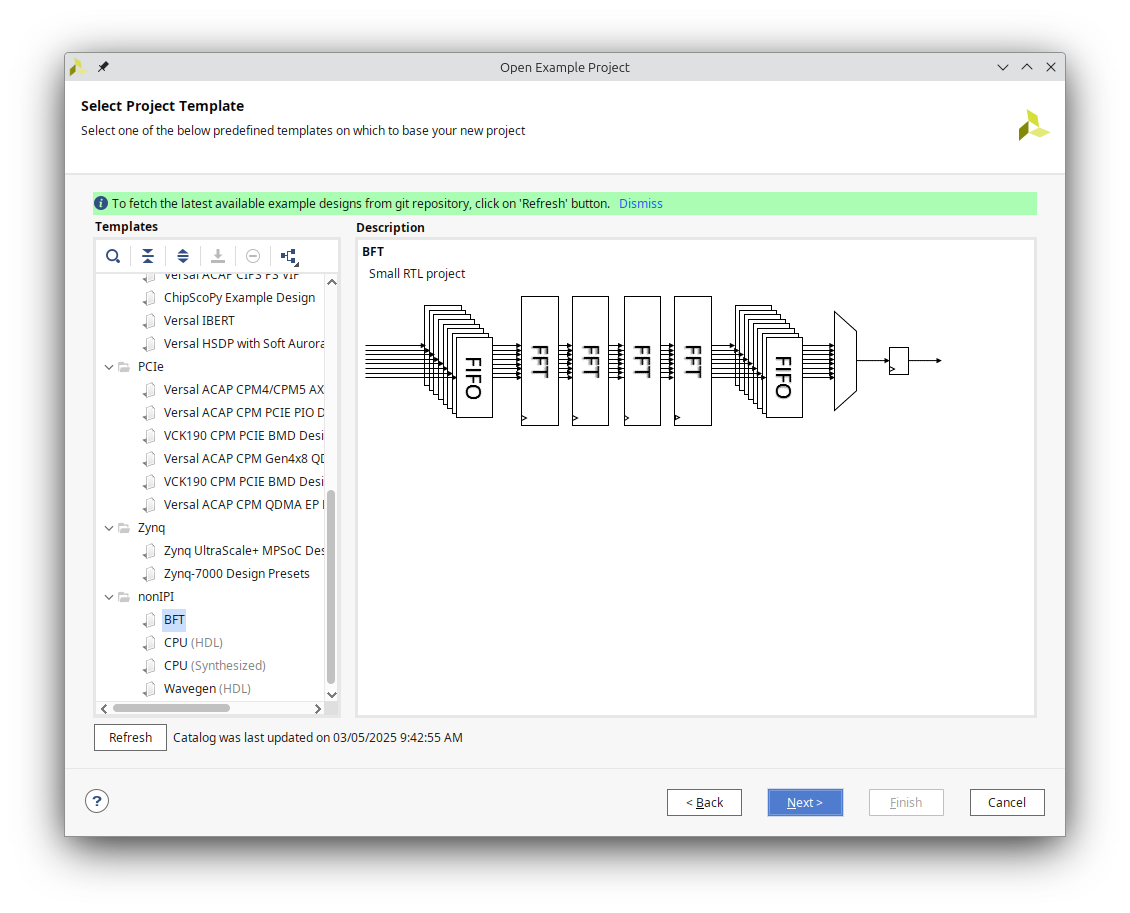
Click Next, give the project a name, and make sure that the project is saved in the directory you just created. Click Next, select the default FPGA part (xc7k70tfbg484-2), and click continue to create the project.
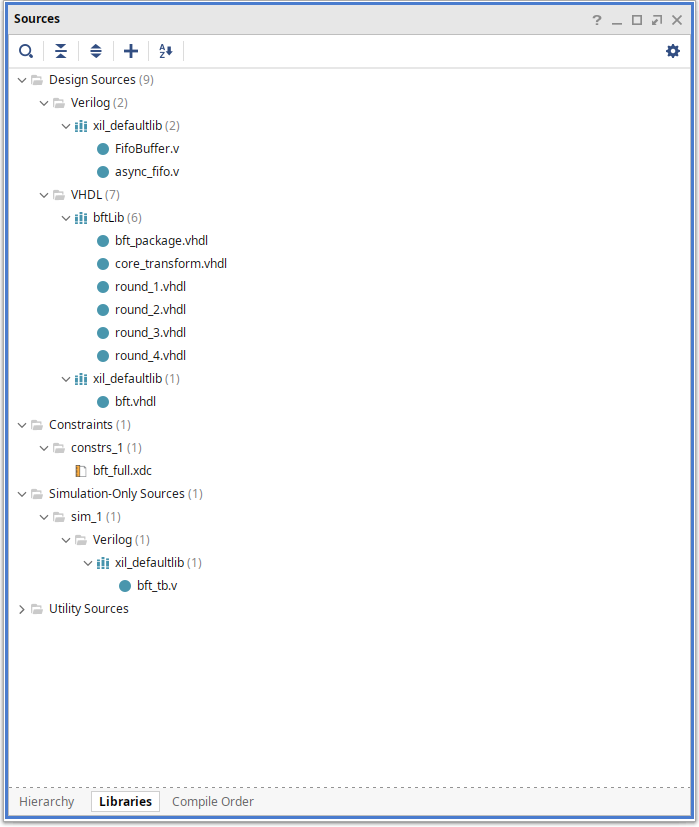
Once the project is open, we can have a look at its content. On the sources window, open the Libraries tab to explore the sources in the project. The project contains two Verilog files, six VHDL modules, assigned to the bftLib library, and the top VHDL module bft in the xil_defaultlib library. The project contains also a constraint file bft_full.xdc and a Verilog test bench bft_tb.v.
Step 2: Create and initialise a git repository#
It’s time to create a new git repository and add our project files on it.
We start by creating a new blank project on GitLab.com by clicking here.
We select Hog-Tutorial as project name, select the Initialize the Project with a README file option, and we click on Create Project.
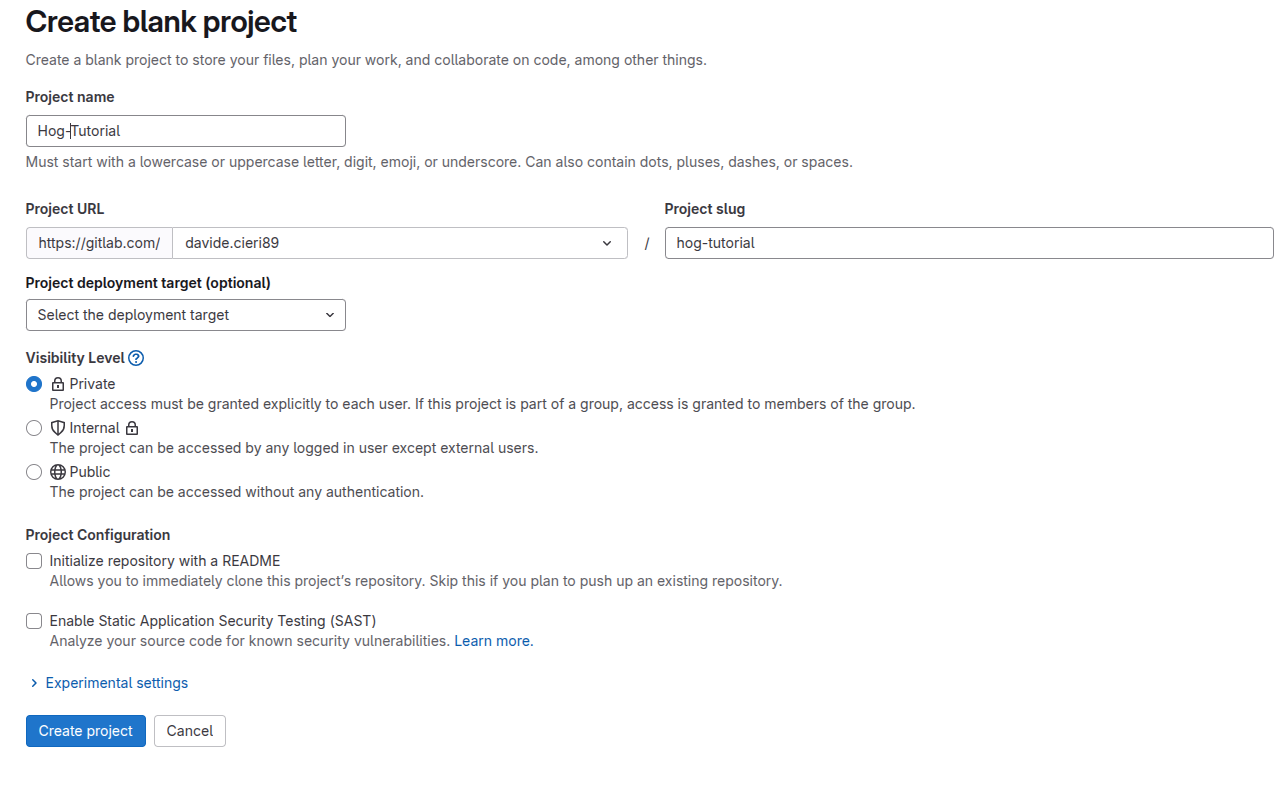
Now we copy the project URL, e.g. https://gitlab.com/$USER/hog-tutorial.git, that will be added as our repo URL.
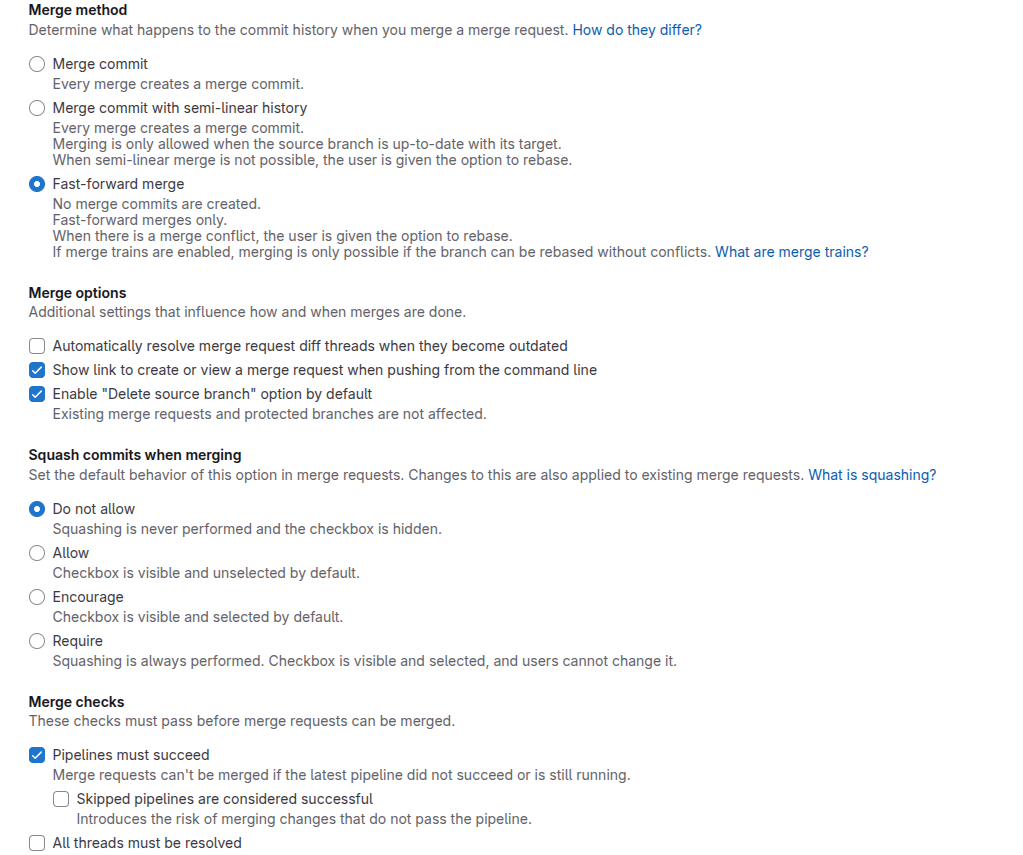
Once the project is created, we need to configure the GitLab repository to work with Hog. Go to Settings->Merge Requests and set the following options, and save the changes.
Merge method: Fast-forward merge.
Squash commits when merging: Do not allow.
Merge checks: Pipelines must succeed.
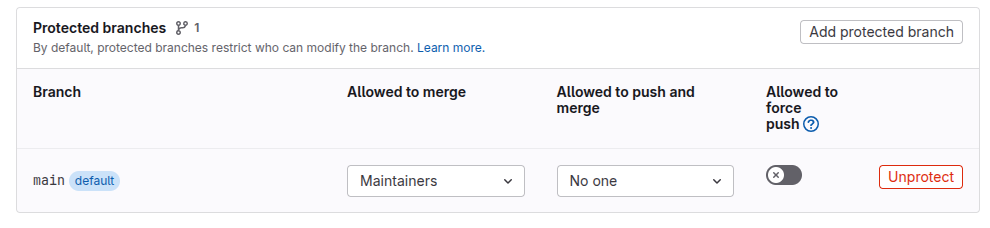
Now, go to Settings->Repository, open the Protected branches section, check that the main branch to the list of protected branches, and remove the option to push to it for everyone. This is necessary, since Hog requires developers to work with a Git feature branch workflow.
Now, on a shell, go back to the Hog-tutorial folder, and setup the git repository:
git init
git remote add origin https://gitlab.com/$USER/hog-tutorial.git
git fetch
git init
git remote add origin git@gitlab.com:$USER/hog-tutorial.git
git fetch
Let’s now create a new branch hogify and add the Hog submodule, to our repository.
git checkout -b hogify
git merge origin/main
git submodule add https://gitlab.com/hog-cern/Hog.git
Note
If you are using the CERN GitLab add the following submodule.
git submodule add https://gitlab.cern.ch/hog/hog.git
Step 3: Hogify the repository#
Now that we have a project in a git repository, we can convert it to a Hog project, to benefit from all the Hog functionalities.
The simplest way to do this is to run the Hog/Init.sh script.
./Hog/Init.sh
When prompted, set the following answer for the script.
Do you want to compile the simulation libraries for Vivado (this might take some time)? n
Found existing Vivado project BFT.xpr. Do you want to convert it to a Hog compatible project? (creates listfiles and hog.conf)? y
Do you want to create projects now (can be done later with CreateProject.sh)? n
Do you want to add three buttons to the Vivado GUI to check and update the list files and the project hog.conf file automatically? y
Your repository does not have Hog-compatible tags, do you wish to create an initial tag v0.0.1 now? y
Now push the just created tag to the remote
git push --tags
Let’s have a look at the files that Hog created. In the repository, you should have now a Top folder, with the following content.
Top
└── BFT
    ├── hog.conf
    ├── list
    │   ├── bftLib.src
    │   ├── others.src
    │   ├── sim_1.sim
    │   ├── sources.con
    │   └── xil_defaultlib.src
    └── sim.conf
Hog created a folder BFT, which contains all the configuration files to create the BFT project.
The hog.conf file contains all the Vivado project’s properties. In this case, the only settings extracted from the existing projects were the FPGA’s part number and the project’s target language. The first line of hog.conf specifies the version of the IDE required to build the project.
# vivado 2022.2

[main]
PART=xc7k70tfbg484-2
TARGET_LANGUAGE=Verilog
The sim.conf file contains all the properties related to the simulation. In this case, we have a single simulation set in the project [sim_1], which is set as active. The bft_tb module is set as a top module for the simulation.
[sim_1]
ACTIVE=1
TOP=bft_tb
This file contains a list of VHDL source files that will be associated to the bftLib library. The filetype (VHDL 93) is set using 93 property for each file.
BFT/BFT.srcs/sources_1/imports/Sources/bftLib/bft_package.vhdl 93
BFT/BFT.srcs/sources_1/imports/Sources/bftLib/core_transform.vhdl 93
BFT/BFT.srcs/sources_1/imports/Sources/bftLib/round_1.vhdl 93
BFT/BFT.srcs/sources_1/imports/Sources/bftLib/round_2.vhdl 93
BFT/BFT.srcs/sources_1/imports/Sources/bftLib/round_3.vhdl 93
BFT/BFT.srcs/sources_1/imports/Sources/bftLib/round_4.vhdl 93
This file contains a list of the the source files in the project, which are not associated to a particular library (e.g. Verilog, txt, coe, IPs, BD files).
BFT/BFT.srcs/sources_1/imports/Sources/FifoBuffer.v
BFT/BFT.srcs/sources_1/imports/Sources/async_fifo.v
This file contains a list of the VHDL source files in the project that will be associated to the xil_defaultlib library. In our case, we have just one file. The top=bft keyword in the file, set the bft module as top module of the project.
BFT/BFT.srcs/sources_1/imports/Sources/bft.vhdl top=bft 93
This file contains a list of the constraints file in the project.
BFT/BFT.srcs/constrs_1/imports/xc7k70tfbg484-2/bft_full.xdc
This file contains a list of the simulation files in the sim_1 simulation set. The lib=others keyword, set the library for the file. In this case, it does not make a difference, since the concept of library is not available in Verilog.
BFT/BFT.srcs/sim_1/imports/Sources/bft_tb.v lib=others
Let’s now commit the files necessary to create the project to git.
git add Top BFT/BFT.srcs
git commit -m "FEATURE: Adding source and configuration files to the repo"
Note
Commit messages starting with the FEATURE: keyword are picked up by the Hog-CI to fill the changelog for the GitLab release.
We are now ready to create our project with Hog.
./Hog/Do C Top/BFT
Once this is done, you can open the new project with Vivado and compare with the original project. You should not see any difference.
vivado Projects/BFT/BFT.xpr &
Let’s now run the synthesis. Hog integrates some tcl scripts in the Vivado workflow. In particular at the pre-synthesis stage, it checks that all the project source and configuration files have been committed to git, and that the content of the Vivado project corresponds to what is declared in Hog configuration and list files.
This check can be done at any time by clicking on the CHK button, that Hog added to the Vivado toolbar.
The pre-synthesis also calculates the version of the firmware and each library, starting from the latest available git tag. By default, Hog increases the patch number, so our new version will be 0.0.2.
 ------------------------- PRE SYNTHESIS -------------------------
 05/03/2025 at 11:50:23
 Firmware date and time: 05032025, 00114523
 Global SHA: 79f6ce9, VER: 0.0.2
 Constraints SHA: 79f6ce9, VER: 0.0.2
 Top SHA: 79f6ce9, VER: 0.0.2
 Hog SHA: 6c3e80e, VER: 9.30.3
 --- Libraries ---
 xil_defaultlib SHA: 79f6ce9, VER: 0.0.2
 bftLib SHA: 79f6ce9, VER: 0.0.2
 -----------------------------------------------------------------
To change the default behaviour, please have a look at the Hog Versioning section.
We can change some settings in the project, and launch the synthesis again. For example, we could set a different synthesis’ strategy, and launch the synthesis again.
You’ll notice that Hog issues a few critical warnings, signaling that the project configuration is different from what is written in the hog.conf file.
CRITICAL WARNING: [Hog:MsgAndLog-0] Project synth_1 setting STEPS.SYNTH_DESIGN.ARGS.DIRECTIVE value "AreaOptimized_high" does not match hog.conf "".
CRITICAL WARNING: [Hog:MsgAndLog-0] Project synth_1 setting STEPS.SYNTH_DESIGN.ARGS.CONTROL_SET_OPT_THRESHOLD value "1" does not match hog.conf "".
INFO: [Hog:Msg-0] /home/dcieri/hog_tutorial/test_tutorial/Top//BFT/sim.conf matches project. Nothing to do
CRITICAL WARNING: [Hog:Msg-0] Number of errors: 2 (Design List files = 0, hog.conf = 2).
INFO: [Hog:Msg-0] Simulation list files match project. All ok!
INFO: [Hog:Msg-0] Simulation config files match project. All ok!
INFO: [Hog:Msg-0] All done.
CRITICAL WARNING: [Hog:Msg-0] Project list or hog.conf mismatch, will use current SHA (b928834) and version will be set to 0.
If we look at the new version table, we’ll also notice that global version of the project is set to 0.0.0, indicating that the current project results could not be replicated, with the available configuration files.
 ------------------------- PRE SYNTHESIS -------------------------
 05/03/2025 at 12:13:49
 Firmware date and time: 05032025, 00120543
 Global SHA: b928834, VER: 0.0.0
 Constraints SHA: 79f6ce9, VER: 0.0.2
 Top SHA: 79f6ce9, VER: 0.0.2
 Hog SHA: 6c3e80e, VER: 9.30.3
 --- Libraries ---
 xil_defaultlib SHA: 79f6ce9, VER: 0.0.2
 bftLib SHA: 79f6ce9, VER: 0.0.2
 others SHA: 79f6ce9, VER: 0.0.2
 -----------------------------------------------------------------
To fix this, you could either modify the hog.conf manually to set the new strategy, or click on the CONF button in the Vivado GUI. Let’s do the latter, and open again the hog.conf
# vivado 2022.2

[main]
PART=xc7k70tfbg484-2
TARGET_LANGUAGE=Verilog

[synth_1]
STEPS.SYNTH_DESIGN.ARGS.CONTROL_SET_OPT_THRESHOLD=1
STEPS.SYNTH_DESIGN.ARGS.DIRECTIVE=AreaOptimized_high
Hog added the missing properties to the file as expected. Let’s now commit it, and launch the full building process, including the bitstream generation.
git add Top/BFT/hog.conf
git commit -m "FEATURE: Updating synthesis properties"
Once this is done, we can compare the results with the original project, to check that they are exactly the same.
We can now delete all the files belonging to the original project, which are no more necessary.
rm -rf BFT/BFT.cache
rm -rf BFT/BFT.hw
rm -rf BFT/BFT.xpr
If we issue a git status command, we can however still see that there are additional files that are not git-tracked.
11:58:56 ~/hog_tutorial/test_tutorial (hogify*) $ git status
On branch hogify
Untracked files:
  (use "git add <file>..." to include in what will be committed)
        Projects/
        bin/
        vivado.jou
        vivado.log
        vivado_75929.backup.jou
        vivado_75929.backup.log
        vivado_86344.backup.jou
        vivado_86344.backup.log
        vivado_pid91165.str
Most of these are Vivado log files, which are created each time you work with it. In addition to that we also have two folders created by Hog.
Projects: this folder will contain all the Vivado (and other IDE) projects that Hog creates.bin: this folder contains the output products of the synthesis and implementation workflow, including the bitstreams. Have a look at the content of this folder, to see what is saved.
Both folders should not be tracked by git. Therefore, we should list them in our .gitignore file. Hog provides already a template for that, so let’s just copy it in our repo, and commit it.
cp Hog/Templates/gitignore .gitignore
git add .gitignore
git commit -m "FEATURE: Adding gitignore"
If we issue again a git status command, you will see that it is now clean.
Step 4: Working with Vivado IPs#
Let’s see now how to deal with Vivado IPs in Hog. Two options are available, either commit the IP .xci files, or create the IPs at creation time.
Using XCI files in Hog#
We want to replace the FifoBuffer module in the project, with a FIFO IP. Open the IP catalogue and search for the FIFO Generator IP. Set the following settings
IP Location:
<your_repo>/IPFifo Implementation: Independent Clocks Block RAM
Write Width: 32
Write Depth: 16
Read Width: 32
Reset Pin: Check
Enable Reset Synchronization: Check
Enable Safety Circuit: Uncheck
Write Acknowledge: Set (Active High)
Programmable Full Type (Single Programmable Full Threshold Constant)
Programmable Empty Type (Single Programmable Empty Threshold Constant)
Click OK, to create the IP, and generate the output products.
The same could have been done with the following command in the Vivado tcl console.
create_ip -name fifo_generator -vendor xilinx.com -library ip -version 13.2 -module_name fifo_generator_0 -dir <repo_path>/IP
set_property -dict [list CONFIG.Almost_Full_Flag {false} \
  CONFIG.Enable_Safety_Circuit {false} \
  CONFIG.Fifo_Implementation {Independent_Clocks_Block_RAM} \
  CONFIG.Input_Data_Width {32} \
  CONFIG.Input_Depth {16} \
  CONFIG.Overflow_Flag {false} \
  CONFIG.Programmable_Empty_Type {Single_Programmable_Empty_Threshold_Constant} \
  CONFIG.Programmable_Full_Type {Single_Programmable_Full_Threshold_Constant} \
  CONFIG.Reset_Type {Asynchronous_Reset} \
  CONFIG.Use_Embedded_Registers {false} \
  CONFIG.Valid_Flag {false} \
  CONFIG.Write_Acknowledge_Flag {true} \
] [get_ips fifo_generator_0]
Let’s now copy to instantiation template and connect it in the FifoBuffer.v file, replacing the async_fifo module. Note, that some signals have different names.
Save the file and click on the CHK button. Hog will tell you that the xci file is not present in our list files.
source -notrace $repo_path/Hog/Tcl/utils/check_list_files.tcl; set argv [list]
INFO: [Hog:Msg-0] Checking BFT list files...
INFO: [Hog:Msg-0] Retrieved project files...
CRITICAL WARNING: [Hog:MsgAndLog-0] /home/dcieri/hog_tutorial/test_tutorial/IP/fifo_generator_0/fifo_generator_0.xci was found in project but not in list files or .hog/extra.files
INFO: [Hog:Msg-0] Simulation List Files matches project. Nothing to do.
INFO: [Hog:Msg-0] Constraint List Files matches project. Nothing to do.
INFO: [Hog:Msg-0] /home/dcieri/hog_tutorial/test_tutorial/Top//BFT/hog.conf matches project. Nothing to do
INFO: [Hog:Msg-0] /home/dcieri/hog_tutorial/test_tutorial/Top//BFT/sim.conf matches project. Nothing to do
CRITICAL WARNING: [Hog:Msg-0] Number of errors: 1 (Design List files = 1, hog.conf = 0).
INFO: [Hog:Msg-0] Simulation list files match project. All ok!
INFO: [Hog:Msg-0] Simulation config files match project. All ok!
INFO: [Hog:Msg-0] All done.
To fix this, click on the LIST button. And again on the CHK to verify that there are no more conflicts. Hog should have created a new ips.src file inside Top/BFT/list, containing the path to the just created xci file.
If we issue a git status, we see that the IP folder and the new ips.src files are not tracked, and the FifoBuffer.v has been modified. You will notice that only the xci file is tracked by git, and not the full IP output products. This is because of these lines in the .gitignore files, that prevent the repository to get dirty with not-required autogenerated files.
IP/*/*
!IP/*/*.xci*
Let’s commit the new changes.
git add BFT/BFT.srcs/sources_1/imports/Sources/FifoBuffer.v IP Top/BFT/list/ips.src
git commit -m "FEATURE: Adding IP Fifo"
Creating IPs in Hog with TCL commands#
For the second option, let’s copy the BFT Hog project folder.
cp -r Top/BFT Top/BFT_IP_TCL
Remove from the new project, the ips.src list file.
rm Top/BFT_IP_TCL/list/ips.src
We want to create the FIFO IP, using a TCL command. Hog allows the developers to execute TCL commands, by adding a post-creation.tcl script, in the project folder. This file will be executed by Hog, just after the creation of the project.
Create the new file with a text editor and past the following snippet to create the IP.
create_ip -name fifo_generator -vendor xilinx.com -library ip -version 13.2 -module_name fifo_generator_0
set_property -dict [list \
  CONFIG.Almost_Full_Flag {false} \
  CONFIG.Enable_Safety_Circuit {false} \
  CONFIG.Fifo_Implementation {Independent_Clocks_Block_RAM} \
  CONFIG.Input_Data_Width {32} \
  CONFIG.Input_Depth {16} \
  CONFIG.Overflow_Flag {false} \
  CONFIG.Programmable_Empty_Type {Single_Programmable_Empty_Threshold_Constant} \
  CONFIG.Programmable_Full_Type {Single_Programmable_Full_Threshold_Constant} \
  CONFIG.Reset_Type {Asynchronous_Reset} \
  CONFIG.Use_Embedded_Registers {false} \
  CONFIG.Valid_Flag {false} \
  CONFIG.Write_Acknowledge_Flag {true} \
] [get_ips fifo_generator_0]
Save and commit the new project to git.
git add Top/BFT_IP_TCL
git commit -m "FEATURE: new project added to git"
Now create the project with Hog
./Hog/Do C Top/BFT_IP_TCL
Have a look at the output log. You should see something similar to this
INFO: [Hog:CreateProject-0] Found post-creation Tcl script /home/dcieri/hog_tutorial/test_tutorial/Top/BFT_IP_TCL/post-creation.tcl, executing it...
INFO: [IP_Flow 19-234] Refreshing IP repositories
INFO: [IP_Flow 19-1704] No user IP repositories specified
INFO: [IP_Flow 19-2313] Loaded Vivado IP repository '/tools/Xilinx/Vivado/2022.2/data/ip'.
INFO: [Hog:CheckExtraFiles-0] /home/dcieri/hog_tutorial/test_tutorial/Projects/BFT_IP_TCL/BFT_IP_TCL.srcs/sources_1/ip/fifo_generator_0/fifo_generator_0.xci (lib: ips.src) has been generated by an external script. Adding to /home/dcieri/hog_tutorial/test_tutorial/Projects/BFT_IP_TCL/.hog/extra.files...
Since the just-created IP will not be committed to git, Hog implements a different way to keep track of any changes to it. When creating the IP (or any other file for what matters) at post-creation time, Hog saves the md5sum of the generated files inside the .hog/extra.files.
/home/dcieri/hog_tutorial/test_tutorial/Projects/BFT_IP_TCL/BFT_IP_TCL.srcs/sources_1/ip/fifo_generator_0/fifo_generator_0.xci 11d35c9e282644c1bcc4c557429c0022
Every time the synthesis is launched, Hog controls that the md5sum of the IP in the project corresponds to what is written in this file. If that’s not the case, Hog will issue a Critical Warning. This means, that every changes to the IP, must be first done into the tcl script and the project must be recreated every time.
Step 5: Setup the Hog-CI with GitLab#
To setup the Hog CI, you need sudo access to a machine with gitlab-runner installed. If you setup the gitlab-runner to run as a shell executable, you have to make sure that Vivado or your required IDE is also installed on the machine.
Alternatively, you can setup the gitlab-runner to run using docker containers, assuming you have access to a docker image with your IDE.
Instructions on how to install the GitLab runner can be found on the official GitLab documentation page.
Once installed login go to your GitLab repository and open Settings->CI/CD->Runners, and click on New project runner.
Setup the runner with the following option
Tags:
hogMaximum job timeout: 86400
And follow the instructions to setup the runner on your machine.
The Hog-CI needs to run some commands with a GitLab account that has maintainer rights to the repository. We suggest to create a second account for this purpose, and not to use your main account.
We need to setup a few variables, to operate the Hog-CI on GitLab.
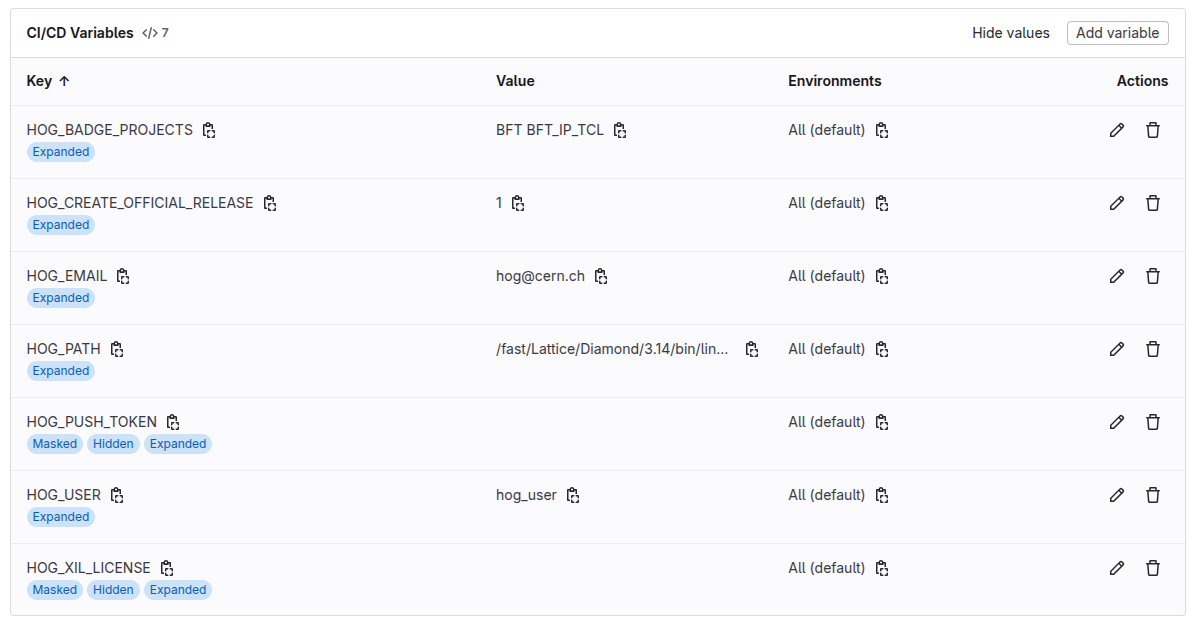
Go to Settings->CI/CD, expand the Variables section and add the following variables.
HOG_USER: Your service account;
HOG_EMAIL: The email of your service account;
HOG_PATH: The
PATHenvironmental variable for your VM, should include the Vivado bin directory;HOG_PUSH_TOKEN: The push token you have generated for your service account. You can obtain one here, logging in with your service account a select
apias scope;HOG_XIL_LICENSE: The Xilinx License Server.
Be sure to uncheck the Protect Variable box, since we want this variables to be accessible from our merge-requests.
We can also setup additional variables, to create the GitLab release and add GitLab badges to our repository’s webpage, showing resource usage and timing information for the chosen projects.
HOG_CREATE_OFFICIAL_RELEASE: If set to 1, Hog creates an official release note using the version and timing summaries taken from the artifact of the projects.
HOG_BADGE_PROJECTS: The list of projects that we want to include in the badges. In our case
BFTandBFT_IP_TCL.
More information on the CI/CD variables that Hog uses can be found here.
Note
These variables can be also written inside the .gitlab-ci.yml file. Gitlab uses the following priority scheme for the environmental variables.
Gitlab CI/CD Variables -> Jobs Specific Variables -> Global gitlab-ci.yml variables.
More info here
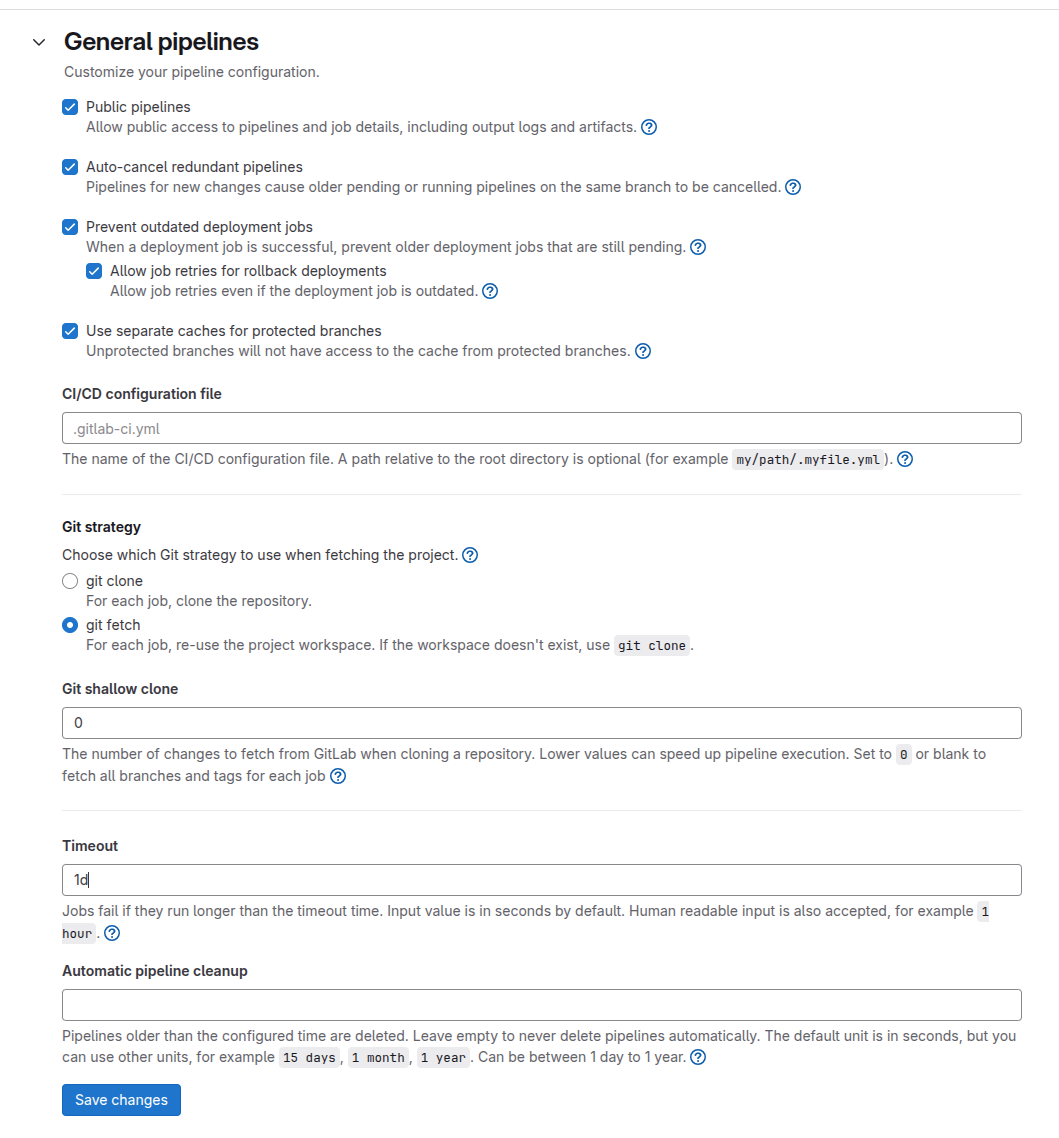
The final configuration we need is in Settings->CI/CD->General pipelines. Here we need to change the Git shallow clone value to 0, to fetch all branches and commits for our job (required to evaluate the new version), and set the timeout to 1d. The latter is not strictly necessary for this tutorial, since our build requires a few minutes to complete, but for large projects this can cause issues.
The GitLab repository should be now ready to run our CI. All we need to do is setup the actual jobs. This is done in GitLab using a yaml configuration file (.gitlab-ci.yml), which should be in the parent path of your repository. Hog provides templates to setup the Hog-CI, using the novel dynamic CI feature from GitLab, or the standard static CI, which allows more configuration.
5.1 Setup the Dynamic CI#
Let’s try first to setup the dynamic CI. Go back to the shell with your repository and copy the template from Hog.
cp Hog/Templates/gitlab-ci_dynamic.yml .gitlab-ci.yml
Open then the file, and change the reference to the current Hog version.
include:
  - project: 'hog-cern/Hog' # Use hog/Hog at gitlab.cern.ch
    file: '/hog-dynamic.yml'
    ref: 'Hog2025.1-3'
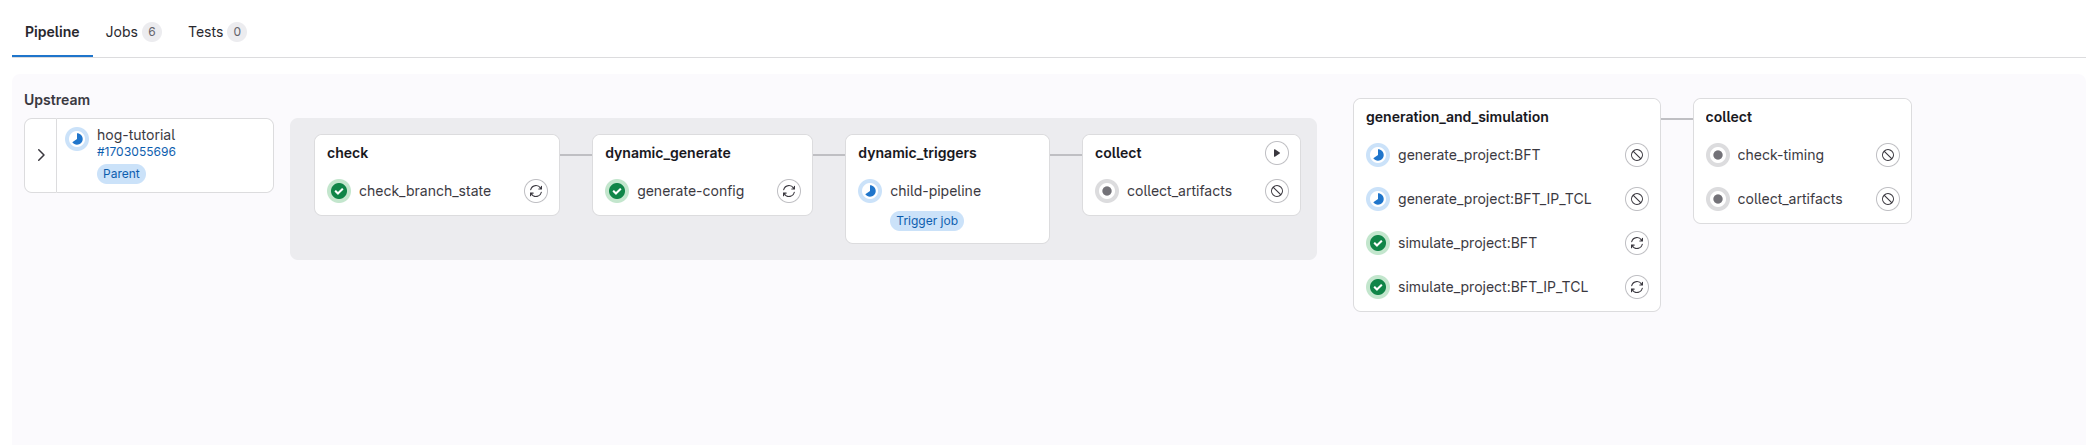
As you can see, to have a working version of the dynamic CI requires just a few lines. By default, Hog will generate a build and simulation job for each project inside the Top folder. The dynamic CI can be configured using ci.conf files, as explained in the dedicated section
Commit and push.
git add .gitlab-ci.yml
git commit -m "FEATURE: Setup Hog Dynamic CI
git push
Now open a Merge Request, either by clicking on the link that git should have written in the log, or by going to the GitLab repository website.

If everything went well you should see the pipeline starting.
5.2 Setup the Static CI#
To setup the static CI, copy the corresponding template from the Hog submodule
cp -r Hog/Templates/gitlab-ci.yml .gitlab-ci.yml
In the file we need to change the reference to the current version of Hog, and write a job configuration for each project that we want to simulate and/or build. The final .gitlab-ci.yml should look like this.
include:
  - project: 'hog-cern/Hog' # Use hog/Hog at gitlab.cern.ch
    file: '/hog.yml'
    ref: 'Hog2025.1-3'
#################### example ###########################
### Change 'example' with your project name

GEN:BFT:
  extends: .generate_project
  variables:
    extends: .vars
    PROJECT_NAME: BFT
    HOG_ONLY_SYNTH: 0  # if 1 runs only the synthesis

SIM:BFT:
  extends: .simulate_project
  variables:
    extends: .vars
    PROJECT_NAME: BFT

GEN:BFT_IP_TCL:
  extends: .generate_project
  variables:
    extends: .vars
    PROJECT_NAME: BFT_IP_TCL
    HOG_ONLY_SYNTH: 0  # if 1 runs only the synthesis

SIM:BFT_IP_TCL:
  extends: .simulate_project
  variables:
    extends: .vars
    PROJECT_NAME: BFT_IP_TCL
Let’s commit and push again, to see the static CI running.
git add .gitlab-ci.yml
git commit -m "FEATURE: Setup the static CI"
git push
Once the pipeline is succesfull, we can merge the merge the merge request. This will trigger the main pipeline that should tag our repository, followed by the tag pipeline that creates the GitLab release and the badges.
Step 6. Create a Quartus Project#
Warning
For this step you need to have Quartus installed on your local machine, and on your CI machines, in the case you want to add the Quartus build to the pipeline.
We want to implement the same BFT project in a MAX10 FPGA (10M50DAF484C6GES). The first step is to copy the Hog BFT project into a new directory of Top.
cp -r Top/BFT Top/BFT_Quartus
Let’s modify the hog.conf file for Quartus. Replace its content with the following code. Change the version of quartus in the header to match with the version you are using.
#quartus 23.1

[main]
PART = 10M50DAF484C6GES
FAMILY = "MAX 10"
We also need some constraint files for our project. Quartus utilises .qsf files for the location constraints and .sdc for timing constraints.
Create a new folder for the Quartus constraint, somewhere in your repository.
mkdir -p quartus/con
Create two files pin.qsf and timing.sdc in the folder, with the following content.
set_location_assignment PIN_M8 -to wbClk set_location_assignment PIN_M9 -to bftClk set_instance_assignment -name IO_STANDARD “2.5 V” -to CLK_50_MAX10 set_instance_assignment -name IO_STANDARD “2.5 V” -to CLK_25_MAX10
set_time_format -unit ns -decimal_places 3 create_clock -name {clk} -period 20.000 [get_ports {bftClk}] create_clock -name {clk} -period 40.000 [get_ports {wbClk}]
Warning
For this tutorial, we are not specifying all the pin constraints, therefore the bitstream will be unusable. The goal is just to show how to use Hog to manage a Quartus project
Now modify the Top/BFT_Quartus/list/sources.con file to include the new constraints.
quartus/con/*
Let’s create also folders to store the quartus sources and ips.
mkdir -p quartus/ip quartus/src
Make a copy of the FifoBuffer.v file, which we’ll use to add the Quartus specific IP.
cp -r BFT/BFT.srcs/sources_1/imports/Sources/FifoBuffer.v quartus/src/FifoQuartus.v
Modify the Top/BFT_Quartus/list/others.src to include the new file.
quartus/src/FifoQuartus.v
We are now ready to create the Quartus project with Hog.
./Hog/Do C BFT_Quartus
In the output log, you should get some warnings, for the simulation files. That’s ok since Hog does not support yet simulation with Quartus.
Open now the just created project with Quartus.
quartus Projects/BFT_Quartus/BFT_Quartus.qpf &
We need to replace the FIFO IP. In the IP Catalog window on the right, search for FIFO and double click to configure the IP.
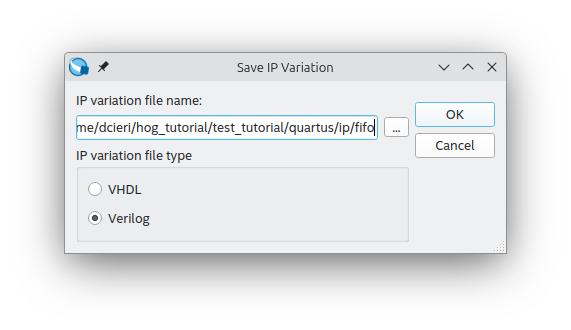
Save the IP in quartus/ip/fifo, and select Verilog as type.
Configure the Fifo as following
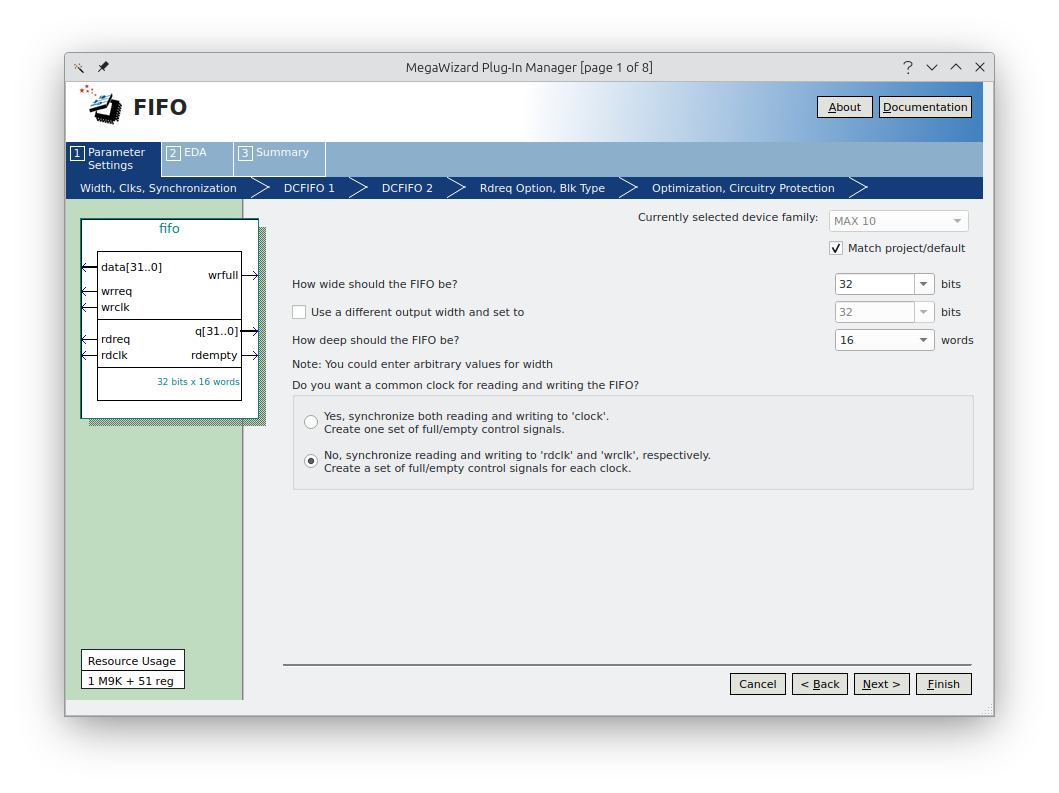
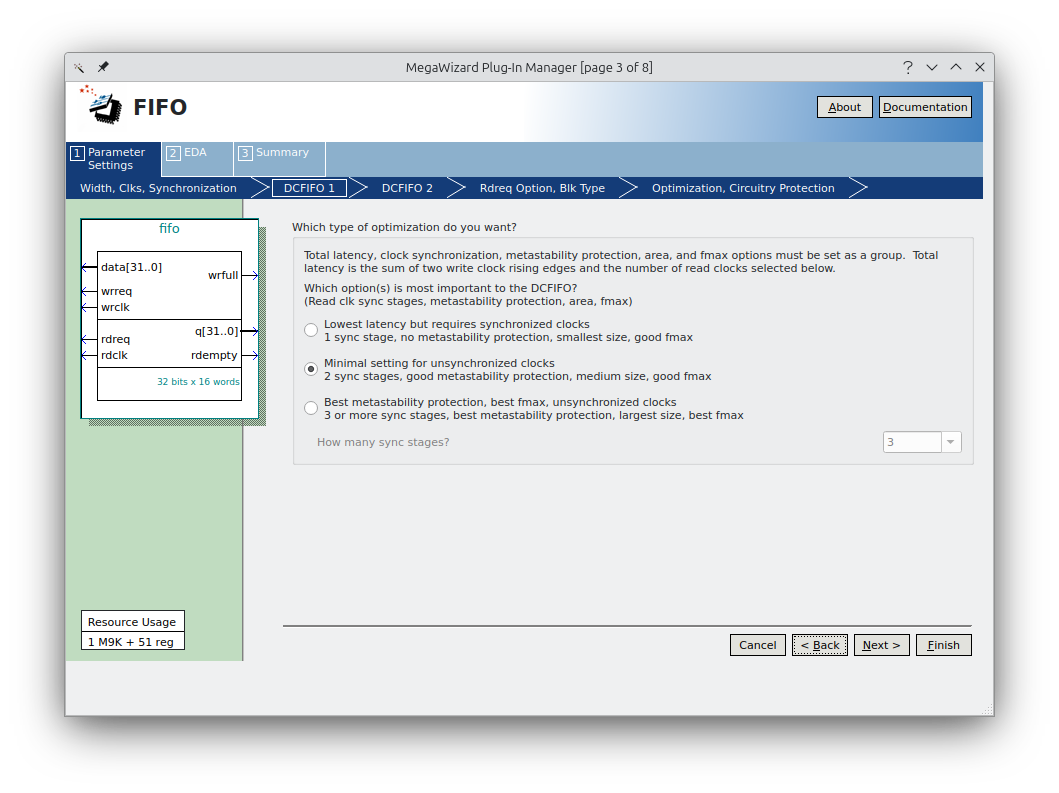
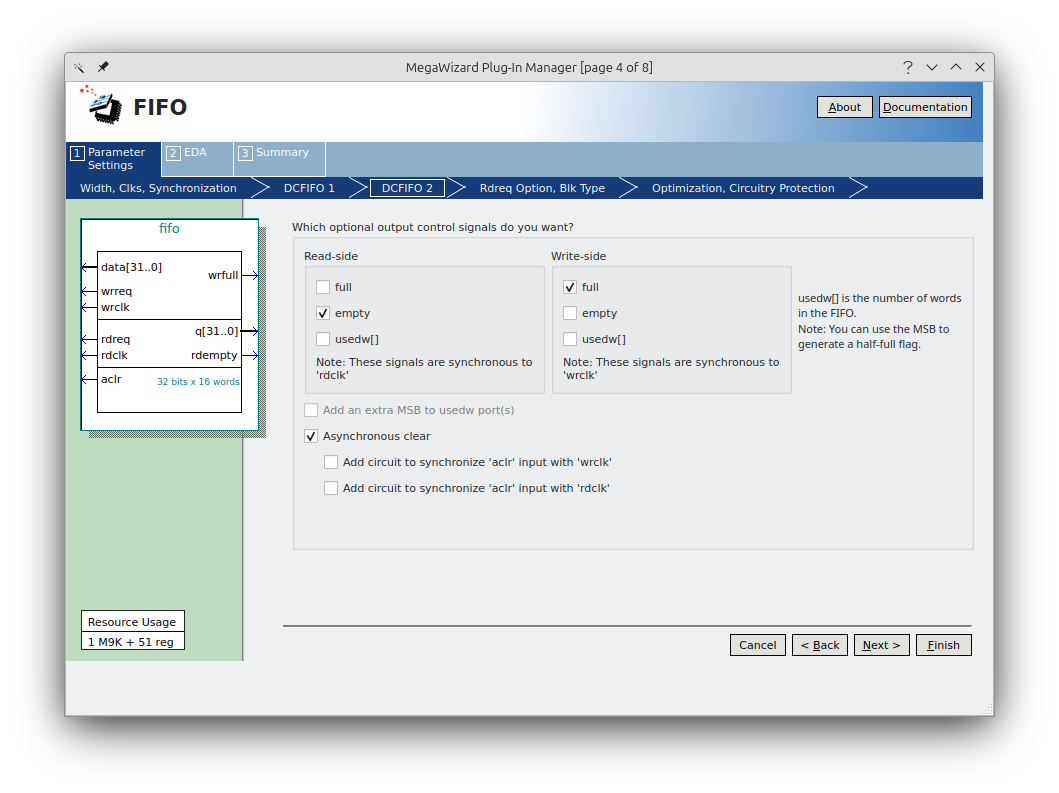
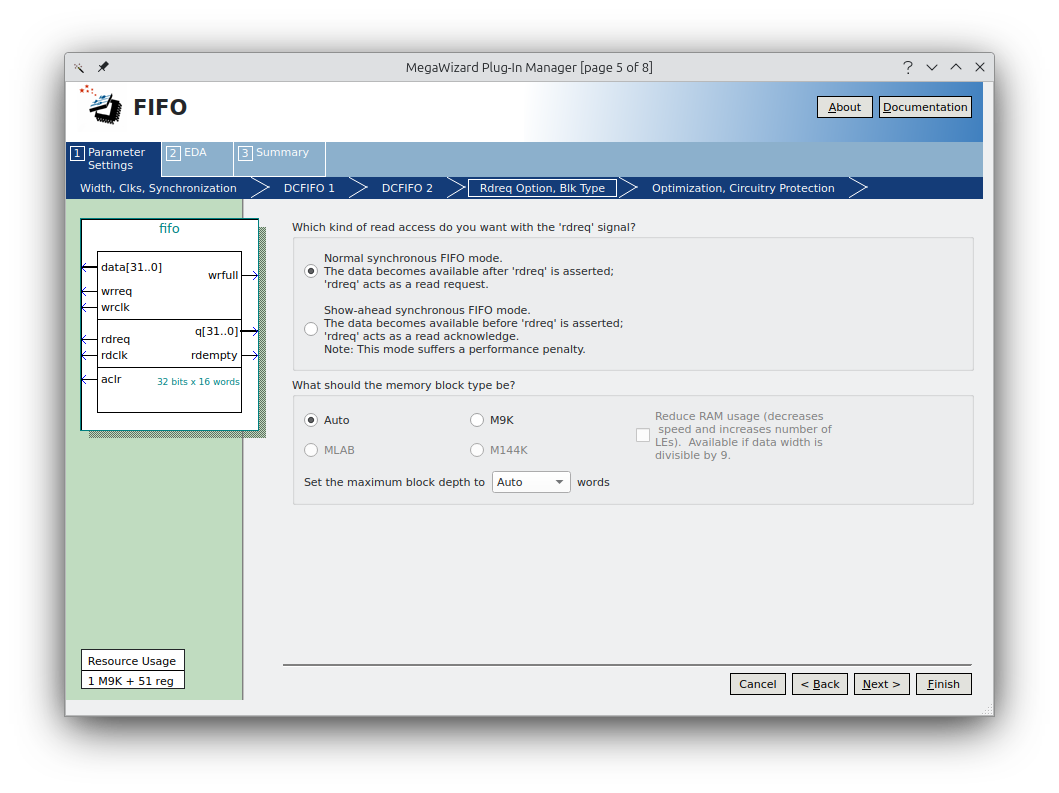

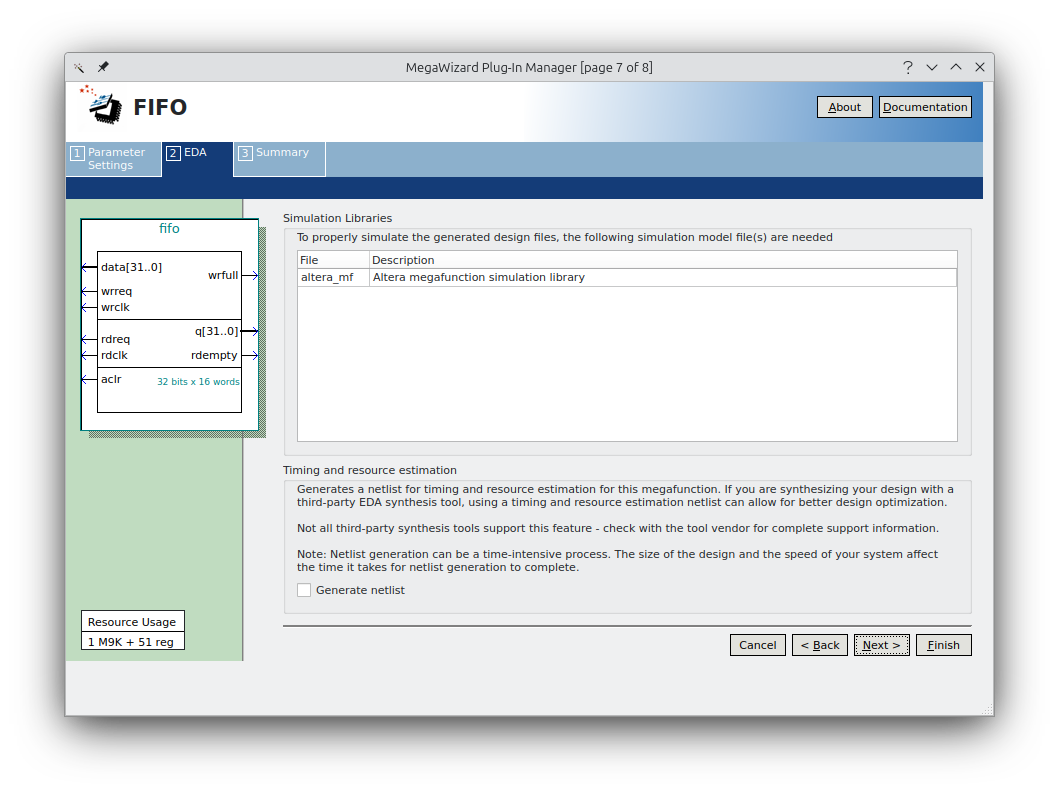
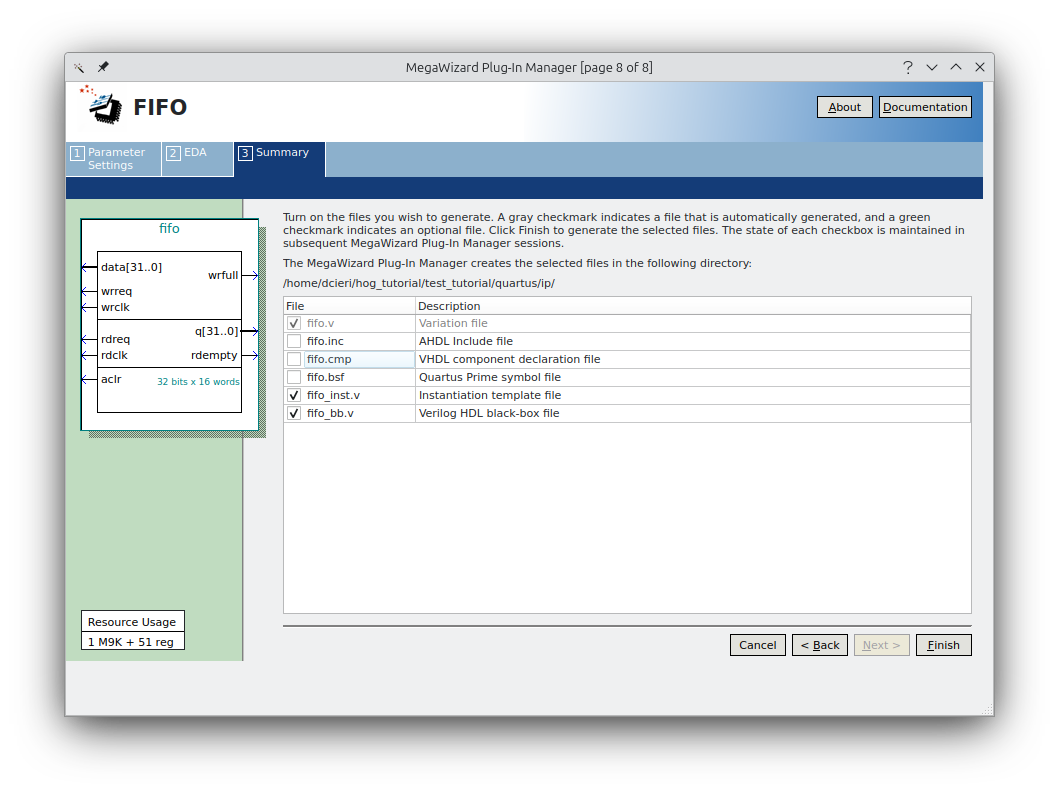
Click on finish and ok to save the .qip. Now close the project, and open the FifoQuartus.v file with your editor. Remove the Vivado IP instantiation and add the following snippet to instantiate the Quartus FIFO IP.
fifo	fifo_inst (
	.aclr ( rst ),
	.data ( din ),
	.rdclk ( rd_clk ),
	.rdreq ( rd_en ),
	.wrclk ( wr_clk ),
	.wrreq ( wr_en ),
	.q ( dout ),
	.rdempty ( empty ),
	.wrfull ( full_wire )
	);
Open the Top/BFT_Quartus/ips.src file now, to include the new IP files.
quartus/ip/fifo.qip
Commit all changes and launch the Quartus workflow, this time from batch, recreating the full project.
git add Top/BFT_Quartus quartus
git commit -m "FEATURE: Adding Quartus BFT project"
./Hog/Do W BFT_Quartus -recreate
If everything goes well, Hog should have copied to the bin folder the report and binary files for the Quartus project.
Step 7. Create a Lattice Diamond Project#
Warning
For this step you need to have Lattice Diamond installed on your local machine, and on your CI machines, in the case you want to add the Diamond build to the pipeline.
To run Hog with Diamond, you also need a local installation of tcllib, and to create a HOG_TCLLIB_PATH environmental variable pointing to the libraries. On Ubuntu,
sudo apt install tcllib
export HOG_TCLLIB_PATH=/usr/share/tcltk/tcllib1.21/
For Diamond, we will convert the demo project for the MachXO3LF Starter Kit, that can be downloaded .
Let’s create new folders, to store the Diamond’s project source files.
mkdir -p diamond/src diamond/con
Copy inside src the Verilog source files and inside .con the .lpf Logic Preference file.
cp <path_to_diamond_project>/source/*.v diamond/src
cp project/Blink.lpf diamond/con/
Now create the project folder inside Top
mkdir -p Top/diamond_blink/list
Create the hog.conf file, and paste the following code, to
# diamond 3.14.0
[main]
DEVICE=LCMXO3LF-6900C-5BG256C
Finally create the two list files for the constraint and source files inside Top/diamond_blink/list.
diamond/src/XO3L_SK_blink.v top=XO3L_SK_blink
diamond/src/heartbeat.v
diamond/src/kitcar.v
diamond/con/Blink.lpf enable
The enable property allows us to ovveride the default Logic Preference file in the Diamond project.
Commit everything we just did.
git add diamond Top/diamond_blink
git commit -m "FEATURE: Adding Diamond project"
We are now ready to create and build our project with Hog.
./Hog/Do CW diamond_blink
If everything went well you can access the binary and report files inside the bin/diamond-blink* folder. You can also open the project with the Diamond GUI.
diamond Project/diamond_blink/diamond_blink.ldf