
How to convert an existing project to Hog#
Warning
Outdated Documentation! This documentation version is out of date. Please check the latest version 2026.1.
Converting an existing project to Hog means: copying the source files into a git repository, adding Hog as a submodule, creating the Hog list files (text files containing the names of your source files), and writing a Tcl script able to create the HDL project.
Before starting#
We assume that you are starting from a clean repository and you want to convert a Vivado project stored in a local folder.
If you are migrating between two git repositories and you want to retain the history of your old repository have a look here
If you are migrating to Hog but you are not changing repository, you can follow the instructions below ignoring the creation of the new local repository. In this case you might want to work in a new branch of your repository.
Let’s suppose your new repository is called new_repo with url new_repo_url, your project is named myproject and it is currently stored in some local folder mypath. If you do not have a new repository, you can go on Gitlab (gitlab.cern.ch if you work at CERN) and create one.
Creating the git repository#
First of all create a new folder where you will store your firmware, initialise it as a git repository and connect it to the remote repository:
  mkdir new_repo
  cd new_repo
  git init
  git remote add origin new_repo_url
For the moment, we are going to work on the master branch, that is the default one. If you want, you can create a branch and work on that:
git checkout -b first_branch
git push origin first_branch
Add Hog to your project#
Hog repository should be included as a submodule in the root path of your repository. To do this, type:
git submodule add ssh://git@gitlab.cern.ch:7999/hog/Hog.git
Here we assumed that you want to use the ssh protocol. If you want to use https enter
git submodule add https://gitlab.cern.ch/hog/Hog.git
If you prefer krb5:
git submodule add https://:@gitlab.cern.ch:8443/hog/Hog.git
However, it is a good idea to not include the submodule protocol explicitly, but to let it be inherited from the repository Hog is included into.
To obtain this edit a file called .gitmodules with your favourite text editor (say emacs):
emacs .gitmodules
In that file, you should find a section as in the following. Modify the url value by replacing it with a relative path. Note that the url that must be specified relative to the path of your repository:
  [submodule "Hog"]
    path = Hog
    url = ../../hog/Hog.git
If your repository is stored on gitlab.com the url specified in your .gitmodules should be
url = ../../hog-cern/hog.git
Now from your repository:
git submodule update
This should trigger an error if you made a mistake when editing the repository path.
Copying some templates from Hog and committing#
Now that you have Hog locally, you can start setting up your repository.
Hog provides a set of templates that you can use, you can add a .gitignore to your repository with the following command:
cp Hog/Templates/gitignore .gitignore
Note
You might need to modify your .gitignore file if you want to do a more complicated directory structure, especially with the IP and BD files. For example, Hog template assumes that you store your IPs in IP/ip_name/ip_name.xci. If you do, this file would be enough for you. If you need a more complicated structure, you can edit the file or you can use several .gitignore files the subdirectory of the main IP directory.
Let’s now make our first commit:
git add .gitignore .gitmodules Hog
git commit -m "Adding Hog to the repository"
git push origin master
If you are working in a branch that is not master, please replace the last instruction with:
git push origin your_branch_name
Early tagging your repository#
Hog assumes that at least a version tag of the form vM.m.p is present in your repository. Let’s now create the first Hog tag:
  git tag v0.0.0
  git push --tags
Convert your project to Hog#
Automatic conversion#
Warning
This feature is currently only supported for Vivado.
If you want to integrate your project(s) within the Hog framework and you do not want to modify your directory structure, you can do it almost automatically. You have to copy your entire directory content, including the Vivado project, into the new repository:
cp ../old_repo/* .
Warning
If your project contains submodules, they shall not be copied from the original repository, but rather added as submodules. Please check the submodules section for extra details.
Now, you have to run the Init.sh script, by issuing:
source Hog/Init.sh
This script will, among other things, scan for all the (not Hog) Vivado projects within your current directory and (optionally) convert them into Hog projects. It automatically creates a directory called Top, containing one subdirectory for every Vivado project that was converted.
If you browse those subdirectories, you will find that they contain a file called Top/myproject/myproject.tcl and another subdirectory called Top/myproject/list. The meaning of each is explained in sections Project Tcl and List Files.
Your old Vivado project(s) has now outlived its purpose, and you shall delete it.
At this point, you have to commit your project files (e.g. Top directory, source files, IPs[1], etc.) into the repository:
git add Top
git add path_1/file_1.vhd
git add path_2/file_2.xdc
git add path_3/file_3.xci
git commit -m "Adding files to project"
Remember that you can always keep track of the uncommitted files by running:
git status
Warning
When you copied the entire content of your old directory, you probably copied also many temporary files that you don’t want to be stored into your repository. When you add the files to the repository, please be particularly careful and select only the ones that are really needed. Setting proper .gitignore rules can help you in this phase.
At this point you should be ready to create your Hog project (stored in the directory Projects), by running:
./Hog/CreateProject.sh myproject
Warning
If you set some peculiar project property, this might not be automatically propagated to the Hog project. Please always compare this project with the original one. In such cases, you can manually add the project property by adding it as a tcl command at the end of the Top/myproject/myproject.tcl file.
Manual conversion#
Generating Hog directory structure#
You have to generate a directory structure similar to this one:
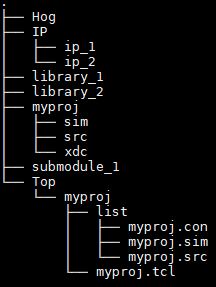
A complete description of the meaning of each folder can be found in THE Hog User Manual
Top folder#
Every Hog-handled HDL repository must have a directory called Top. In here, each subdirectory - that we call the project top-directory - represents an HDL project in the repository.
You can start by creating your project top-directory:
mkdir -p Top/myproject
Every project top-directory must contain a subdirectory called list, where the so-called hog list files are stored. Let’s create it:
mkdir Top/myproject/list
Moreover, a tcl script with the same name of the project (plus the .tcl extension) must be in the project top-directory. Hog runs this script, called the project tcl script, to create a project. This is a recap of what we have learned up to now:
A
Topfolder must be in the repositoryInside this folder, there is one subfolder for each project in the repository, called the project top-directory
Inside each project’s top-directory there is 1. a
listsubdirectory containing: the list files of the project and 2. a tcl script used to create the project;
For more advanced Hog features, additional files and folder are located in the Top folder, but we do not discuss them now for simplicity.
To create the project’s tcl script, we will start from the template provided in the Hog/Templates folder:
cp Hog/Templates/project_vivado.tcl Top/myproject/myproject.tcl
Different templates are provided for Vivado, PlanAhead and Quartus and are named \(project\_vivavo.tcl\), \(project\_ise.tcl\) and \(project\_quartus.tcl\)
Use your favourite text editor to modify the template Tcl file. There are several things you can edit, depending on your needs, for example, the FPGA name or the synthesis or implementation strategies. The template contains comments to guide you through the process.
Now you can commit everything you just did:
git add Top
git commit -m "Adding Hog Top folder"
Importing source files to the project#
You are now ready to import the files needed to build your project.
Tip
Hog gives you the possibility to organise the source files in different VHDL libraries (Verilog does not have the concept of library). You can add your source files into several .src files in the list directory, each of these .src files will correspond to a different library with the same name as the .src file (excluding the .src extension). For simplicity, in this chapter, we will assume the presence of a unique library with the same name as your project.
First of all, copy the files from your local folder into the folder that contains the git repository. Exception made for some reserved directory (e.g. Top, IP, BD) you can put your files wherever you feel like inside your repository, organising them as you see fit.
In this example, we will create a directory named lib_myproject where we will store all the source, simulation and constraint files.
mkdir -p lib_myproject/source lib_myproject/simulation lib_myproject/constraint
cp ../old_repo/source_1.vhd lib_myproject/source
cp ../old_repo/source_2.vhd lib_myproject/source
...
cp ../old_repo/simulation_1.vhd lib_myproject/simulation
cp ../old_repo/simulation_2.vhd lib_myproject/simulation
...
cp ../old_repo/constraint_1.vhd lib_myproject/constraint
cp ../old_repo/constraint_2.vhd lib_myproject/constraint
...
After having added all the relevant files in your folders you have to add their path and file names to the appropriate list files. In this example, we will create:
One source list-file called
Top/myproject/list/myproject.src, containing the source files of your projectOne simulation list-file called
Top/myproject/list/myproject.sim, containing the files used in the simulation (e.g. test benches, modules that read/write files, etc.)One constraint list-file called
Top/myproject/list/myproject.con, containing your constraints (.xdc, .tcl, etc.)
You can copy and modify this bash script to ease this quite tedious part of the work:
for i in $( ls lib_myproject/source/* ); do \
  echo $i >>  Top/myproject/list/myproject.src; \
done
for i in $( ls lib_myproject/simulation/* ); do \
  echo $i >>  Top/myproject/list/myproject.sim; \
done
for i in $( ls lib_myproject/constraint/* ); do \
  echo $i >>  Top/myproject/list/myproject.con; \
done
Note that the path of the file is specified with respect to the main folder of the repository.
If you want, you can add comment lines in the list-files starting with a # and you can leave empty lines (or lines containing an arbitrary number of spaces). All of these will be ignored by Hog.
At this point, you might want to check that the files are correctly picked up by regenerating the Hog project: ./Hog/CreateProject.sh myproject, Hog will give you an error if a file is not found.
You can open the created project in Projects/myproject/myproject.xpr (or Projects/myproject/myproject.qpf for Quartus) with the GUI and check that all the files are there. If not, modify the list files and create the project again. When you are satisfied, you can commit your work:
git add lib_myproject
git add Top/myproject/list/myproject.src
git add Top/myproject/list/myproject.sim
git add Top/myproject/list/myproject.con
git commit -m "Adding source files"
Submodules#
If your project uses source or simulation files hosted in a separate repository you can add that repository as a git submodule.
git submodule add my_submodule_url
You can add your submodules wherever you like in your repository.
In the same fashion as the source files contained in your repository, files taken from a submodule must be added to a Hog list file.
Intellectual Properties (IP)#
IP files can be stored anywhere in your repository or submodules. However, particular care must be taken to avoid that the files generated by Vivado or Quartus are kept separated and not committed to the repository. To achieve this, these simple rules must be followed:
each IP file (
.xcifor Vivado) must be contained in a sub-folder called with the same name as the.xcifile (extension excluded).only the IP file must be committed to the repository (e.g.
.xcifor Vivado,.ipfor Quartus)a
.gitignorefile must be used to tell git to ignore all non-IP files, a template is provided in theTemplatesdirectory.
Basically for each IP in your project run:
  mkdir -p path_to_your_ips/ip_name/
  cp ../old_repo/ip_name.xci path_to_your_ips/ip_name/
Then you must add the .xci files to the .src list file you want, in this case, we will use a separate file called IP.src. You can use the following script if you like:
Note
There is no concept of library for the IPs, so we prefer to put them in a separate .src file. You can put them in the same list file as your other source files if you wish. Just open Top/myproject/list/myproject.src with a text editor and add them there.
  for i in $( ls path_to_your_ips/* ); do \
    echo $i/$i.xci >> Top/myproject/list/myproject.src;
  done
As usual, you can check that the files are correctly picked up by regenerating the project ./Hog/CreateProject.sh myproject
If you are satisfied with the changes, you can commit your work.
  git add path_to_your_ips
  git add Top/myproject/list/IP.src
  git commit -m "Adding IP Files"
IP initialisation files (.coe, .mif)#
Please note that the .gitignore template provided by Hog adds constraints on the IP folder.
Out of all the files contained in repo/IP/, git will pick up only .xci files.
Files with different extensions will be ignored.
If you have .coe files for RAM initialisation or analogous files please make sure that you store these files in a separate folder and point to them in the IP one by using a relative path.
The top file of your project#
Your project must contain a module called top_myproject, i.e. your project’s name preceded by top_. Hog will pick up such module and set it as the Top of your project.
Info
The top module of your project must be called top_
Since Hog will back annotate your project to track the source code used in each build, extra generics will be provided to your top file at the beginning of the synthesis
You can add the Hog parameters/generics to your top file to store those values in some registers. The complete list of the values can be found here. The templates provided in ./Hog/Templates/, contain all the generic/parameters names.
We have to customise the library names, in our case, there is only one library called myproject, possibly a submodule, and no XML_VERSION, flavour or external libs. These are more advanced Hog features that are not treated in this guide.
All your source files are now compiled as a separate library called according to the .src file they are contained in. So if you are using multiple .src files, you have to add the library to your project:
  library myproject;
  use myproject.all;
If you are using a module that is included in a different .src file as the top module, you will have to specify the library when you use it:
  u_1 : entity myproject.a_component_in_lib1
  port map(
    clk => clk,
    din => din,
    dout => dout
  );
If you work within the same library (i.e. .src file) you can normally use the work library.
Create your project#
As you know, if you run ./Hog/CreateProject.sh myproject, Hog will create your project in Projects/myproject/myproject.xpr or Projects/myproject/myproject.qpf. You can open the project with the GUI and check that everything looks alright.
The .gitignore template, that you copied in your repository, takes care of ignoring the Projects directory as we do not want to commit Vivado/Quartus files to the repository. If you decided not to use the provided template you should take care of ignoring this directory.
Also, you should try to run the complete workflow as something might have gone wrong with your IPs or the libraries.
If something is indeed wrong, try to fix it by modifying: the source files, the list files, the project tcl file. If you modify the list files or the project tcl file, you have to recreate the project to see if the modifications had the desired effect.
Code documentation#
Hog can be used to automatically generate and deploy documentation for your code.
Hog works with Doxygen version 1.8.13 or later.
If your code already uses Doxygen style comments, you can easily generate Doxygen documentation.
You just have to create a directory named doxygen containing the files used to generate the HDL documentation.
A file named doxygen.conf should be in this directory together with all the files needed to generate your Doxygen documentation.
You can copy a template configuration from Hog/Templates/doxygen.conf and modify it.