
Setting up Hog Continuous Integration#
Warning
Outdated Documentation! This documentation version is out of date. Please check the latest version 2026.1.
Hog Continuous Integration makes use of the Gitlab CI/CD tool. Both the Gitlab repository and your local area must be set-up to work properly with Hog CI. In this paragraph, we assume that we are working with a Gitlab Project called MyProject under the Gitlab group MyGroup. Please, replace these with the actual names of your project and group.
Preliminary requirements#
To run the Hog-CI, you need a CERN service account. If you don’t have one, you can easily request it here. The service account will run the Hog CI. For that, it needs to have access to your local repository.
Go to https://gitlab.cern.ch/MyGroup/MyProject/-/project_members and give Maintainer rights to your service account
Log in to Gitlab with your service account and create a private access token with API rights here
Once you have your service account, you should also get 1 TB of space on EOS, that can be used to store the results of Hog CI. If, for some reasons, your service account doesn’t have space on EOS, you could request it here.
Set up your personal Gitlab CI YAML#
Gitlab CI uses a YAML configuration file to define which commands it must run. By default this file is called .gitlab-ci.yml and must be stored in the root folder of your repository. Hog cannot provide a full YAML file for your project, but a template file can be found under Hog -> Templates -> gitlab-ci.yml as a reference.
For example, suppose we want to write the .gitlab-ci.yml configuration file to run the Hog project my_project on the CI. This file will actually include the Hog hog.yml configuration file, where the CI stages are defined. To include the reference to the Hog parent file, add at the beginning of your .gitlab-ci.yml
    include:
        - project: 'hog/Hog'
        file: '/hog.yml'
        ref: 'vX.Y.Z'
Here you must substitute ‘vX.Y.Z’ with the version of Hog you want to use. The version of Hog MUST be specified. If you fail to do so , the CI will pick up the parent configuration file from the latest Hog master branch. This is discouraged, since Hog development could lead to not back-compatible changes that could break your CI. Moreover the pre synthesis script will check that the reference in your .gitlab-ci.yml file is consistent with your local Hog submodule, giving a Critical Warning if the two don’t match.
Now, you need to define the stages you want to run in the CI for our project. Hog CI runs always the stages that are not project-specific (e.g. Merge), therefore there is no need to declare them in your file. To add a stage stage_1 for your my_project, use the following syntax:
  stage_1:my_project:
    extends: .stage_1
    variables:
      extends: .vars
      VARIABLE: <variable_value>
In this snippet the first line is the stage name, i.e. you are defining a stage named ‘stage_1:my_project’.
The second line tells the script that the stage is an extension of ‘.stage_1’ defined in the parent hog.yml file.
The third line starts the variable declaration section of the script.
Since your script extends .stage_1, then it must define the variable used by this script.
The line extends: .vars informs the variables section that it is an extension of the .vars object defined in hog.yml.
The last line shows how to set the value for one named VARIABLE defined in the .vars object.
So, for example, if you want to add a Generate stage for your my_project, you should add to the .gitlab-ci.yml, the following lines:
  generate_project:my_project:
    extends: .generate_project
    variables:
      extends: .vars
      PROJECT_NAME: my_project
A more detailed description of the CI stages and their YAML configuration can be found here
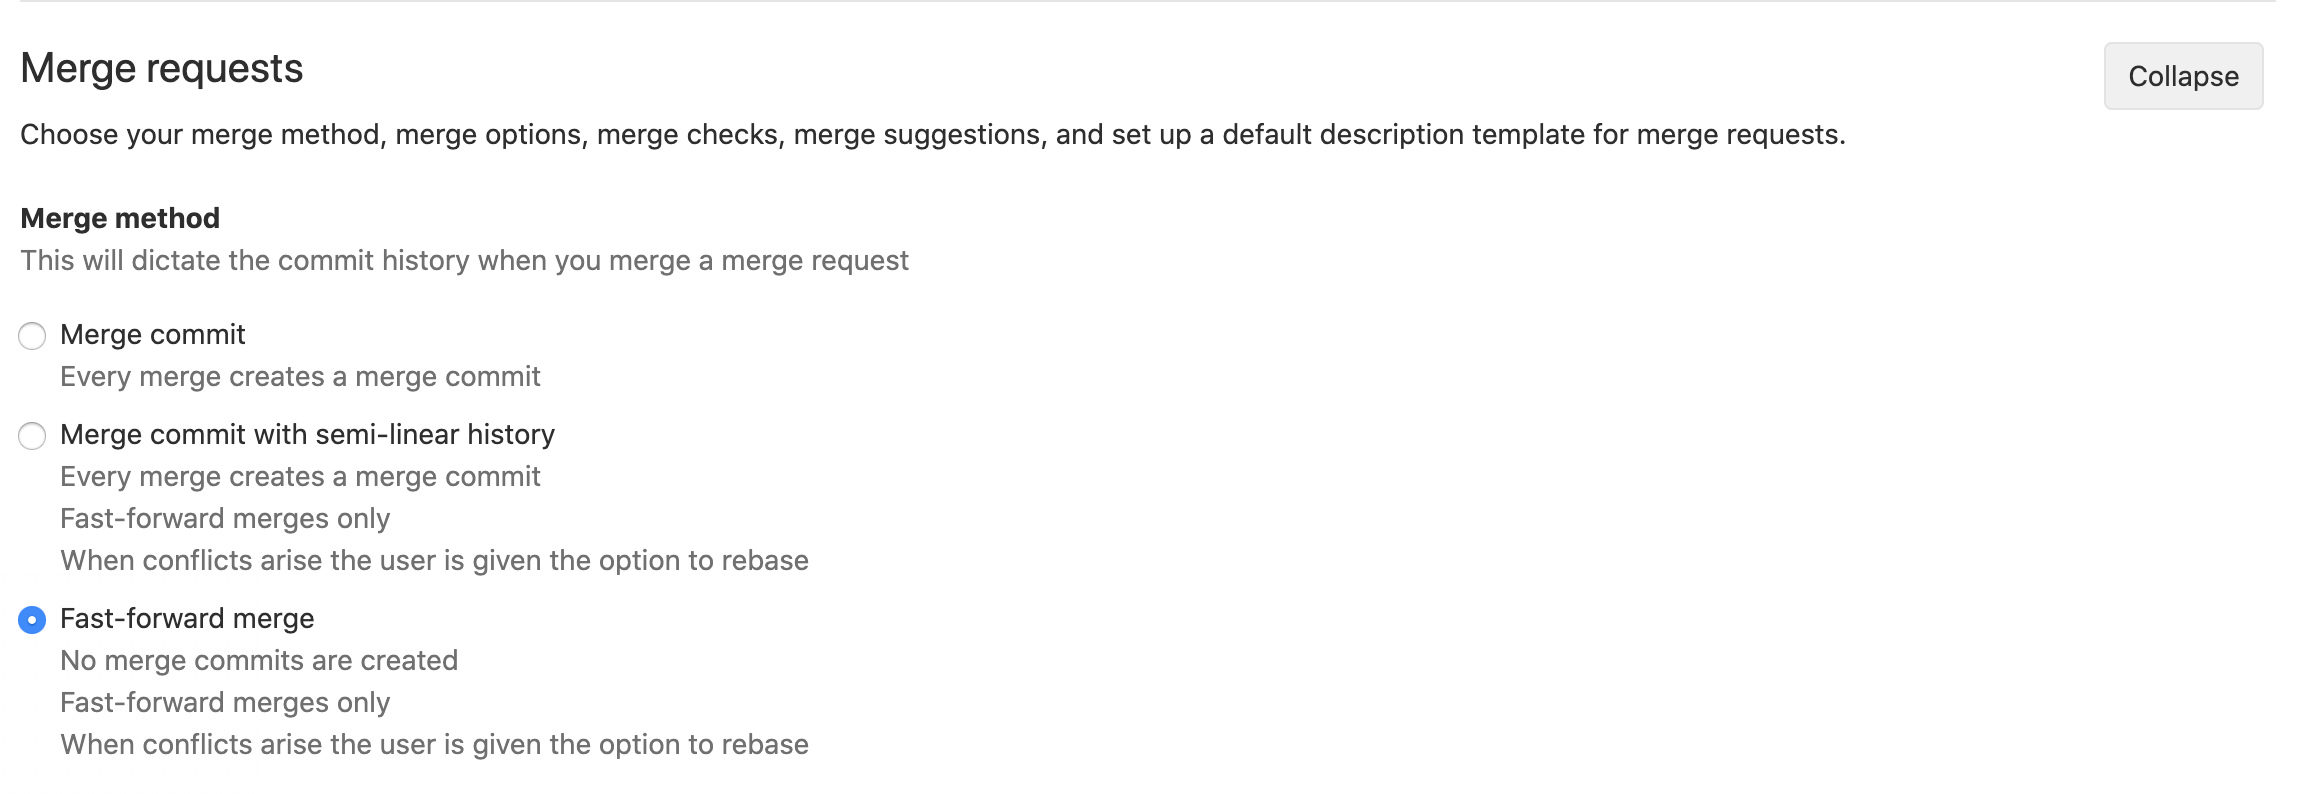
Remove merge commit#
Go to https://gitlab.cern.ch/MyGroup/MyProject/edit
Expand Merge Request settings
Select Fast-forward merge
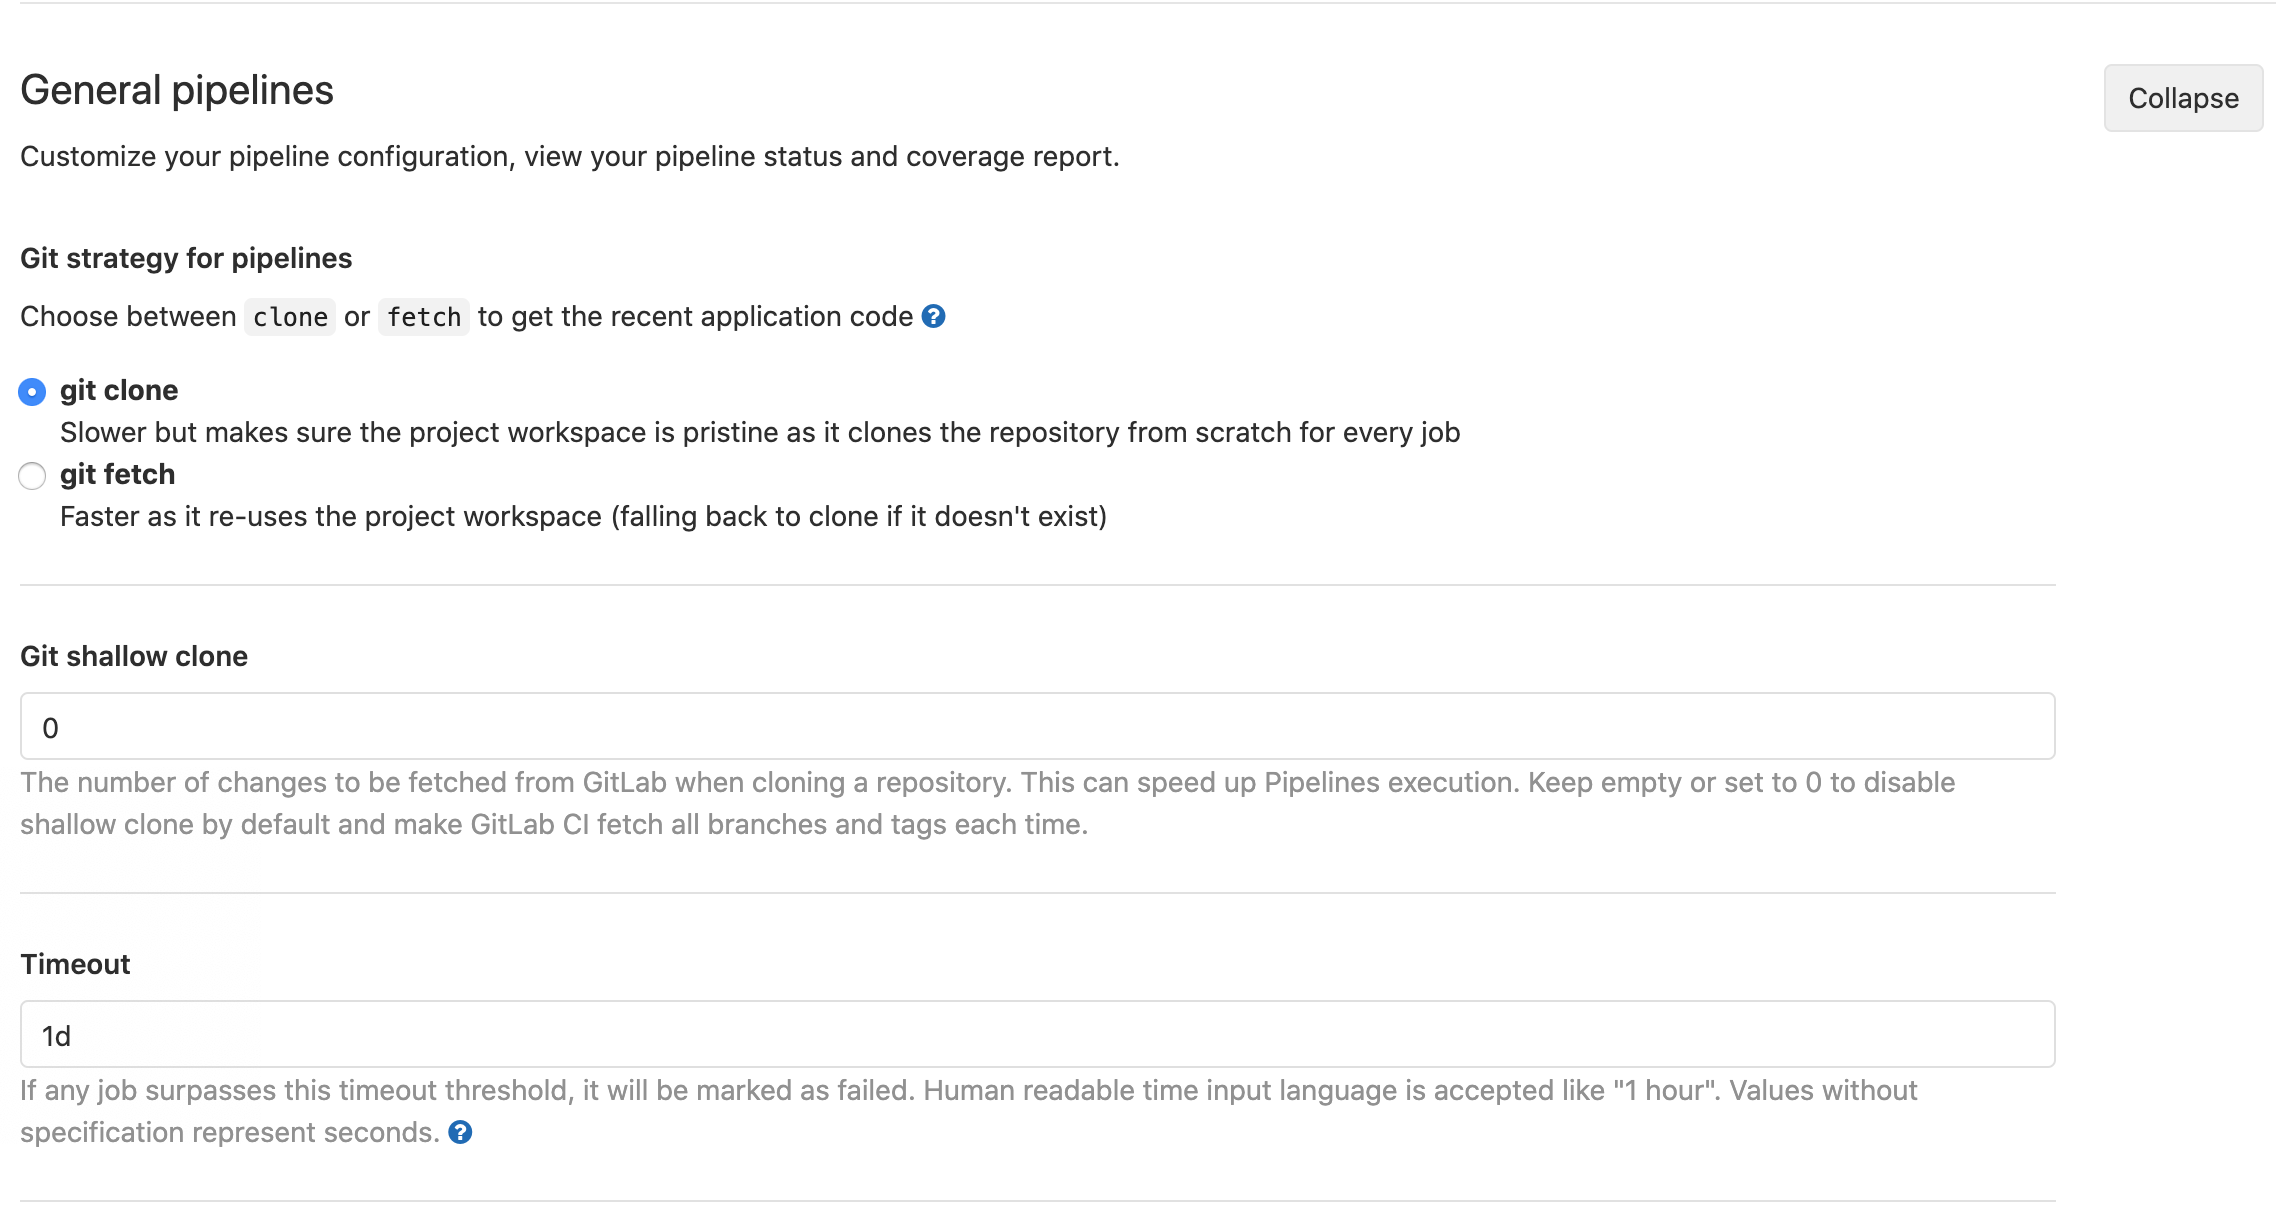
Pipeline configuration#
Go to https://gitlab.cern.ch/MyGroup/MyProject/-/settings/ci_cd
Expand General pipelines
Select git clone
Set Git shallow clone to 0
Set Timeout to a long threshold, for example 1d
Set-up Runners#
Unfortunately, we cannot use shared runners for every CI job, as the necessary software (Xilinx Vivado, Mentor Graphics Questasim, etc.) are not available. The download, installation and licensing processes would have to be done at each time that the CI is started, slowing down the entire process. As a consequence, you need to set-up your own physical or virtual machines. Please refer to Setting up a Virtual Machines section for more information.
Now take the following actions:
Go to
Settings->CI/CDExpand
RunnersMake sure the shared runners and eventual group runners are enabled for this project
On the left enable the private runners that you have installed on your machines.
Environment variables#
Go to
Settings->CI/CDExpand
Variables
The following variables are needed for Hog-CI to work, so if any of them is not defined, or defined to a wrong value, Hog-CI will fail.
Name |
Value |
|---|---|
HOG_USER |
Your service account name (e.g. my_service_account) |
HOG_EMAIL |
Your service account’s email address (e.g. service_account_mail@cern.ch) |
HOG_PASSWORD |
The password of your service account (should be masked) |
HOG_PATH |
The PATH variable for your VM, should include Vivado bin directory |
HOG_PUSH_TOKEN |
The push token you generated for your service account (should be masked) |
HOG_XIL_LICENSE[1] |
Should contain the Xilinx license servers, separated by a comma |
With the following optional variables you can configure the behaviour of Hog-CI:
Name |
Description |
|---|---|
HOG_COMPILER |
The IDE to be used for project compilation: if not defined will assume vivado. if multiple IDEs are needed you can separate them with |
EOS_MGM_URL |
Set the EOS instance. If your EOS storage is a user storage use |
HOG_OFFICIAL_BIN_EOS_PATH |
The EOS path for archiving the official binary files of your project |
HOG_USE_DOXYGEN |
Should be set to 1, if you want the Hog CI to create the doxygen documentation of your project |
HOG_CHECK_PROJVER |
Should be set to 1, if you want that the Hog CI runs only the projects that have been modified with respect to the target branch |
HOG_CHECK_SYNTAX |
Should be set to 1, if you want the Hog CI to run check syntax |
HOG_CHECK_YAMLREF |
If this variable is set to 1, Hog CI will check that “ref” in |
HOG_IP_EOS_PATH |
The EOS path where to store the IP generated results. If not set, the CI will synthesise the IPs each time |
HOG_ONLY_SYNTH |
If this variable is set to 1, Hog-CI will run only the synthesis for all projects in the CI |
HOG_MR_MSG |
This variable can be set to 0, 1 (default), 2. It specifies the amount of messages that Hog will write into the merge request page. If set to 0 Hog will not write any massage, if set to 1 Hog will write just one message after all the project have been successful, if set to 2 Hog will write one message per successful project. |
HOG_NO_BITSTREAM |
If this variable is set to 1, Hog-CI runs the implementation but does NOT run the write_bitstream stage |
HOG_RESET_FILES |
All the files (or wildcards) contained in this variable (separated by spaces or new lines) be reset at the pre-synthesis time by Hog-CI |
HOG_NO_RESET_BD |
If this variable is set to 1, BD files will NOT be reset at the pre-synthesis time by Hog-CI |
HOG_CREATE_OFFICIAL_RELEASE |
If this variable is set to 1, Hog-CI creates an official release note using the version and timing summaries taken from the artifact of the projects. |
HOG_SIMULATION_LIB_PATH |
The PATH in your VM, where the Simulation Lib files are stored (Vivado only) |
HOG_TARGET_BRANCH |
Project target branch. Merge request should start from this branch. Default: master |
HOG_INTERMEDIATE_BRANCH |
Intermediate build branch. Merge request targeting this branch activates an intermediate pipeline. More info here. |
HOG_NJOBS |
Number of CPU jobs for the synthesis and implementation. Default: 4 |
HOG_EXTERNAL_PATH |
If specified, entries in the |
Archive binary files on EOS space (Optional)#
The Gitlab CI will produce some artefacts. These include the resulting binary files of your firmware projects and, optionally, the Doxygen documentation html files. Hog has also the ability to copy these files into a desired EOS repository. To enable this feature, we have to specify the following environmental variables: EOS_MGM_URL, HOG_OFFICIAL_BIN_EOS_PATH.
If you wish to have your files to be accessible in a web browser, you should create a web page in EOS, following these instructions. For a personal project, by default, the website will be stored in /eos/user/<initial>/<userID>/www. The Hog EOS paths must be then sub-folders of the website root path. To expose the files in the website, follow these instructions.
Using EOS space for IP synthesis (Optional)#
In order to save resources and possibly speed up the workflow, the products of the IP synthesis arr copied to a directory on EOS, specified via HOG_IP_EOS_PATH. Hog-CI will retrieve the already synthesised IPs rather than waste time and resources to produce them again.
The IPs are archived in the IP path on EOS using the md5 hash of the .xci file, so if an IP is modified, it will be copied again on EOS.
It is recommended to clean the IP EOS space regularly as Hog will not delete old IP products.