
Simulation#
Warning
Outdated Documentation! This documentation version is out of date. Please check the latest version 2026.1.
Hog supports Vivado Simulator (also called Xsim), Mentor Graphics Questasim and Mentor Graphics Modelsim.
The simulation setup is always handled by Vivado, as if the simulation button on the GUI was clicked, then the simulation run is done with the simulation software.
Note
Currently the simulation is not supported under Quartus. A complete support will be included in the next releases.
Simulation sets#
Simulations are organised in so-called “simulation sets” as in Vivado.
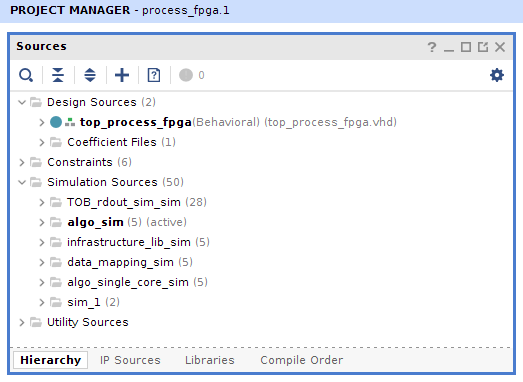
In this figure, you can see an example of simulation sets, these are contained in Vivado in the Simulation_Sources folder in the hierarchy view.
You can right click on each of them, set it as active (becomes bold) and run it by clicking the “Run simulation button”. In the figure above algo_sim is the active simulation.
Every simulation set has a top entity, the test bench containing the device under test, and can be simulated independently.
In Hog every simulation set correspond to a .sim list file.
In the .sim list-files, in addition to the properties defined for the .src list files, some other properties are specified.
These properties are:
topsim=<entity_name>: (mandatory) the name of the entity that will be the top level of the simulation;runtime=<time>: (optional) it indicates the running time for your simulation;wavefile: (optional) it indicates the name of the entity you want to set as top level in your simulation (Questasim/Modelsim only);dofile: (optional) it indicates the file containing the signal waveforms to be observed in your simulation (Questasim/Modelsim only).
Project simulator#
The software used to simulate is set at project level in Vivado. To change it you have to change the SIMULATOR parameter in your project Tcl file.
Note
Vivado does not allow to run different simulations with different simulators automatically. If you want to do that locally, you have to go every time to the simulation settings to switch from one simulator to another. The setting will be valid at project level, so for all the simulations sets. If you change the simulator by clicking in Vivado GUI, the change will not be propagated to the repository.
Simulation in the CI#
If the simulation job is configured in your projects CI, the Hog CI will automatically run the simulation sets.
The CI stage will fail if one simulation fails. This means that, in order for the CI stage to be meaningful, each simulation set should be designed to fail if some unwanted behaviour is present.
Even if Vivado does not allow for different simulators in the same project, in Hog CI it is possible to specify a different software to be used in each set. This can be done by adding at the top of the .sim list one of the following lines:
    #Simulator xsim     # For Vivado Simulator
    #Simulator questa   # For QuestaSim Simulator
    #Simulator modelsim # For ModelSim Simulator

    #Simulator skip_simulation #To skip the simulation in the CI
If you do not specify the simulator software, Hog will set ModelSim as default.
If for any reason, you do not want a specific simulation set to be simulated by the CI, just use skip_simulation.
An example .sim list file looks like this
    #Simulator Xsim
    tb_source_dir/tb_for_lib1.vhd topsim=tb_lib1 runtime=10us
    wave_source_dir/wave_lib1.tcl wavefile
    do_source_dir/dofile_lib1.do dofile
    tb_source_dir/another_file.vhd
Simulating without GUI#
If you want to run the simulation locally, but without using the GUI (i.e. in the same way that CI does), you can use the Hog/LaunchSimulation.sh wrapper script.
Hog/LaunchSimulation.sh <proj_name> [library path]
This script will launch all the simulation sets in the specified projects, using the software specified in the .sim file and skipping the simulation if skip_simulation is specified.
This script will assume that the Modelsim/Questasim libraries are compiled and located in <repository>/SimulationLib. If this is not the case, the simulation library path should be specified via the [library path] option.